Hover animations are a great way to make an application feel dynamic and responsive. It's a small thing, but it's exactly the kind of little detail that, in aggregate, can make a product feel great.
Sometimes, though, a simple state change on mouse-enter doesn't quite work. Hover over these icons to see what I mean:
Maybe it's the asymmetry, but these hover states just don't feel good to me 😬
Instead, what if the icons only popped over to their hover state for a brief moment?
I love this effect. It's playful and dynamic and surprising. It's not commonly done, since it's significantly more complex than using transition.
It can be used in all kinds of nifty ways. Some examples:
After an informal Twitter poll(opens in new tab), it was decided that this effect would be called a "boop".
In this tutorial—which is intended for intermediate React users—we'll learn how to build it ✨
Link to this headingA first stab
The neat thing about component-driven frameworks like React is that we can package up behaviours in much the same way that we package UI elements. In addition to <Button>s and <Table>s, we can create <FadeIn>s and <SoundEffect>s.
In our case, the effect—quickly applying and then removing a transformation—can be divorced from any specific UI elements, so we can apply it to anything!
Here's a first shot at a React component:
const Boop = ({ rotation = 0, timing = 150, children }) => {
  const [isBooped, setIsBooped] = React.useState(false);

  const style = {
    display: 'inline-block',
    backfaceVisibility: 'hidden',
    transform: isBooped
      ? `rotate(${rotation}deg)`
      : `rotate(0deg)`,
    transition: `transform ${timing}ms`,
  };

  React.useEffect(() => {
    if (!isBooped) {
      return;
    }

    const timeoutId = window.setTimeout(() => {
      setIsBooped(false);
    }, timing);

    return () => {
      window.clearTimeout(timeoutId);
    };
  }, [isBooped, timing]);

  const trigger = () => {
    setIsBooped(true);
  };

  return (
    <span onMouseEnter={trigger} style={style}>
      {children}
    </span>
  );
};
This is a lot of code, so let's walk through it!
The fundamental idea is that when mousing over this element, it flips to an alternative state, just like a typical hover transition. In addition, though, it also starts a timer. When that timer elapses, the state flips back to the "natural" state, regardless of whether we've still hovering or not.
It's a bit like one of those "useless machines" that turns itself off after a short interval:
We keep track of the "boop" state with a state hook, isBooped.
const [isBooped, setIsBooped] = React.useState(false);We wrap the thing we want to boop — children — in a span. This is so we can apply the rotation style, as well as handle mouse events to trigger the effect in the first place.
const trigger = () => {
  setIsBooped(true);
};

return (
  <span onMouseEnter={trigger} style={style}>
We use an effect hook which is set to fire whenever isBooped changes. Our hover event causes this value to flip, which causes the effect hook to trigger. The effect hook schedules a timeout to flip isBooped back to false.
React.useEffect(() => {
  // We only want to act when we're going from
  // not-booped to booped.
  if (!isBooped) {
    return;
  }

  const timeoutId = window.setTimeout(() => {
    setIsBooped(false);
  }, timing);

  // Just in case our component happens to
  // unmount while we're booped, cancel
  // the timeout to avoid a memory leak.
  return () => {
    window.clearTimeout(timeoutId);
  };

  // Trigger this effect whenever `isBooped`
  // changes. We also listen for `timing` changes,
  // in case the length of the boop delay is
  // variable.
}, [isBooped, timing]);
What about the effect itself? For now, we're limiting it to rotation. When isBooped is true, we apply a transform: rotate to the wrapping element.
We control both the rotation amount, in degrees, and the transition length through props, since different situations might call for different effects. We also need to set display to inline-block, because inline elements aren't transformable, and we add backface-visibility: hidden to take advantage of hardware accelerationTechnically, this property affects how our element looks when it's rotated to face away from the user. We don't care about that, but this property has a side-effect—it lets our GPU take care of the rendering, which makes the animation look smoother..
const style = {
  display: 'inline-block',
  backfaceVisibility: 'hidden',
  transform: isBooped
    ? `rotate(${rotation}deg)`
    : `rotate(0deg)`,
  transition: `transform ${timing}ms`,
};
Here's how we'd use our new Boop component:
<Boop rotation={20} timing={200}>
  <button>
    <Icon icon="gear" />
  </button>
</Boop>
And here's what it looks like:
This looks alright, but I know we can do better.
Link to this headingSprings to the rescue!
The motion in this initial version feels robotic and artificial to me. It doesn't have the fluid, organic movement that I crave from modern web animations.
In A Friendly Introduction to Spring Physics, I shared how I add depth and realism to my animations. If you haven't already, I'd suggest checking it out! It features these fun little springy demos:
(✨ Drag and release the weights to see the animation ✨)
My favourite spring-physics animation library is React Spring(opens in new tab). It offers a modern hook-based API, and unbeatable performance. Let's update our snippet to use it instead of CSS transitions:
import { animated, useSpring } from 'react-spring';

const Boop = ({ rotation = 0, timing = 150, children }) => {
  const [isBooped, setIsBooped] = React.useState(false);

  const style = useSpring({
    display: 'inline-block',
    backfaceVisibility: 'hidden',
    transform: isBooped
      ? `rotate(${rotation}deg)`
      : `rotate(0deg)`,
  });

  React.useEffect(() => {
    // Unchanged
  }, [isBooped, timing]);

  const trigger = () => {
    // Unchanged
  };

  return (
    <animated.span onMouseEnter={trigger} style={style}>
      {children}
    </animated.span>
  );
};
Before, we were creating a style object and passing it directly onto our span. Now, we're passing that style object (without transition) into useSpring.
The useSpring hook can be thought of as one of those industrial machines that squirts the strawberry filling into pop-tarts:
In other words, it takes some plain CSS and injects ✨ spring magic ✨ into it. Instead of using the Bézier curves that CSS provides, it'll use spring math instead. That's why we omit the transition property; we're delegating that task to React Spring.
Because spring physics aren't a native part of the web (yet!), we can't pass this magic-injected style object onto a <span>. Instead, we render an <animated.span>, which is identical to the <span> we had before, except it knows how to handle the springy style object we've produced.
Here's the result:
This feels a bit sluggish, so let's tweak the configuration:
const style = useSpring({
  display: 'inline-block',
  backfaceVisibility: 'hidden',
  transform: isBooped
    ? `rotate(${rotation}deg)`
    : `rotate(0deg)`,
  config: {
    tension: 300,
    friction: 10,
  },
});
By cranking up the tension and lowering the friction, our icons react much more swiftly to being hovered over:
Now we're getting somewhere!
So far, we've limited our boop to affect rotation, but we can do a lot more than that! Let's update it to support size changes (via scale) and position shifts (via translate):
The transform CSS property accepts multiple space-separated values, so our code becomes:
const Boop = ({
  x = 0,
  y = 0,
  rotation = 0,
  scale = 1,
  timing = 150,
  children,
}) => {
  const [isBooped, setIsBooped] = React.useState(false);

  const style = useSpring({
    display: 'inline-block',
    backfaceVisibility: 'hidden',
    transform: isBooped
      ? `translate(${x}px, ${y}px)
         rotate(${rotation}deg)
         scale(${scale})`
      : `translate(0px, 0px)
         rotate(0deg)
         scale(1)`,
    config: {
      tension: 300,
      friction: 10,
    },
  });

  // The rest is unchanged…
};
We default all values to their natural state (eg. 0px translate, 1x scale). This allows us to only specify the values we want to change: if we don't pass a value for rotation, it won't rotate.
I feel pretty happy with this result, but there's a problem with this solution… And it's a significant one. In fact, we need to rethink our whole approach!
Link to this headingDisconnected boops
On the project I'm working on, I have widgets that can be expanded to show the full content. I thought it'd be fun to cause the caret to skip down a bit on hover:
This presents an interesting challenge, because there's a disconnect—I want the boop to affect only the caret, but it should be triggered whenever I mouse-over any part of it. If I wave my cursor over the word "Show", the caret should boop.
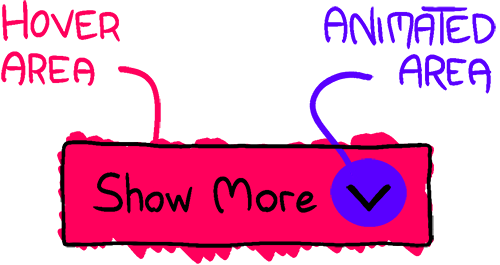
Our current approach doesn't allow for this at all. The animation is bound to the same element as the event-handler.
After some experimentation, I realized that a hook, not a component, was the right API for this effect.
Link to this headingStarting from the consumer
Let's start from the perspective of someone using the API. I'll figure out how to implement it later; first, I want to figure out the simplest, easiest interface.
Here's what I came up with:
import { animated } from 'react-spring';

function SomeComponent() {
  const [style, trigger] = useBoop({ y: 10 });

  return (
    <button onMouseEnter={trigger}>
      Show more
      <animated.span style={style}>
        <Icon icon="caret-down" />
      </animated.span>
    </button>
  );
}
We should be able to pass our hook an object representing the config, and it should give us two things:
The style object, to be applied to an
animatedelement, likeanimated.spanoranimated.buttonA trigger function, to call whenever we want the boop to occur.
If we want, we can apply both of these things to the same element, but we don't have to! In fact, this hook gives us a ton of flexibility: we can trigger it whenever we want, not just on hover. For example, we can include mobile users by setting the effect on tap, or schedule it in an interval to add prominence to an important part of the UI!With great power comes great responsibility. Please don't use this to create annoying experiences!
Here's how it's implemented:
// hooks/use-boop.js
import React from 'react';
import { useSpring } from 'react-spring';

function useBoop({
  x = 0,
  y = 0,
  rotation = 0,
  scale = 1,
  timing = 150,
  springConfig = {
    tension: 300,
    friction: 10,
  },
}) {
  const [isBooped, setIsBooped] = React.useState(false);

  const style = useSpring({
    display: 'inline-block',
    backfaceVisibility: 'hidden',
    transform: isBooped
      ? `translate(${x}px, ${y}px)
         rotate(${rotation}deg)
         scale(${scale})`
      : `translate(0px, 0px)
         rotate(0deg)
         scale(1)`,

    config: springConfig,
  });

  React.useEffect(() => {
    // All the same stuff...
  }, [isBooped, timing]);

  const trigger = React.useCallback(() => {
    setIsBooped(true);
  }, []);

  return [style, trigger];
}
Much of this logic is copied over; we're doing the same work to produce that style object. Instead of applying it onto an element, though, we pass it off to the caller.
Two other small tweaks:
The spring configuration is now provided as a parameter, since different situations might call for different physics.
The trigger function is wrapped in
React.useCallback. This is done so that the function reference doesn't change between renders, to avoid breakinguseMemocomponents. Because we don't know how the trigger function will be used, this seems like a prudent bit of forethoughtSome folks would categorize this as a premature optimization, but I've lost count of how many times I've had to perform this optimization to fix a measured, noticeable problem. Especially when the hook is made to be generalized and reusable, this feels like a no-brainer to me..
Link to this headingBack to the component
This hook is neat, but I actually really liked the component API we came up with earlier. In cases where there isn't a disconnect between event-handler and animation, can we use a component instead?
The really cool thing about this pattern is we can easily wrap the hook in a component, to have our cake and eat it too:
// components/Boop.jsx
import React from 'react';
import { animated } from 'react-spring';

import useBoop from '@/hooks/use-boop';

const Boop = ({ children, ...boopConfig }) => {
  const [style, trigger] = useBoop(boopConfig);

  return (
    <animated.span onMouseEnter={trigger} style={style}>
      {children}
    </animated.span>
  );
};
Our Boop component gets a whole lot smaller, since we're delegating all the hard stuff to our useBoop hook. Now we have access to two glorious APIs, both powered by the same logic. DRY AF.
Link to this headingKeeping it accessible
The component/hook combo we've created is delightful, but delight is subjective. Not everybody wants our UI to dance and jiggle about, especially folks who have a vestibular disorder.
I've written about how to build accessible animations in React. Let's apply some of those lessons here:
// hooks/use-boop.js
import React from 'react';
import { useSpring } from 'react-spring';

function useBoop({
  rotation = 0,
  timing = 150,
  springConfig = {
    tension: 300,
    friction: 10,
  },
}) {
  const prefersReducedMotion = usePrefersReducedMotion();

  const [isBooped, setIsBooped] = React.useState(false);

  const style = useSpring({
    // All the same stuff
  });

  React.useEffect(() => {
    // All the same stuff here as well...
  }, [isBooped, timing]);

  const trigger = React.useCallback(() => {
    // Yep yep
  }, []);

  let applicableStyle = prefersReducedMotion ? {} : style;

  return [applicableStyle, trigger];
}
The prefers-reduced-motion hook will let us know if the user has expressed a preference to remove motion. If that value is true, we'll return a "dummy" style object. This ensures that the element will never move, since the style object is always empty.
Link to this headingYours to discover
First: thank you so much for reading this far!! This has been quite a journey, and I appreciate you for taking it with me 😄
You might be wondering, though: why on earth did we need to cover this in such depth? Why didn't I just publish an NPM module and write a post explaining how to use it, like I did with useSound? Surely that would be more convenient, both for the reader and the author.
Here's the thing: this effect is effective because it's rare. I'm not interested in commoditizing it, because it would lose its charm!
Instead, I'd much rather teach folks how to create effects like this, and let them run with it. This code will live in your Git repo, not buried in a node_modules folder. Tinker with it, and see what else it can do! Create things I never could have anticipated, and show me on Twitter(opens in new tab) 😄
This code is mutable, and I hope you'll do some experimentation ✨ if you're really feeling adventurous, you could try and incorporate more physics: maybe the element should translate in the same direction as the cursor is moving, as if it was blowing in the breeze?
Here's the final version, ready to copy-and-paste into your repo:
import React from 'react';
import { useSpring } from 'react-spring';

// UPDATE this path to your copy of the hook!
// Source here: https://joshwcomeau.com/snippets/react-hooks/use-prefers-reduced-motion
import usePrefersReducedMotion from '@/hooks/use-prefers-reduced-motion.hook';

function useBoop({
  x = 0,
  y = 0,
  rotation = 0,
  scale = 1,
  timing = 150,
  springConfig = {
    tension: 300,
    friction: 10,
  },
}) {
  const prefersReducedMotion = usePrefersReducedMotion();

  const [isBooped, setIsBooped] = React.useState(false);

  const style = useSpring({
    transform: isBooped
      ? `translate(${x}px, ${y}px)
         rotate(${rotation}deg)
         scale(${scale})`
      : `translate(0px, 0px)
         rotate(0deg)
         scale(1)`,
    config: springConfig,
  });

  React.useEffect(() => {
    if (!isBooped) {
      return;
    }

    const timeoutId = window.setTimeout(() => {
      setIsBooped(false);
    }, timing);

    return () => {
      window.clearTimeout(timeoutId);
    };
  }, [isBooped, timing]);

  const trigger = React.useCallback(() => {
    setIsBooped(true);
  }, []);

  let appliedStyle = prefersReducedMotion ? {} : style;

  return [appliedStyle, trigger];
}

export default useBoop;
Link to this headingBonus: That star animation
In the initial demos of this tutorial, I showcased a hoverable star animation:
This effect does indeed use the useBoop hook we've created, but it also involves some trigonometry, which is beyond the scope of this tutorial. I'm in the process of writing a post about how to use trigonometry to create effects like this one—if you'd like to receive early access to that tutorial, and others like it, you can sign up for my newsletter:
You’ll receive my newsletter whenever I publish new content. It also includes little extras that don't quite fit on this blog. You can, of course, unsubscribe at any time, no hurt feelings. 💜
In the meantime, though, I'll share the snippet, with as much context as I can in the comments! Hope it helps. 🌟
import React from 'react';
import styled from 'styled-components';
import { animated, useSpring } from 'react-spring';
import { Star } from 'react-feather';

import useBoop from '@/hooks/use-boop';

import Spacer from '@/components/Spacer';

const useAngledBoop = (index) => {
  // Our star has 5 points across a 360-degree area.
  // Our first point should shoot out at 0 degrees,
  // our second at 72 degrees (1/5th of 360),
  // our third at 144 degrees, and so on.
  let angle = index * (360 / 5);
  // By default in JS, 0-degrees is the 3-o'clock
  // position, but I want my animation to start at
  // the 12-o'clock position, so I'll subtract
  // 90 degrees
  angle -= 90;

  // Trigonometry methods in JS use radians, not
  // degrees, so we need to convert.
  const angleInRads = (angle * Math.PI) / 180;

  // If this was meant to be reusable, this would
  // be configurable, but it's not, so it's
  // hardcoded. The # of pixels from the center
  // that our circle will bounce.
  const distance = 42;

  // Convert polar coordinages (angle, distance)
  // to cartesian ones (x, y), since JS uses
  // a cartesian coordinate system:
  const x = distance * Math.cos(angleInRads);
  const y = distance * Math.sin(angleInRads);

  // `normalize` is commonly called "lerp",
  // as well as Linear Interpolation. It
  // maps a value from one scale to another.
  // In this case, I want the time to vary
  // between 450ms and 600ms, with the first
  // point being the slowest, and the last
  // one being the fastest.
  //
  // It's defined below
  let timing = normalize(index, 0, 4, 450, 600);

  // `normalize` produces linear interpolation,
  // but I want there to be a *bit* of an ease;
  // I want it to appear to be slowing down,
  // as we get further into the circles.
  timing *= 1 + index * 0.22;

  const friction = normalize(index, 0, 4, 15, 40);

  const boop = useBoop({
    x,
    y,
    timing,
    scale: 1.4,
    springConfig: { tension: 180, friction },
  });

  return boop;
};

const CircleDemo = () => {
  const [c1s, c1t] = useAngledBoop(0);
  const [c2s, c2t] = useAngledBoop(1);
  const [c3s, c3t] = useAngledBoop(2);
  const [c4s, c4t] = useAngledBoop(3);
  const [c5s, c5t] = useAngledBoop(4);
  const [starStyles, starTrigger] = useBoop({
    scale: 1.1,
    rotation: 10,
    timing: 150,
    springConfig: {
      tension: 300,
      friction: 6,
    },
  });

  return (
    <Wrapper>
      <Button
        onMouseEnter={() => {
          // If I had more than 5 points, I might
          // write a `callAll()` helper function.
          // But I don't, so this is fine.
          c1t();
          c2t();
          c3t();
          c4t();
          c5t();
          starTrigger();
        }}
      >
        <IconWrapper style={starStyles}>
          <Star size={48} />
        </IconWrapper>
      </Button>
      <Circle style={c1s} />
      <Circle style={c2s} />
      <Circle style={c3s} />
      <Circle style={c4s} />
      <Circle style={c5s} />
    </Wrapper>
  );
};

// This helper function is used in the component
const normalize = (
  number,
  currentScaleMin,
  currentScaleMax,
  newScaleMin = 0,
  newScaleMax = 1
) => {
  // FIrst, normalize the value between 0 and 1.
  const standardNormalization =
    (number - currentScaleMin) / (currentScaleMax - currentScaleMin);

  // Next, transpose that value to our desired scale.
  return (
    (newScaleMax - newScaleMin) * standardNormalization + newScaleMin
  );
};

// My project uses styled-components.
// Nothing here is styled-components-specific,
// however. It's just the tool I was already
// using.
const Wrapper = styled.div`
  position: relative;
  width: min-content;
`;

const Button = styled.button`
  position: relative;
  z-index: 3;
  padding: 8px;
  border-radius: 50%;
`;

const IconWrapper = styled(animated.span)`
  display: block;

  svg {
    display: block;
    stroke: var(--color-text) !important;
    fill: var(--color-background) !important;
  }
`;

const Circle = styled(animated.div)`
  position: absolute;
  z-index: 1;
  top: 0;
  left: 0;
  right: 0;
  bottom: 0;
  width: 8px;
  height: 8px;
  margin: auto;
  border-radius: 50%;
  background: hsl(50deg, 100%, 48%);
`;

export default CircleDemo;
Link to this headingTroubleshooting
If you don't see any motion, and no errors are reported, it's possible that you forgot to use animated! I still make this mistake frequently.
// Broken example:
function Thing() {
  const [style, trigger] = useBoop({ x: 2 });

  return (
    <button style={style} onMouseEnter={trigger}>
      Hello World
    </button>
  );
}

// Fixed!
import { animated } from 'react-spring';

function Thing() {
  const [style, trigger] = useBoop({ x: 2 });

  return (
    <animated.button style={style} onMouseEnter={trigger}>
      Hello World
    </animated.button>
  );
}
Last updated on
September 13th, 2024