I love interactive things, but I’m not a fan of expensive devices, especially those we have to buy year after year to have the latest hardware in our hands!
I’m a fan of accessible technology!
With that in mind, today I’m going to show you how to control elements in a 3D scene using just your hands, a webcam, and a web browser. The key focus here is converting a 2D screen into a 3D space, with full depth control. I’ll keep the focus on that!
By the way, here you can try a nice implementation of this controller in an Endless Spaceship Game.
Setup
First, we need to create our @mediapipe/hands instance to detect the hand landmarks.
export class MediaPipeHands {
  constructor(videoElement, onResultsCallback) {
    const hands = new Hands({
      locateFile: (file) => {
        return `https://cdn.jsdelivr.net/npm/@mediapipe/hands/${file}`;
      },
    });
    hands.setOptions({
      maxNumHands: 1,
      modelComplexity: 1,
      minDetectionConfidence: 0.5,
      minTrackingConfidence: 0.5,
    });
    hands.onResults(onResultsCallback);
    this.camera = new Camera(videoElement, {
      async onFrame() {
        await hands.send({ image: videoElement });
      },
      width: 1280,
      height: 720,
    });
  }
  start() {
    if (this.camera) this.camera.start();
  }
}
I have created a class called MediaPipeHands that contains this implementation, so we can easily add it to the code and reuse it anywhere.
Like this:
this.mediaPiepeHands = new MediaPipeHands(videoElement, (landmarks) =>
  this.onMediaPipeHandsResults(landmarks)
);
this.mediaPiepeHands.start();
The onMediaPipeHandsResults is a callback from the library that returns the mentioned landmarks, it comes from hands.onResults.
Now, let’s create our WebGL scene with Three.js, only to have some elements we can interact with.
Nothing special, a simple Three.js scene 😉
Here’s another class for rapid prototyping, a plug-and-play static class that can be accessed anywhere in your code. Keep in mind that it doesn’t follow any standard, it’s just to make my life easier.
import {
  Scene,
  PerspectiveCamera,
  Color,
  WebGLRenderer,
  AmbientLight,
  DirectionalLight,
  SpotLight,
  Clock,
} from "three";
export class ScenesManager {
  static scene;
  static camera;
  static renderer;
  static clock;
  static setup() {
    ScenesManager.scene = new Scene();
    ScenesManager.scene.background = new Color(0xcccccc);
    ScenesManager.camera = new PerspectiveCamera(
      45,
      window.innerWidth / window.innerHeight,
      0.01,
      100
    );
    ScenesManager.camera.position.set(0, 0, 2);
    ScenesManager.clock = new Clock();
    ScenesManager.renderer = new WebGLRenderer({ antialias: true });
    ScenesManager.renderer.setSize(window.innerWidth, window.innerHeight);
    ScenesManager.renderer.setPixelRatio(window.devicePixelRatio);
    ScenesManager.renderer.shadowMap.enabled = true;
    const ambLight = new AmbientLight(0xffffff, 1);
    ScenesManager.scene.add(ambLight);
    ScenesManager.renderer.setSize(window.innerWidth, window.innerHeight);
    document.body.appendChild(ScenesManager.renderer.domElement);
  }
  static render() {
     ScenesManager.renderer.render(ScenesManager.scene, ScenesManager.camera);
  }
}
Only import it and initialize it to have a Scene:
import { ScenesManager } from "./ScenesManager.js";
.
.
.
ScenesManager.setup();
Creating the controls
Let’s start using our landmarks, it is cartesian coordinates that come from @mediapipe/hands I have mentioned.
Here is the reference so you know what I’m talking about and understand the values we will use.
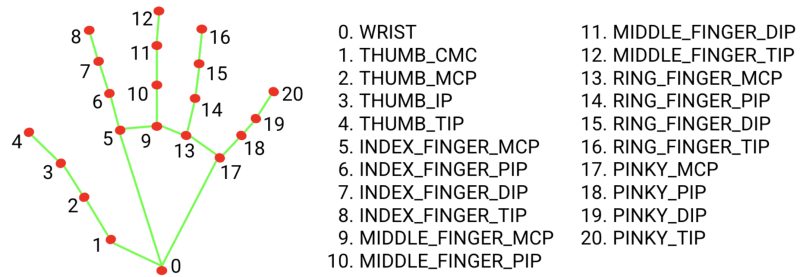
To move our elements on the x/y-axis I’ll select only one point, 9. MIDDLE_FINGER_MCP, my choice is based only on the position of this coordinate, it is at the center of everything and makes sense.
At least for me 😅
We are using only one hand in this exploration, so the first 21 indexes of the landmark matter.
If you want to use two hands, use the same array and read values starting from index 21.
if (landmarks.multiHandLandmarks.length === 1) {
    for (let l = 0; l < 21; l++) {
       this.handsObj.children[l].position.x = -landmarks.multiHandLandmarks[0][l].x + 0.5;
       this.handsObj.children[l].position.y = -landmarks.multiHandLandmarks[0][l].y + 0.5;
       this.handsObj.children[l].position.z = -landmarks.multiHandLandmarks[0][l].z;
    }
}
This is the result:
As you can notice, landmark points have the same scale even in a 3D space, it is because @mediapipe/hands have no proper z-axis, it is 2D, so here the magic starts to happen! ⭐️
Yes, you are right, it is not magic, but I like this term! 😅
Z-Depth: 2D to 3D conversion
My idea is to get 2 landmark points, calculate the distance between them in 2D space, then apply it as depth.
As you can notice in the video above, the cursor (big sphere), already moves in the correct direction opposite the landmarks.
To make it happen I selected point 0. WRIST and 10. MIDDLE_FINGER_PIP from landmarks.
this.refObjFrom.position.copy(this.gestureCompute.depthFrom);
const depthA = this.to2D(this.refObjFrom);
this.depthPointA.set(depthA.x, depthA.y);
this.refObjTo.position.copy(this.gestureCompute.depthTo);
const depthB = this.to2D(this.refObjTo);
this.depthPointB.set(depthB.x, depthB.y);
const depthDistance = this.depthPointA.distanceTo(this.depthPointB);
this.depthZ = THREE.MathUtils.clamp(
   THREE.MathUtils.mapLinear(depthDistance, 0, 1000, -3, 5),
   -2,
   4
);
I limit this value between -2 and 4 to make it friendly but it is not necessary, it is all about your feelings as a user.
So to move in the correct direction, we need to invert this distance to a negative value, so when the hand is near the camera the cursor is far from the camera.
Like this:
this.target.position.set(
  this.gestureCompute.from.x,
  this.gestureCompute.from.y,
  -this.depthZ
);
Gestures
The same logic I have used to compute closed_fist gesture.
As it is a unique gesture we need to grab an object, we don’t need to import another dependency like GestureRecognizer. It will save load time and memory usage.
So I got 9. MIDDLE_FINGER_MCP and 12. MIDDLE_FINGER_TIP and applied the same approach, based on the distance my hand is closed or not!
this.gestureCompute.from.set(
   -landmarks.multiHandLandmarks[0][9].x + 0.5,
   -landmarks.multiHandLandmarks[0][9].y + 0.5,
   -landmarks.multiHandLandmarks[0][9].z
).multiplyScalar(4);
this.gestureCompute.to.set(
   -landmarks.multiHandLandmarks[0][12].x + 0.5,
   -landmarks.multiHandLandmarks[0][12].y + 0.5,
   -landmarks.multiHandLandmarks[0][12].z
).multiplyScalar(4);
const pointsDist = this.gestureCompute.from.distanceTo(
   this.gestureCompute.to
);
this.closedFist = pointsDist < 0.35;
Collision Test
Now we need to make it funnier (for me, all this is fun lol), so let’s calculate the collision between our cursor and objects and start grabbing them.
I wrote a simple AABB test because it was more accurate and performant during my testing rather than using a raycaster.
But remember, every case is one case, so perhaps it will perform better with another algorithm for you or even with a Rasycater!
this.targetBox3.setFromObject(this.target); // Target is my cursor
this.objects.forEach((obj) => {
  this.objectBox3.setFromObject(obj);
  const targetCollision = this.targetBox3.intersectsBox(this.objectBox3);
  if (targetCollision) {
    // Do something...I did a drag and drop interaction.
  }
});
So that’s our result:
You can preview it and browse through the code here.
Final words
I hope you enjoy it as much as I did! It was a lot of fun and enriching for me.
We finally have good hand tracking in the browser. This hasn’t been possible for a while. I’m not talking about the technology itself, which has been around for a long time, but the performance wasn’t as good as nowadays!
With this, we have a universe of possibilities to explore and the chance to create interesting experiences for any audience. I believe in and defend technology for everyone.
Thank you very much for reading this and see you next time!