 Why You Can Trust CNET
Our expert, award-winning staff selects the products we cover and rigorously researches and tests our top picks. If you buy through our links, we may get a commission. How we test TVs
As good as your TV looks, there's a really good chance you can make it look even better. While every TV has myriad settings that can be confusing, a few taps of the remote on specific ones can improve the image without requiring any specialized knowledge or equipment. If you've never adjusted any your TV's settings, just know that how it looks out of the box is almost always the worst it will look. Don't worry if you've never done this before. You can't damage your TV, and you can easily go back to the factory settings.
Ideally you'll have a setup disc that has specific test patterns you can use, but honestly, you can get most of the way there by using whatever you watch regularly. Simply changing a TV's picture mode can result in the biggest improvements to the image. Once you've cycled through those and gotten a sense of how they affect the picture, you then can dive into specific settings to fine-tune, if you need to.
Adjusting a TV's settings is actually the first step we do here at CNET as part of our TV review process. We immediately dig into the menus to adjust the picture settings to make sure the televisions we're testing have optimal picture quality.
We've broken down all the settings you might need to tweak to get the best picture out of your TV. Just keep in mind that picture setting names can vary from one manufacturer to another. A setting that one TV company calls "brightness," for example, could control something totally different on another television. We tackle a lot of the variations below, but we can't account for every TV maker, especially when it comes to older models.
Start with the right picture mode
Your TV's picture mode has the largest effect on overall picture quality. This one setting controls a group of adjustments which change the overall "look" of your TV. If you've never changed this setting your TV is probably still in the default mode, typically labeled Standard, Vivid, Dynamic, Bright or something similar. The TV is usually at its least accurate in this mode, with typically blown-out colors and image "enhancing" features that might catch the eye on a shelf in a store, but at home can make the TV look worse than it could.

The easiest way to get accurate color? Put your TV in Movie or Cinema mode.
Sarah Tew/CNETA place to start is switching to the mode called Cinema, Movie, Calibrated or Filmmaker. These will dial back some of the picture's more garish aspects. At first, the TV might even look soft or too warm ("reddish"). We'll discuss below why that is, but for now trust that you're actually seeing more fine detail, and the image is more lifelike.
Read more: What's the Best Picture Mode?
You may find that the TV's picture is good enough now without any further adjustment, and that's great! However, if you want to fine tune the image you may need to move on to more specific controls. Some of the most important, at least from a TV reviewer's perspective, are brightness, color temperature and motion smoothing. Let's continue.
Brightness or black level

Enlarge Image

On the left, what the teahouse should look like. On the right, when the brightness control is set too low. Notice how the shadows disappear completely.
Geoffrey Morrison/CNET- Controls the black or dark parts of an image
- Too high will look flat and washed out
- Too low will erase detail in shadows and dark areas of the image
On most TVs, the brightness control doesn't actually control the TV's "brightness." Instead, it adjusts how dark the darkest parts of the image are. Like with contrast, there's a fine line between too high and too low. In this case, too high and the image will appear washed out. Too low and all shadows will disappear into black. With some TVs, like newer Sonys, this control is more correctly labeled Black Level.

A closeup from the image above. Notice how you can't see anything in the shadows in the image on the right.
Geoffrey Morrison/CNETTo set brightness, you're looking for the opposite type of content from contrast. Dark movies, like Aliens or The Dark Knight, are perfect for this. Some famously dark TV episodes might be too dark to use for this.
Turn the Brightness control down until everything disappears into blackness (or something close). From there, turn it back up so you can see detail in everything, but the image doesn't look washed out. Another test for this is a darker scene with someone with long hair. The underside of their hair (I don't know what people with hair call it) away from the light can be a good place to spot shadow detail. Another possibility is people wearing dark coats at night. You should be able to see the detail in the coat, not just a void with a head on top. Again, you might need to try a few different shows or movies to get it right.
Backlight or OLED light
- Controls the light intensity of the entire display
- Too high and it can cause headaches or eye strain, waste energy and, in some cases, cause premature wear on the TV
- Too low and the image is too dim and difficult to see
Nearly all TVs will have some control that adjusts the overall light output of the TV. It's usually labeled as the backlight control, or OLED light, or something similar. For example, on newer Sony TVs this setting is labeled Brightness, and on Roku TVs there are five settings (Brightest to Darkest) in addition to a backlight control. Whatever the label, this setting is the actual brightness, which is generally separate from the control labeled "Brightness" (see above).
You should adjust this setting based on room lighting and personal preference. Brighter rooms and daylight viewing will call for a higher setting, while home theater or nighttime viewing often looks better at a lower setting. On an LCD TV, a bright backlight can wash out the image somewhat and reduce contrast and pop, especially on models that lack full array local dimming.
The brighter the TV is, the more energy it will consume, if you're concerned about how much electricity you use. Higher brightness also makes OLED TVs somewhat more susceptible to image retention and burn-in -- although that's unlikely with typical viewing habits, even at maximum brightness.
Read more: OLED Screen Burn-In: What You Need to Know
Contrast

Enlarge Image

On the left, what the image of some friendly beachside 'roos should look like. On the right, when the contrast control is set too high. Notice the lack of detail in the sand and how the clouds are blown out.
Geoffrey Morrison/CNET- Controls the white or bright parts of an image
- Too high will erase detail from clouds, snow and other bright objects
- Too low will look dim and flat
The contrast control adjusts how bright the bright parts of the image are. There is an upper limit, however. If you set the control too high, it "clips" the whites, making near-white details totally white. This effectively erases any detail in bright objects like clouds without making the image actually brighter.
To set contrast by eye, you'll need something with a lot of bright areas of the image. Baseball works pretty well for this -- a fly ball, pop fly, home runs, something with shots of the sky or something with clouds. Other sports like skiing, ice skating, and hockey, with their large patches of bright, nearly white surfaces, can also do the trick. What you're looking for is a bright image, but still with highlight detail. In other words, the bright areas of the image still have detail, and aren't just awash in white.
Once you've found something you think will work, turn the contrast control up until you start losing detail. Clouds will cease being clouds, snow will just be glare. Now turn the control back down till you see detail again. Somewhere in this range will be ideal. Since all content is a little different you might need to tweak it a bit as you watch other shows/movies.
Don't want to mess with all that? Just leave it at the default for the Movie or Cinema setting.
Sharpness

Enlarge Image

On the left, the original image of the walls of Tallinn. On the right, what it could look like if you set the sharpness control too high.
Geoffrey Morrison/CNET- Controls artificial edge enhancement, not image sharpness
- Too high erases image detail, adds a halo to fine lines
- Depending on the TV, set to 0 there's no effect, or a slight softening
Believe it or not, the sharpness control doesn't really improve sharpness. In a way it improves apparent sharpness, but at the expense of actual fine detail and usually with additional noise. On nearly all TVs the sharpness control adds "edge enhancement," artificially accentuating any edges the TV finds in the image. The problem is, doing this hides the actual detail in the image, so the result looks more artificial with less actual detail.

A close-up of the example above. Note the extra noise and artificial "halo" around the spires on the right.
Geoffrey Morrison/CNETSo it may seem counterintuitive, but you should turn the sharpness control down. Way down. Some TVs look best with the control at 0. Others look best within the first 10% or so of this control's range. If you're used to how your TV looks with the sharpness control way up, as it typically is in the Dynamic or Vivid modes, it might appear soft at first when you turn it down. Find some high-quality 4K content and you might be surprised how detailed it now looks. You should be able to find the sweet spot on your TV looking closely for textures in clothing, wrinkles in faces, hair and beards, that kind of thing.
Read more: Why You Need to Turn Down Your TV's Sharpness Control
Color and tint
- Controls color saturation and red-green shift respectively
- It's a holdover from the analog TV days
- Generally will be correct, or close enough, out of the box
Generally, the color and tint controls will be reasonably close to correct out of the box, especially in Cinema or Movie mode. You can experiment with their effects, but it's rare they're off by more than one or two steps in either direction. To accurately set these you need a blue color filter. Setup discs will typically come with the correct blue filter and the test patterns you'll need to use to fine tune these settings.
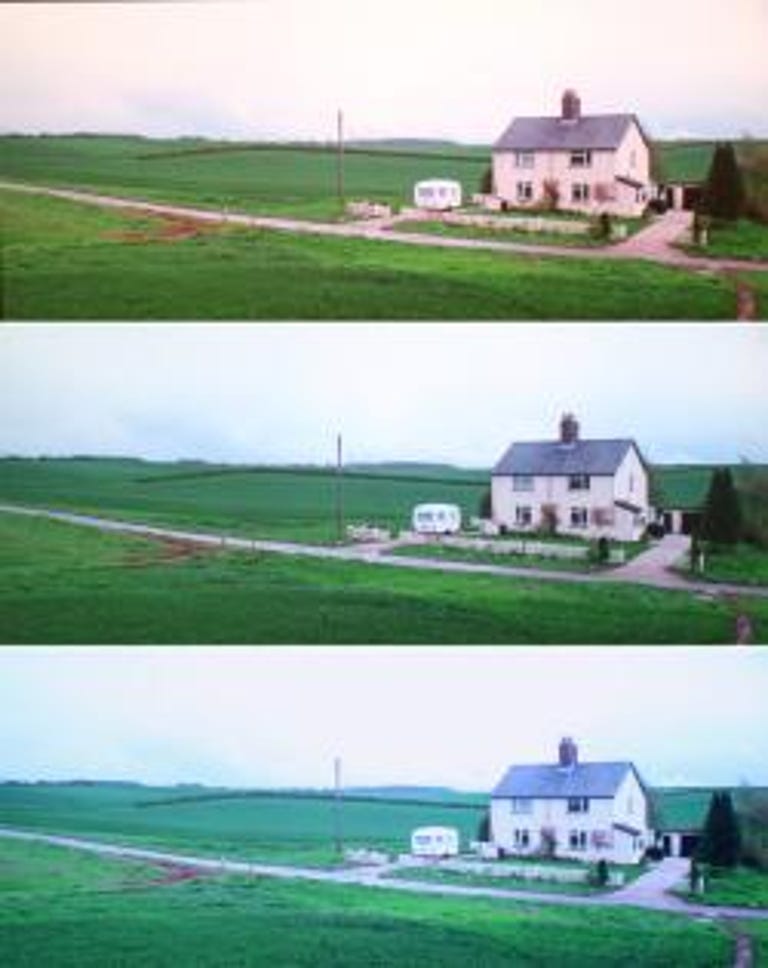
At the top, the color temperature is set too low, or warm. At the bottom, it's set too high, or cool.
Geoffrey Morrison/CNETColor temperature or white balance
- Controls how "warm" or "cool" the image looks
- Too high and the image will be too blue ("cool")
- Too low and the image will be too red ("warm")
Color temperature is a difficult one. Your brain gets used to the color temp of your TV, so if you change it, it's going to seem "wrong." In fact, this is probably the first thing you'll notice if you switch to the Cinema or Movie mode. It's going to look too warm or "reddish." On most TVs, this is actually the most accurate and lifelike. Your TV has been lying to you for years!
Switch to your TV's warm color temperature mode and watch it for a few days. If it still seems off to you, try the standard mode. I promise the cool mode will look far too blue once you get used to warm.
Check out my article on color temp and why it matters for more info.
Motion interpolation or smoothing (the soap opera effect)

- Controls how "smooth" motion is by artificially creating new frames of video
- Too high, or even enabled at all, it can be annoying to some
- Too low and the TV might appear soft with motion, such as sports
As TV settings go, motion interpolation is a rather controversial topic. Many people, including film purists and pretty much everyone who works in Hollywood, hate it. It makes movies look like a cheap soap opera or a video you'd shoot on your phone. If you've ever looked at a new TV and just felt something was off, or the image just didn't look real (or "too" real), it's probably this. Some people like it, but a lot of people don't. Your new TV almost certainly has this feature turned on in non-Cinema or Movie modes. Turning it off might change how you feel about your purchase. Switching to Cinema or Movie modes will often turn this feature off, or at worst switch it to its lowest setting.
"Off" is preferred by most filmmakers for movies and scripted TV shows. Sports and other live TV can look smoother and more detailed with motion interpolation on.
Read more: Tom Cruise Wants You to Turn Off Soap Opera Effect. Here's How
Game mode
- Reduces input lag, or how long it takes for your input to register onscreen
- Usually disables features that might make the image better
- Useful for any game that requires timing or aiming, especially online multiplayer
Input lag is how long it takes for you to press a button on a game controller and then to have an onscreen effect in the game. For many people this delay, measured in milliseconds, isn't noticeable. For others, especially with certain types of games, it can make a massive difference. From jumping puzzles to pixel-perfect aim in a first-person shooter, getting the timing right in many games is crucial.
Minimizing input lag, usually via a feature called game mode, can make a significant difference. If you've bought a new TV and suddenly your scores and rankings have dropped, this might be why. It's not something you want to leave enabled all the time, since it usually disables processing features that can improve the TV's picture quality.
Some TVs and consoles now support switching to this mode automatically.
Further steps
As mentioned above, the next step to fine-tuning your TV to perfection is getting a setup disc. The Spears & Munsil UHD disc is a great option because it gets you right to the patterns without any extraneous fluff (though you will need a 4K Blu-ray player). Alternatively, the Apple TV has a calibration routine built right into the set-top box. If you just want someone else to do it, ideally with specialized test equipment, see if there are any TV calibrators in your area.
Lastly, make sure any sources you have, like a streaming stick or a cable or satellite box, are set to your TV's resolution (4K for 4K TVs, etc). Generally speaking they should do this automatically, but it's worth digging into the settings to be sure. Your 4K TV won't look its best without 4K content. You might need to pay for a higher tier to get that, depending on the service.
Lastly, HDMI. Chances are whatever HDMI cables you have are fine. If you try to send 4K from a media streamer and it doesn't work, it's possible your HDMI cables can't handle the additional resolution. But new HDMI cables are cheap. If your TV is getting the resolution you want from your sources, new HDMI cables won't make the image look or sound better, so you can save your money.
For more, check out CNET's lists of the best 55-inch, 65-inch and 75-inch TVs you can buy. You can also take a look at the best 4K TVs available.
As well as covering audio and display tech, Geoff does photo tours of cool museums and locations around the world, including nuclear submarines, aircraft carriers, medieval castles, epic 10,000-mile road trips and more.
Also, check out Budget Travel for Dummies, his travel book, and his bestselling sci-fi novel about city-size submarines. You can follow him on Instagram and YouTube.