Micro-frontends let you split a large web application into smaller, manageable pieces. It’s an approach inspired by the microservice architecture that allows different parts of your applications to be developed and scaled independently by different team members using their preferred frameworks and build tools.

Vite is an excellent choice for micro-frontends due to its fast build times and straightforward setup. Recently, things have improved even further as you can now build SSR (server-side rendered) applications with Vike (formerly vite-plugin-ssr) while still benefiting from the micro-frontend architecture.
In this tutorial, we’ll explore how to use Vike and vite-plugin-federation. We’ll do a mini-introduction to Vike, cover some of its features that make building SSR enjoyable, and also discuss how to leverage it to build scalable micro-frontends.
What is Vike?
Vike (not to be confused with its parent build tool, Vite), is the new name for vite-plugin-ssr. Vike started as a plugin designed to add server-side rendering (SSR) capabilities to Vite, but it has since grown into a more comprehensive framework for building complete web applications.
Behind the scenes, Vike leverages Vite’s bundling and development server to set up a server that renders your application’s pages on the fly. When a user requests a page, Vike generates the HTML on the server at runtime which makes it ideal for applications with dynamic content that changes frequently.
In addition to being an SSR framework, Vike can also be used as a static-site generator (SSG), which, in contrast to SSR, will pre-generate the HTML and asset files for your website at build time so that when a user requests a page, the server simply serves these pre-built HTML files.
Key features
Beyond its SSR and SSG functionalities, some other major features of Vike include:
- Fast — Vike is fast by design, as it leverages techniques like code splitting link prefetching and fast cold starts
- Zero-config — Vike also requires little to no configuration and only gives you control where it matters; everything else just works out of the box
- Integration — Vike is a complete framework that can easily integrate with tools for data fetching, authentication, server management, CSS frameworks, and internationalization
- Supports multiple frameworks — Vike is flexible and works with frameworks like React, Vue, Svelte, or any other framework you prefer
Getting started with Vike
With Node.js and npm installed on your system, you can create a new Vike project by running the following command:
npm create vike@latest
# OR
yarn create vike
Running this command will prompt you to select your preferred JavaScript framework and create a new project based on the selected framework.
Vike also supports the Bun runtime, which means you can start a new project with the following command: \
bun create vike
Bati for advanced setup
The Vike team has developed a scaffolding tool, Bati, that allows you to customize your project setup by selecting your preferred CSS library (like Tailwind or DaisyUI), authentication method, database, data-fetching library, and more — all during installation.
For example, to create a new Vike app with React and Tailwind, you can run:
npm create bati -- --react --tailwindcss
This command will scaffold the files and directories needed for your selected installation options. Next, we’ll need to install all the required packages by running: \
npm install
Finally, start your app with:
npm run dev
Your app should now be running in the browser, and you should see an output similar to the image below:

Using Vike and vite-plugin-federation for micro-frontend
Vike cannot solely be used for building micro-frontends; it has to be integrated with a module federation plugin that allows you to share components and states across different applications. One popular option for this in the Vite ecosystem is vite-plugin-federation.
To use vite-plugin-federation, we’ll need to set up a minimum of two projects, one of which will act as the host and the other a remote project from which we want to access certain components or shared application states.
In our case, a Vike project will be the host, while an independent vite+react/vue/svelte project will act as remote. The following image also illustrates this better:
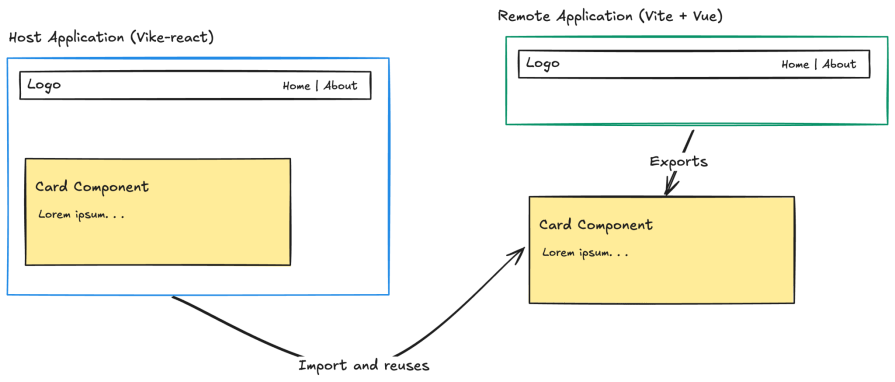
As shown in the image above, we’ll have an independent component (e.g., a card component), created in a bare Vite application, in this case, Vite + Vue. We’ll then import and reuse this component in another standalone Vike-react application using vite-plugin-federation.
Let’s write some code to see the implementation in action!
Setting up the remote Vite + Vue app
To get started, create a new folder for your micro-frontend project and move into it: \
mkdir micro-vike && cd micro-vike
Next, run the following command to create the remote Vite + vue app from which we’ll export a card component that other independent applications can reuse:
npm create vite@latest vue-card -- --template vue
To proceed, move into the new project directory and run the command below to install vite-plugin-federation as a dev dependency:
cd vue-card
npm install @originjs/vite-plugin-federation --save-dev
When you run a Vite application in dev mode, it checks and tries to run it in the default 5173 port; if this port is not available, it starts the application in another random port. However, for our implementation, we need to be aware of the port in which our remote application is running, as we’ll subscribe to it.
For this reason, we have to force our app to start in a custom port. To do this, open your project package.json and update the dev script to match the one below:
. . .
"scripts": {
  "dev": "vite --port 5001 --strictPort",
}
. . .
With this new update, our app is forced to run in port 5001.
Next, let’s design the card component that we want to export. Create a new Card.vue file in the default src/components directory and paste the following code into it:
<template>
  <div class="container">
    <h1 class="title">{{ title }}</h1>
    <p class="description">{{ description }}</p>
  </div>
</template>
<script setup>
const props = defineProps({
  title: {
    type: String,
    required: true,
  },
  description: {
    type: String,
    required: true,
  },
});
</script>
<style scoped>
.container {
  padding: 16px;
  background-color: #f9f9f9;
  border-radius: 8px;
}
.title {
  font-size: 24px;
  color: #333;
  margin-bottom: 8px;
}
.description {
  font-size: 16px;
  color: #666;
}
</style>
The code above defines a basic Card component with scoped styling, plus the card accepts a title and description prop. Before moving forward, you can import this component in your Vue app to test and ensure everything works fine:
<!-- src/App.vue -->
<template>
  <div>
    <h1>Remote Vite + Vue app</h1>
    <Card
      title="Hello World"
      description="This is a description passed as a prop."
    />
  </div>
</template>
<script setup>
import Card from "./components/Card.vue";
</script>
You should see an output similar to the one below.

To make the Card component available remotely, open the default vite.config.js file and update its content with the code below:
import { defineConfig } from "vite";
import vue from "@vitejs/plugin-vue";
import federation from "@originjs/vite-plugin-federation";
export default defineConfig({
  plugins: [
    vue(),
    federation({
      name: "remote_app",
      filename: "remoteEntry.js",
      exposes: {
        "./Card": "./src/components/Card.vue",
      },
      shared: ["vue"],
    }),
  ],
  build: {
    modulePreload: false,
    target: "esnext",
    minify: false,
    cssCodeSplit: false,
  },
});
Here, we defined a module federation named remote_app that other applications can use to reference our Vite + Vue app. Additionally, the filename: remoteEntry.js option specifies the name of the main entry file that gets generated; this file contains all the necessary information for other apps to load the components we’ve exposed.
It’s important you verify that this file is generated after you build your project. Typically, it should be available at http://localhost:5001/assets/remoteEntry.js. However, in some rare cases, it is available at http://localhost:5001/dist/assets/remoteEntry.js.
Furthermore, in the config above, we used the exposes option to expose our Card component so that other apps can import it by using remote_app/Card. Furthermore, because we’re using module federation, we needed to update our build process to disable modulePreload, so as to control how modules are loaded dynamically; we also set target to esnext to ensure we use the latest JavaScript features needed for module federation to work properly.
Finally, build and start the remote app by running the following command:
npm run build
npm run dev
The build command is necessary to generate the remoteEntry.js file, and the npm run dev command makes it accessible via localhost.
Setting up the host Vike-react app
Now, let’s dive into creating the host app that’ll leverage theCard component we just exposed. Move back into your main project root directory — micro-vike — and scaffold a new Vike-react with Bati by running the following command:
npm create bati -- --react host
The command above sets up the project in a new directory called host, and so far, we should have a structure similar to the following:
micro-vike/
├── vue-card/
│   └── . . .
└── host/
    └── . . .
Next, install the vite-plugin-federation in the host project by running the command below:
cd host
npm install @originjs/vite-plugin-federation --save-dev
Finally, update the vite.config.js file for the host project to match the following: \
import react from "@vitejs/plugin-react";
import { defineConfig } from "vite";
import vike from "vike/plugin";
import federation from "@originjs/vite-plugin-federation";
export default defineConfig({
  plugins: [
    vike(),
    react(),
    federation({
      name: "app",
      remotes: {
        remoteApp: "http://localhost:5001/dist/assets/remoteEntry.js",
      },
      shared: ["react", "react-dom"],
    }),
  ],
  build: {
    modulePreload: false,
    target: "esnext",
    minify: false,
    cssCodeSplit: false,
  },
});
Here, we made a similar change as we did with our remote app, plus we also updated our host app to connect to the remoteEntry URL we defined earlier.
With all these changes, we can now load the Card component we created with Vue earlier in our Vike-react project, as shown below:
// pages/index/+Page.jsx
import React from "react";
import Card from "remoteApp/Card";
export default function Page() {
  return (
    <>
      <h1>Vike + React</h1>
      <Card
        title="Hello World"
        description="This is a description passed as a prop."
      />
    </>
  );
}
Start your application with the following command:
npm run dev
And you should see an output similar to the one below when we run our Vike application:

And that’s it! We’ve successfully loaded a Vue component from an independent Vite + vue project into another Vike-react project!
Monorepo consideration
It’s worth mentioning that you can also integrate Monorepo frameworks like Nx and Turborepo to consolidate your micro-frontends into a single repository. This way, you can further simplify code sharing, dependency management, and configuration, and also reduce maintenance efforts.
However, whether this is the right choice depends on your project’s requirements. If you’re interested in getting started with Nx, you can refer to this adoption guide.
Conclusion
Throughout this tutorial, we’ve explored Vike, its key features, how to get started with it, and how it can be combined with vite-plugin-federation to build scalable micro-frontend applications. You can also find all the code used in this tutorial in this GitHub repository.
Thanks for reading!