 Why You Can Trust CNET
Our expert, award-winning staff selects the products we cover and rigorously researches and tests our top picks. If you buy through our links, we may get a commission. Reviews ethics statement
Has your MacBook started slowing down or overheating? Perhaps you're looking to upgrade to the M3 MacBook Airreleased earlier this year or want to size up to a 14-inch or 16-inch MacBook Pro. Whatever your reason for upgrading to a new Mac, you might offset the cost by selling your old one. Before you box up your MacBook, however, there are a few steps to make the transition to your new machine a smooth and safe one. You'll likely want to migrate your data to your new Mac, and you'll definitely need to wipe your old Mac clean.
Whether you're selling your Mac, handing it down to a family member or friend, recycling it or donating it to an organization, you'll want to erase your personal information and files before parting with it. It's a crucial security measure you don't want to skip. Your Mac's hard drive is bursting with sensitive information that you wouldn't want to be accessible, even if you trust your laptop's next owner. There's always a chance that some malware could snake its way in and uncover your personal details.
Ready to remove all traces of your data and return your old Mac to its default factory settings? The specific steps you need to take will depend on what MacBook model and operating system you're working with. We've listed out the steps for newer models (running on Monterey OS or later and equipped with Apple Silicon or the Apple T2 security chip) and older MacBooks, so you can follow whichever guide applies to your laptop.
How to factory reset a newer MacBook on macOS Monterey or later
Newer MacBook models have an erase assistant built in to their settings to help you quickly clear your data and factory reset your MacBook. If your MacBook is running on macOS Monterey or later and has either an Apple Silicon or an Apple T2 security chip, you should have access to the Erase All Content and Settings function.
1. Open the erase assistant
If you're running macOS Ventura or later, click on the Apple icon in the corner of your screen, then select System Settings. Choose General > Transfer or Reset > Erase All Content and Settings. The erase assistant will then open up.
If you're running macOS Monterey, lick on the Apple icon in the corner of your screen, then select System Preferences. From the menu bar, choose Erase All Content and Settings. If your laptop supports it, the erase assistant will then appear.
If you don't see the Erase All Content and Settings option or get an error message stating that the erase assistant is not supported on your MacBook, you may have an older model and you'll need to use a different approach to reset it. Scroll down to our second set of instructions below for older MacBooks.
2. Follow the onscreen instructions and review your data
The erase assistant will show you a summary of what'll be erased. Then follow the onscreen directions to continue with the factory reset. You'll need to enter your administrator credentials for your MacBook. Next, enter your Apple account login to sign the MacBook out of Find My.
You may be asked if you want to backup your data before proceeding with the reset process. If you forgot to do this earlier, it's a good idea to pause and back up your data to an external hard drive before you erase everything.
3. Confirm that you want to erase all content and settings

A window will pop up confirming that your data and settings will be permanently erased if you proceed. If you're ready to proceed, select Erase All Content & Settings to confirm that you want to reset your MacBook.
Your laptop will then begin the process of removing all of your data and will restart. Your screen may go dark during this portion of the process or you may see a progress bar. You may be asked to reconnect to your Wi-Fi network during this deletion process, too. Your laptop will also generally disconnect from Bluetooth accessories such as your mouse or external keyboard.
Once the reset is complete, you'll see the Activate Mac screen, indicating that your MacBook has been reset to factory settings and can now be sold or recycled. If you're keeping the laptop or want to set it up to give to a family member, you can use the Setup Assistant to begin the setup process from scratch.

If you're running an earlier operating system or have an older model without the Apple Silicon or T2 chip, you'll need to follow a slightly longer process to wipe your data before selling or donating your MacBook.
1. Sign out of your accounts
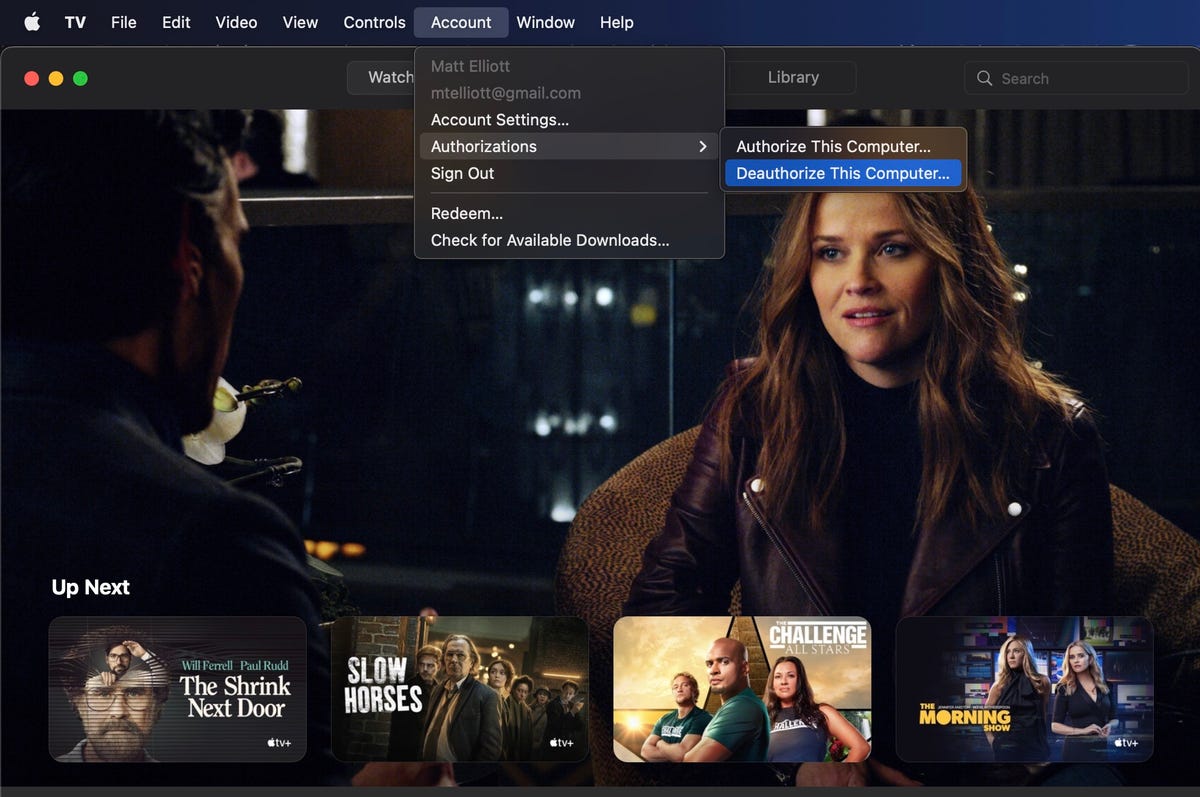
After migrating your data to your new Mac or making one last backup to preserve your data, it's time to remove all traces of yourself from the machine. First, you'll need to sign out of all of your accounts. Years ago, this was done using iTunes, but you now must individually sign out of three apps -- Music, TV and Books. Open up any of those apps and go to Account > Authorizations > Deauthorize This Computer. You'll need to enter your Apple ID and password and then hit the Deauthorize button.

Next, turn off Find My Mac and sign out of iCloud. Go to System Preferences > Apple ID, click iCloud in the left panel and then uncheck Find My Mac. Next, click Overview from the left panel and then click the Sign Out button.
Lastly, you'll need to sign out of Messages. Open the Messages app, go to Messages > Preferences, click the iMessage tab and then click Sign Out.
2. Bluetooth unpairing
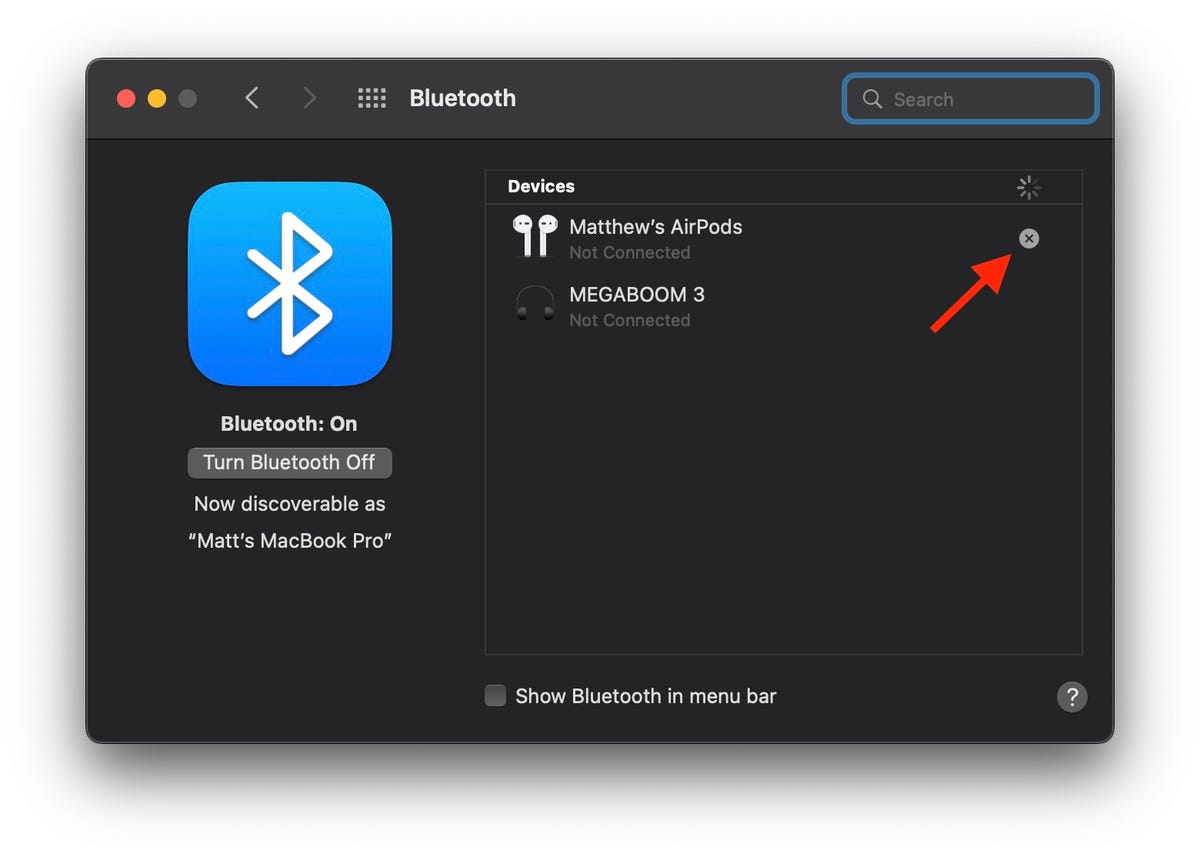
If you're handing down your old Mac to your kid or someone else in your house, then it's a good idea to unpair any Bluetooth devices so your mouse or keyboard controls the new Mac without interfering with the old one. Go to System Preferences > Bluetooth, mouse over the device you want to unpair, click the X button to the right of its name, then click Remove.

3. Reset NVRAM
NVRAM is memory where your Mac stores essential settings needed before loading macOS, such as screen resolution, time zone, volume level and startup disk selection. Sometimes these files can get corrupted, so give your Mac's next owner a fresh start by resetting the NVRAM. To do so, shut down your Mac, then turn it on and immediately press and hold four keys together: Option, Command, P, and R. You can release the keys after 20 seconds or so. That's it! Your Mac's NVRAM has been reset.
4. Factory reset
You need to put your MacBook into Recovery Mode in order to erase all of your data and reinstall MacOS. To enter Recovery Mode on an old Intel-based Mac, restart it and immediately press and hold Command-R. You can release the keys once you see the Apple logo. On an M1-based Mac, booting into Recovery Mode is slightly different. You simply press and hold the power button until you see the startup options window, then click Options and Continue to get to the utilities window.)

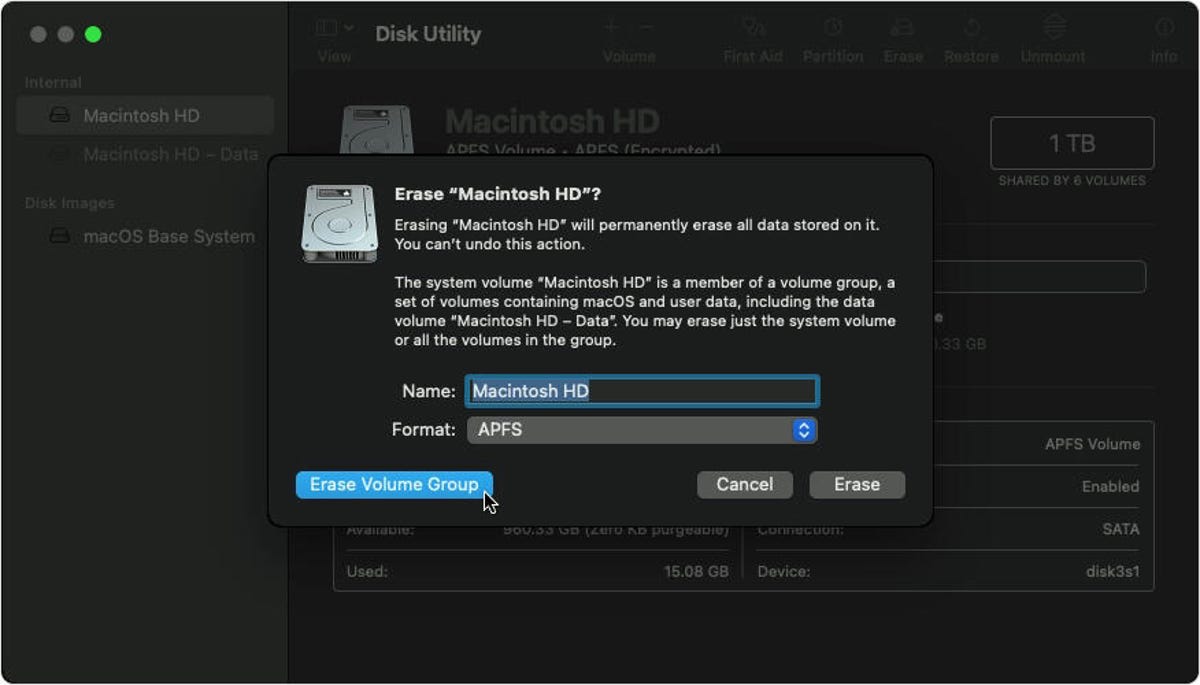
Next, you'll see the MacOS Utilities window. Choose Disk Utility, click Continue and select your startup disk -- unless you renamed it, odds are it's labeled Macintosh HD or something similar. Next, click the Erase button at the top of the Disk Utility window and fill out these two fields:
- Name: Choose a name for the fresh, new volume. Why not go with the tried-and-true Macintosh HD?
- Format: Choose APFS.
If you're trying to sell an ancient Mac that has a mechanical hard drive instead of a solid-state drive, then choose Mac OS Extended (Journaled) for Format.
Next, click the Erase Volume Group and after Disk Utility does its thing, quit Disk Utility. (If you don't see the Erase Volume Group button in the lower-left corner, then click the Erase button in the lower-right corner instead.)
You should return to the MacOS Utilities window. (If not, restart your Mac again, holding down Command-R while it reboots.) From the MacOS Utilities window, select Reinstall MacOS and follow the instructions to install the operating system. After MacOS has been reinstalled, you'll be greeted by the Setup Assistant, which you can then quit out of and shut down your Mac. It's now ready for a fresh start with its next owner.
Here's how to factory reset an iPhone, how to reset AirPods that are acting up, and how to reset a Chromebook in under a minute.