Nitro.js is a universal server toolkit that can be used either as a standalone or as the server engine of full-stack frameworks. Created by the Unified Javascript Tools (UnJS) team, Nitro seeks to relieve developers of the complexities associated with building performant and scalable server-side applications that can keep up with the pace of current and future web demands — from universal deployments to performance optimizations and everything in between.

Nitro is used to power the server engine for Nuxt v3, which is popular with the JavaScript community. Nitro is built on top of the h3 engine, which is a light and performant JavaScript framework.
In this article, we’ll build and deploy an API using Vercel to learn more about Nitro, its features and ecosystem, and how it can help us supercharge our server-side applications. You can follow the source code for this project in this GitHub repository. Now, let’s dive in!
Nitro.js key features
Zero configuration
Setting up a Nitro project requires zero configuration. We software developers already spend an outrageous amount of time setting up configurations for various tools, frameworks, and projects, so the team behind Nitro has decided that the experience can be better.
As a bonus, we get TypeScript support out of the box, which altogether provides a great developer experience.
Universal deployment
Nitro’s universal deployment feature is a huge standout feature. We get to write code once, which can be deployed to almost any hosting provider, environment, or runtime.
Nitro has cross-platform support for Node.js, browsers, service workers, and more. It generates output formats suitable for a wide range of these platforms. Nitro’s output format is easily customizable with little to no code required.
Auto-imports and tree-shaking
To further enhance the developer experience, Nitro lets us automatically import the utilities, modules, and functions we need, which helps reduce boilerplate code and keep our codebase clean and minimal.
This level of ergonomics, coupled with tree-shaking to eliminate unused code from the final code output bundle, works to keep our project lean and efficient, thereby reducing cognitive load on us, enhancing the maintainability of the code base, and also increasing software performance.
File system-based routing
Nitro simplifies the creation of backend API routes by enabling a file-based system. All we have to do is create a file in the /api or /routes folder, and Nitro will automatically and, under the hood, map the files to routes using h3.
So, to create an endpoint to fetch data from a database, the file structure would look like /routes/listings.get.ts, and voilà! We get an endpoint that supports the GET method, and the endpoint route is /listings.
The same can be done for other HTTP methods, such as POST: /routes/listings.post.ts and PUT : routes/listings.put.ts. In each route file, a defineEventHandler method is defined, which contains all of the route’s functionality and runs when the endpoint is hit with a request. We will explore more about event handlers later on in the course of this article.
Nitro’s file-based routes are highly customizable as they give access to setting up route rules, parameters, middleware, filtering, and more.
Caching
Caching is very important for creating performant and scalable applications for a large number of users. Nitro takes performance to the next level by providing caching built into its server toolkit.
We can either set up caching for each API route or a matched API route pattern in our nitro.config.ts file or directly in each file for each of the API routes by replacing the defineEventHandler with the defineCachedEventHandler method and setting the options. Both work; however, the latter gives us more fine-grained control over the cache settings.
Nitro also lets us customize our cache storage to use options such as Redis or a KV store. Additionally, we can cache functions that aren’t event handlers but are used in one or reused across multiple event handlers, such as utility functions using the defineCachedFunction method.
Hot module reloading
Hot module reloading allows developers to update parts of their server-side code without requiring a full server restart. It enables real-time updates to the application while preserving its state. This significantly improves the development workflow and leads to faster development.
Setting up a Nitro.js project
We’ve sung enough of Nitro’s praises. Now, let’s get our feet wet by setting up a Nitro project.
First, let’s ensure we have the latest LTS version of Node.js or Bun installed. Then we can get started by opening up our terminal and entering the following command:
#npm
npx giget@latest nitro todos-api --install
Once completed, our Nitro project is ready to go. While still in the terminal, let’s enter the project directory using the cd command and run the command below to open up the Nitro development server in the browser at http://localhost:3000/:
#Enter directory
cd todos-api
#Run dev server
npm run dev
If done correctly, we should see a white screen with the text “Start by editing
server/routes/index.ts.”
Next, let’s open up the project in our code editor, and we’ll see the directory structure of the newly created project.
The directory structure of our Nitro.js project
Most of the code changes will happen in files and folders located in the server/ directory. They include:
routes/: The/routesdirectory defines the API routes and event handlers. Subdirectories can be created in the/routesdirectory to create nested event handlers. The name and directory of the file is the API route pathapi/: Similar to the/routesdirectory, the only difference is that API routes created in the/apidirectory are prefixed with/api/for convenience’s sakeutils/: This directory is used to house all of the utility functions to be used in the Nitro project. Functions defined here can be auto-imported into any file in the projectplugins/: This directory contains the custom Nitro plugins for your projectnitro.config.ts: This file is used to configure your Nitro project
Building APIs with Nitro
Now, we’ll create an API that lets us create, read, update, and delete to-dos.
Before we properly begin, let’s create a utils/index.ts file inside the server directory and paste in the following code:
// server/utils/index.ts
export type Todo = {
  id: number;
  todo: string;
  completed: boolean;
};
Here, we export the Todo type, and thanks to Nitro’s auto-import magic, we can use it anywhere without needing to import it manually.
Creating to-dos
We’ll start by creating an endpoint that we can use to create new to-dos. Let’s create a file named todos.post.ts in the server/routes/ directory and copy and paste the following code:
//todos.post.ts
export default defineEventHandler(async (event) => {
  const { todo, completed } = await readBody(event);
  if (!todo || !completed)
    return {
      statusCode: 400,
      message: "Both Todo and Completed fields should have a value set",
    };
  if (completed !== "true" && completed !== "false")
    return {
      statusCode: 400,
      message: "The value of completed must either be true or false",
    };
  const todoList: Todo[] = (await useStorage("data").getItem("todos")) || [];
  const newTodo: Todo = {
    id: Date.now(),
    todo,
    completed,
  };
  todoList.push(newTodo);
  await useStorage("data").setItem("todos", todoList);
  return {
    statusCode: 201,
    message: "Todo added successfully",
    data: {
      ...newTodo,
    },
  };
});
Let’s analyze the content of the code block above:
- First, we define the asynchronous event handler function
defineEventHandler - We read the data sent through the body of the request using
readBody - Next, we perform some early error checking and return descriptive messages
- Using Nitro’s storage layer (
useStorage), we read the value of all previously stored to-dos or assign the variable to an empty array if none exists- Setting the argument of
useStoragetodatawrites data to a default.data/kvdirectory so we can see all our stored data in the directory in a file namedtodos.json
- Setting the argument of
- Next, we create a new to-do and append it to
todoList - We then write the current value of
todoListback to the data source - Finally, we return a status code, a message, and the newly added to-do to show the to-do was added successfully
We can test out the newly created endpoint using cURL in our terminal by pasting the following code:
curl --location 'http://localhost:3000/todos' \
--header 'Content-Type: application/x-www-form-urlencoded' \
--data-urlencode 'todo=Take out the trash' \
--data-urlencode 'completed=false'
We should get a similar response to the one below:
...
{
  "statusCode": 201,
  "data": {
    "id": 1723597116886,
    "todo": "Take out the trash",
    "completed": "false"
  }
}
...
Voilà! Our endpoint works. Let’s go ahead and finish up the remaining endpoints.
Fetching all to-dos
Let’s create a file named todos.get.ts in the server/routes/ directory and paste in the following code:
// todos.get.ts
export default defineEventHandler(async () => {
  const todos = await useStorage("data").getItem("todos");
  return {
    statusCode: 200,
    message: "Success",
    todos || [],
  };
});
The code above fetches all the to-do data saved in the .data/kv/todo.json file alongside a status code and message to signify the request was successful.
To test out this endpoint, let’s open up our terminal and paste the following cURL command:
curl --location 'http://localhost:3000/todos'
The response should be a list of all the to-dos we have created:
...
{
  "statusCode": 200,
  "todos": [
    {
      "id": 1723597116886,
      "todo": "Take out the trash",
      "completed": "false"
    }
  ]
}
...
Fetching a single to-do
Fetching a single to-do would require the use of route parameters, and to achieve this in Nitro’s file-based route system, we would have to use the [<param>] syntax, where param is the name of the parameter. In this case, we’ll use id as our parameter name.
Let’s create a file named todo/[id].get.ts and paste in the following code:
// todos/[id].get.ts
export default defineEventHandler(async (event) => {
  const id = getRouterParam(event, "id");
  const todos: Todo[] = (await useStorage("data").getItem("todos")) || [];
  const singleTodo = todos.find((todo) => todo.id === Number(id));
  if (!singleTodo)
    return {
      statusCode: 404,
      message: "Todo item not found",
      data: {},
    };
  return {
    statusCode: 200,
    message: "Success",
    data: singleTodo,
  };
});
Here, we use the .find JavaScript method to search the stored to-dos to find the one that matches the param, and if no existing to-do matches, an empty object is returned alongside a status code and message. If a match is found, we then return the matching to-do alongside a status code and message.
To test this endpoint, let’s paste in the following cURL command in our terminal.
Remember to replace the
idparameter value with that of a to-do that exists in your list of todos:
curl --location 'http://localhost:3000/todos/[id]'
We should get a response similar to the following:
...
{
    "statusCode": 200,
    "data": {
        "id": 1723597116886,
        "todo": "Take out the trash",
        "completed": "false"
    }
}
...
Updating a to-do
To update a to-do, we’ll use the PATCH HTTP request method. Let’s create a file [id].patch.ts in the routes/todos/ directory and paste in the following code:
// todos/[id].patch.ts
export default eventHandler(async (event) => {
  const id = getRouterParam(event, "id");
  const { todo, completed } = await readBody(event);
  if (!todo && !completed)
    return {
      statusCode: 400,
      message: "Either Todo or Completed should have a value set",
    };
  if (completed !== "true" && completed !== "false")
    return {
      statusCode: 400,
      message: "The value of completed must either be true or false",
    };
  //fetch existing todos and find the index of the todo with matching id
  const todos: Todo[] = (await useStorage("data").getItem("todos")) || [];
  const index = todos.findIndex((item) => item.id === Number(id));
  if (index === -1) {
    return {
      statusCode: 404,
      message: "Todo not found",
      data: {},
    };
  }
  // Update the todo property
  if (todo !== undefined) {
    todos[index].todo = todo;
  }
  // Update the completed property
  if (completed !== undefined) {
    todos[index].completed = completed;
  }
  // store the update todo back in storage
  await useStorage("data").setItem("todos", todos);
  return {
    statusCode: 200,
    message: "Todo updated successfully",
    data: {
      ...todos[index],
    },
  };
});
Let’s test it out by running the cURL command.
Here, the value of
completedis set to “true”:
curl --location --request PATCH 'http://localhost:3000/todos/1723597116886' \
--header 'Content-Type: application/x-www-form-urlencoded' \
--data-urlencode 'completed=true'
We should get the typical response:
...
{
  "statusCode": 200,
  "message": "Todo updated successfully",
  "data": {
    "id": 1723597116886,
    "todo": "Take out the trash",
    "completed": "true"
  }
}
...
Deleting a to-do
To delete a to-do, we’ll use the DELETE HTTP method. Let’s create a file [id].delete.ts in the todos/ directory and paste in the following code:
// todos/[id].delete.ts
export default defineEventHandler(async (event) => {
  const id = getRouterParam(event, "id");
  const todoList: Todo[] = (await useStorage("data").getItem("todos")) || [];
  const index = todoList.findIndex((item) => item.id === Number(id));
  if (index === -1) {
    return {
      statusCode: 404,
      message: "Todo not found",
      data: {},
    };
  }
  // Remove the todo item from the list
  const deletedTodo = todoList.splice(index, 1)[0];
  // Save the updated list back to storage
  await useStorage("data").setItem("todos", todoList);
  return {
    statusCode: 200,
    data: {
      ...deletedTodo,
    },
    message: "Todo successfully deleted",
  };
});
Let’s test the endpoint with the following cURL command. Remember to replace the id parameter value with that of a to-do that exists in your list of to-dos:
curl --location --request DELETE 'http://localhost:3000/todos/[id]'
We should get the typical response:
...
{
    "statusCode": 200,
    "data": {
        "id": 1723597116886,
        "todo": "Take out the trash",
        "completed": "true"
    },
    "message": "Todo successfully deleted"
}
...
Now if we run the cURL command to check our list of to-dos, we should be one to-do item short. So, our endpoint works as expected.
Hurray! We’re done creating all the endpoints and testing them out to ensure they function as expected. Let’s move on to deploying our app for the rest of the world to be able to use.
App deployment with Nitro.js
Nitro.js supports deployment to various hosting platforms with zero configuration needed. For this guide, we’ll use Vercel. However, feel free to use any other hosting provider from Nitro’s list of supported deployment options that require little to no configuration.
During local development, Nitro’s storage layer makes use of files in our local directory to store data. Because we’ll be deploying to a remote server, we have to make provisions for a storage layer for our app to use. And because we’re using Vercel, Vercel’s KV storage is a good option.
First, we have to add @vercel/kv to our app’s list of dependencies using this command:
npm i @vercel/kv
Then, we’ll configure our nitro.config.ts to use Vercel KV as our storage driver:
export default defineNitroConfig({
  srcDir: "server",
  storage: {
    data: { driver: "vercelKV" },
  },
});
Next, let’s initiate our project as a git repository using git init and commit all our file changes using git add . && git commit -m "setup and deploy todo api"
After that, we’ll create a new repository for our project on GitHub (feel free to use whichever Git provider you prefer) and push our existing code to it.
Next, we’ll deploy to Vercel. Let’s go into our Vercel dashboard, click on the Add New menu, and select Project:

Then, on the next screen, let’s import our newly created Git repository:
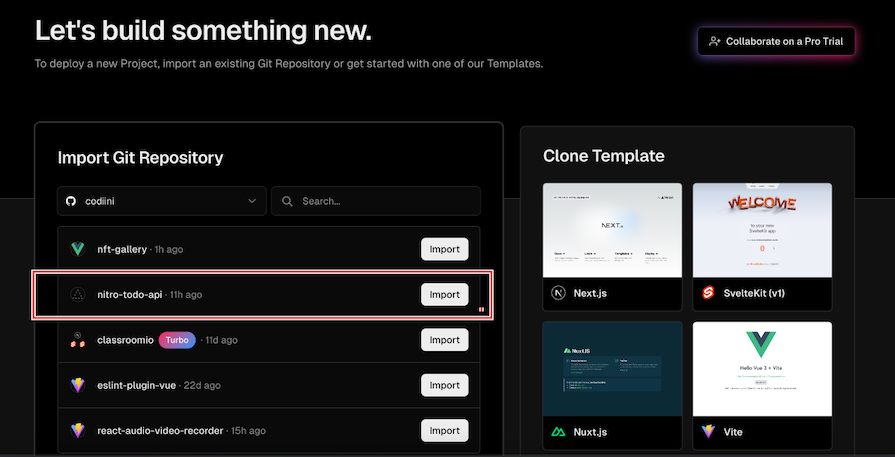
On the next page, we’ll deploy, as we don’t need to make any configurations to deploy our project:

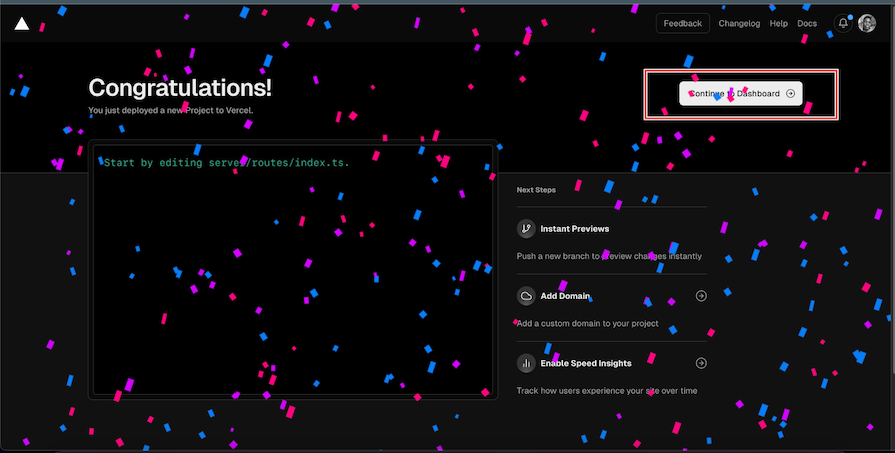
Our project has deployed successfully but we’re not done just yet. Let’s click the Continue to Dashboard button to go to our project settings and configure our storage option:
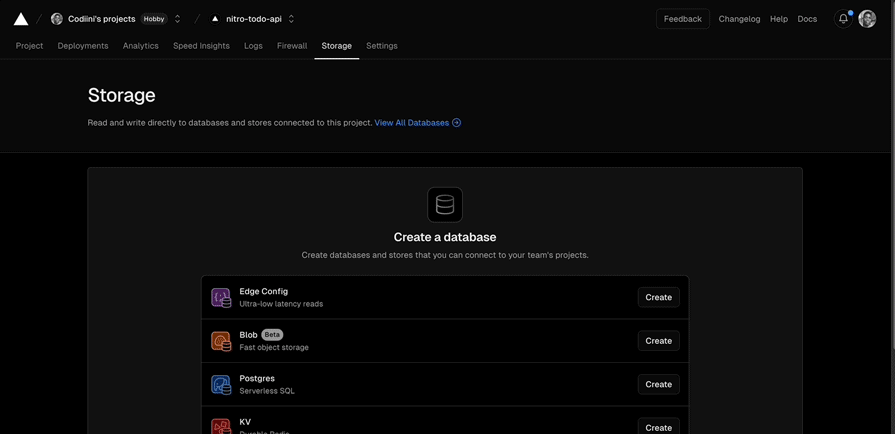
Let’s click on the Storage button in the top menu bar and configure our KV storage as shown below:
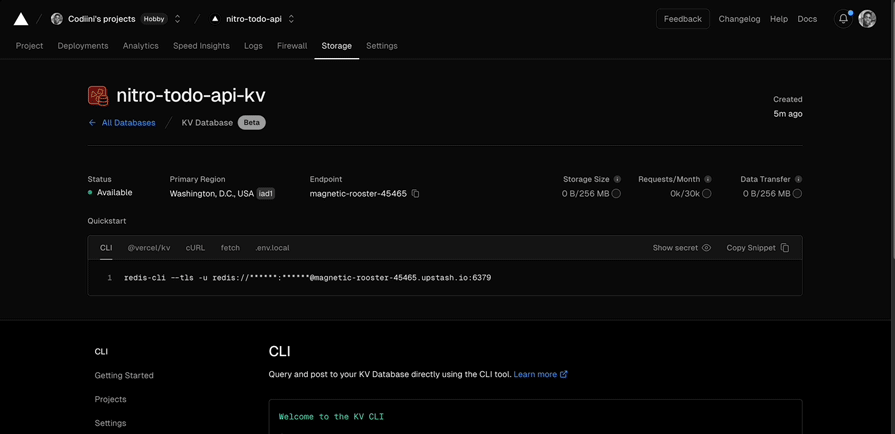
Our KV storage should now be created and automatically added to our project. One last step we need to take to ensure everything works as expected is to manually redeploy our project via the following steps:
And ta-da! Our Todos API is ready to go. We can test our API like we did using cURL while building locally. We just need to replace http://localhost:3000/ with our project URL.
The UnJS ecosystem
Nitro.js is great, and greatness takes a community to build. It is built on top of other amazing projects within the UnJS ecosystem, which comprises a collection of universal JavaScript utilities designed to work with any JavaScript runtime, platform, or environment.
At the time of writing, Nitro has about 5.8k GitHub stars and over 450k weekly npm downloads, and these metrics seem to be trending upwards. In Nitro’s case, this signifies how much the JavaScript community has yearned for an intuitive, developer-experience-centric, and feature-rich toolkit to build servers.
Aside from being the server engine for Nuxt 3, Nitro is also being considered to be used as the server engine for other popular frameworks such as Angular and Solid Start.
Nitro’s main growth drivers can be attributed to it being open source and contributions from the community. According to their GitHub repository, there are currently about 253 open source contributors, including the maintainers. This assures that Nitro will be around for a very long time, will receive frequent updates, and can only get better than it currently is.
Let’s take a look at some notable packages in the UnJS ecosystem.
h3
h3 is a minimal HTTP framework built for high performance and portability. It’s a modern and friendlier alternative to Express.js. It serves as the composable server framework on top of which Nitro is built, including Nitro’s file-based route system.
Unplugin
Unplugin is a unified plugin system for building tools, that supports Vite, Rollup, webpack, esbuild, and every framework built on top of them. This means you can create a plugin using the unified interface Unplugin provides, which can work with the frameworks and projects built on top of the aforementioned build tools.
Unstorage
Unstorage is a universal key-value storage API that is runtime-agnostic and supports over 20 key-value storage drivers. Nitro integrates Unstorage to provide a built-in persistent storage layer. It also powers Nitro’s caching feature.
ofetch
ofetch prides itself in being a much better alternative to the browser-native Fetch API that works on Node.js, browsers, and service workers. ofetch boasts a much better developer experience by providing features such as better error handling, type support, and auto retries. It powers Nitro’s built-in fetch API that can be used to get data from server endpoints or other sources.
unimport
The unimport package provides unified utilities to support auto-importing APIs in modules. Unimport powers one of Nitro’s great developer experiences: not needing to import every function or utility. Rather, just use it as desired.
Conclusion
Nitro.js has emerged as a powerful and innovative solution in the server-side JavaScript landscape. It addresses many of the pain points developers face when building modern web applications by offering features like universal deployment, auto-imports, file-based routing, and built-in caching. Its integration with the UnJS ecosystem provides a great foundation for scalable and efficient server-side development.
As we’ve seen through our Todo API example, Nitro simplifies the process of creating, deploying, and managing server-side applications. Its zero-configuration approach and developer-friendly features make it an attractive option for both beginners and experienced developers.
With its growing community support and continuous improvements, Nitro is in a position to play a significant role in shaping the future of server-side JavaScript development. Whether you’re building a small project or a large-scale application, Nitro offers the tools and flexibility to improve your development process and enhance your productivity.