The Reactive Extensions Library for JavaScript, or RxJS, is famous for being a reactive programming library that uses Observables. If this doesn’t make sense to you, no worries — that’s why this guide is relevant.

In this adoption guide, we’ll get to know RxJS features, benefits, and more to help you understand what it is, how it works, and why you should use it. By the end of this guide, you’ll be able to discern when and how to adopt it effectively in your projects.
Introduction to RxJS
Around 2011, Microsoft’s Cloud Programmability Team needed to manage events better across different parts of an application. This need gave rise to a project called Volta, an experimental toolset aimed at simplifying the development of multi-tier web applications.
RxJS was part of this project; its logo, which features an electric eel, is a nod to Volta. Meanwhile, “extensions” refers to another technology developed around the same time called Parallel Extensions, which complements the Reactive Extensions (Rx) library nicely.
The first version of Rx was made for the .NET framework and released on 21 June 2011. Later, the team created an Rx implementation for JavaScript, RxJS, along with versions for other languages like C++. In late 2012, RxJS was released as open source software, first on CodePlex and later moved to GitHub.
Getting started with RxJS
Truthfully, reactive programming is not easy, especially at first. However, it gets less difficult the more you work with it, so it could be helpful to get started as early as you can.
To get started, you will need some understanding of the following:
- JavaScript fundamentals — This includes understanding how to declare and invoke functions, as well as knowing how to handle events in JavaScript using event listeners. Familiarizing yourself with
try...catchblocks will also boost your efficiency - Asynchronous JavaScript — You need to know the basics of callbacks and understand the Promise API, including how to create and consume promises. A good grasp on knowing how to use async and await for handling asynchronous operations would be as well appreciated.
- RxJS installed — check out the steps below to guide you
To install RxJS, create a new directory. For the sake of this tutorial, you can name it RxJs-Guide. Navigate into it, open up the terminal, and initialize a new Node project by running this command:
npm init -yWe will have to install RxJS next; to do that, you will have to run this command:
npm install rxjsFurther reading:
- Dynamically creating JavaScript elements with event handlers
What is RxJS?
In software applications, there is a huge dependence on asynchronous operations, which involve fetching data from APIs. RxJS has revolutionized the way we treat this data — it allows us to treat data like streams by providing us with tools to manipulate asynchronous data. These tools include Observables, Observers, operators, Subscriptions, Subjects, and Schedulers.
We’ll get into how RxJS works in more detail later, but as a quick analogy for now, you could think of it as a personal local sports live streaming service.
In this service, the Observables or data streams are the broadcast channels, while the observers are the viewers subscribing to these channels to receive the live events. When a viewer subscribes, they start receiving the broadcast immediately and can unsubscribe anytime to stop it.
Operators act as filters to customize the broadcast, such as skipping commercials or highlighting key moments. Schedulers manage the timing and order of the broadcasts, while Subjects are special Observables that share the same broadcast with all viewers simultaneously, ensuring everyone sees the same event at the same time.
Key RxJS features to know
In the previous section, we explored a simple explanation of how RxJS works to give you a high-level understanding without getting lost in the technical details. Going further, we’ll define some technical terms and go into example use cases of these features.
We’ll divide this section in two. First, we’ll discuss Observables, Observers, and Subscriptions, and put our knowledge into action by building a simple RxJS system. Then, we’ll discuss operators, Subjects, and Schedulers, expanding on our RxJS system with these features to demonstrate a realistic use case.
Observables
You’re likely to find Observables in every RxJS definition. But what exactly are Observables?
Observables are like functions that don’t take any input but can produce more than one value over time, and push them to observers. Like functions, Observables are lazy and need to be subscribed to.
There’s some resemblance between Observables and the EventEmitter class that could cause us to confuse them, but they function a little differently. One notable difference is that an EventEmitter is eager while Observables are lazy and don’t start producing data until you subscribe to them.
Here’s a table to help you understand the difference between Observables, functions, and an EventEmitter at a glance:
| Type | Loading strategy | Data mechanism | Output |
|---|---|---|---|
| Observables | Lazy | Push | Multiple values |
| Functions | Lazy | Pull | Single value |
| EventEmitter | Eager | Push | Multiple values |
Further reading:
- A guide to RxJS Observables
- How to build custom Node.js event emitters
Observer
We mentioned data streams in our previous analogy of Observables as broadcast channels. A stream is a perfect way to describe the kind of data Observables wrap, since an Observable is like a channel through which data flows over time.
You can watch this channel and get new pieces of data as they come in, either synchronously or asynchronously. For example, this data could be a stream of numbers, clicks, or messages that you can react to whenever a new piece arrives.
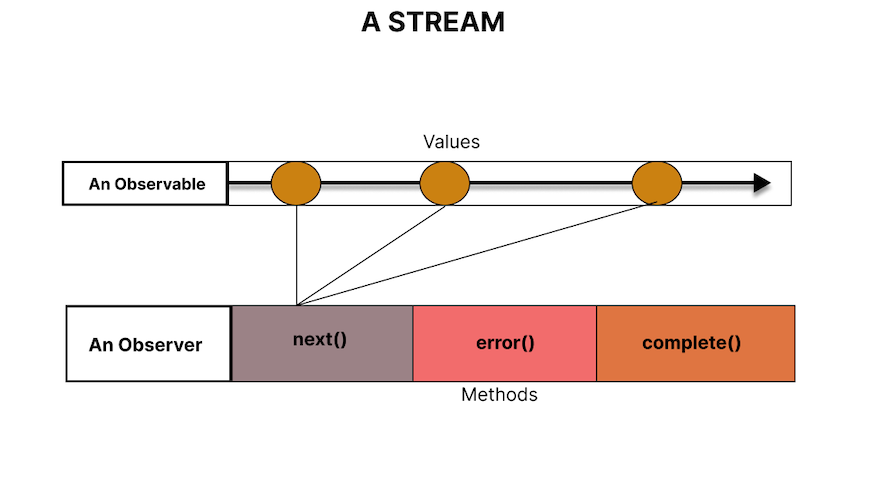
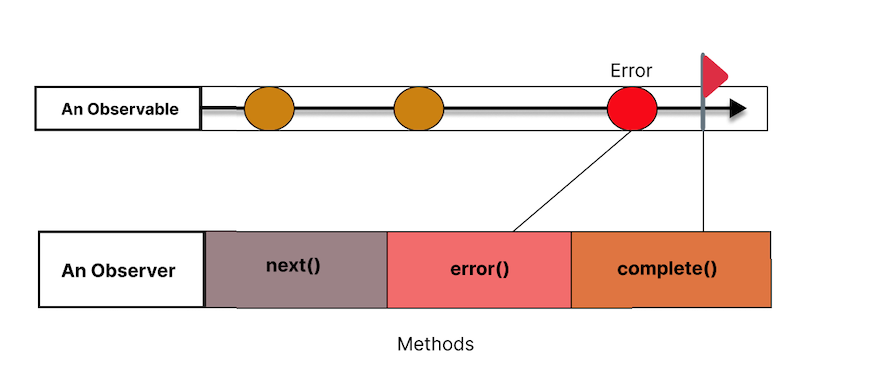
Observers, meanwhile, provide the ability to react to this data stream. They will execute some code whenever we receive a new value or error message. The Observer implements three methods:
next()is called by the Observable whenever a new value is emittederror()is called whenever the Observable throws an errorcomplete()is called whenever the Observable is done
Note that an Observable may never finish, which is due to user activity.
For example, if you have an Observable wrapped around a clickListener in a button, it will react each time the user clicks the button by emitting a value or throwing an error. You have no idea when it will finish, as it depends on when the user stops clicking.
That’s where Subscriptions come in. Let’s see how a Subscription works in RxJS next.
Subscription
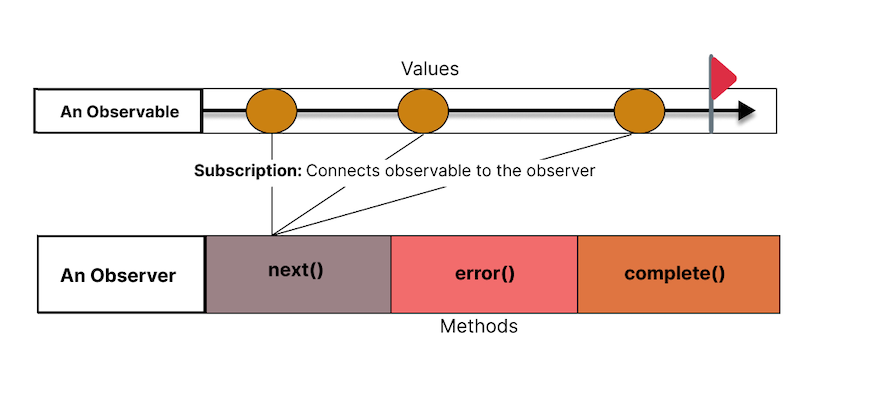
A Subscription lets the Observable know when it should call an Observer method. Using the subscribe method, we can tell the Observable that the Observer cares about the values it’s emitting. You can either subscribe or unsubscribe to the flow of data.
The diagram series below will help you understand Observables, Observers, and Subscriptions. First, let’s see how an Observable wraps around a stream of values:
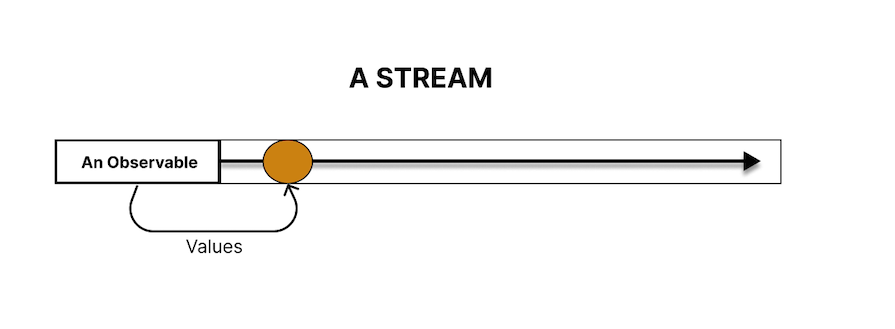
This introduces the role of Observers, which get introduced to handle a value or more than one value:
The Subscription happens when the Observer starts listening to the Observable. At this point, the Observable begins to send values to the Observer, triggering the next(), error(), and complete() methods as the Observable emits values, encounters an error, or completes, respectively:
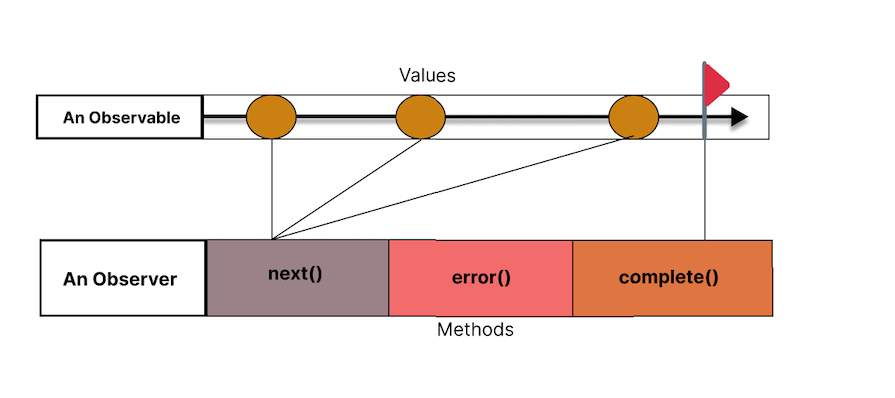
As we’ve mentioned already, not all observables end, but some do.
For example, an observable that fetches data from an API will end. It makes an HTTP GET request to get user data, emits the data once fetched, and then completes, stopping any further emissions. In such cases, the complete method is called automatically after the data is fetched and emitted:
We could also have a stream that throws an error at some point in time. For example, when we make an HTTP request, the response we receive could be a server-side error. In cases like this, the Observable will throw the error, which we can handle in the error function:
Now that we’ve seen what Observables, Observers, and Subscriptions are, let’s put them to work. We’ll be building an RxJS system where we have an Observable emitting some data.
Building an RxJS system with Observables, Observers, and Subscriptions
If you followed the setup steps in our Getting started with RxJS section, you should have a basic project set up already. Navigate to your project directory, open it in any code editor of your choice — I’m using VS Code — and create an index.js file.
In this file, we’ll first create an Observable, then create an Observer, and finally connect them with a Subscription and run the code. Start by importing an RxJS Observable like so:
const {Observable} = require('rxjs');Next, let’s instantiate the Observable class and pass it a function to create our Observable. This function takes a subscriber object as an argument, which is used to emit values, handle errors, and signal completion. Remember an Observable can emit multiple values, and we’ll be emitting more than one. The code looks like this:
//Create an observable
const observable = new Observable((subscriber) => {
subscriber.next(100);
subscriber.next(200);
subscriber.next(300);
subscriber.complete();
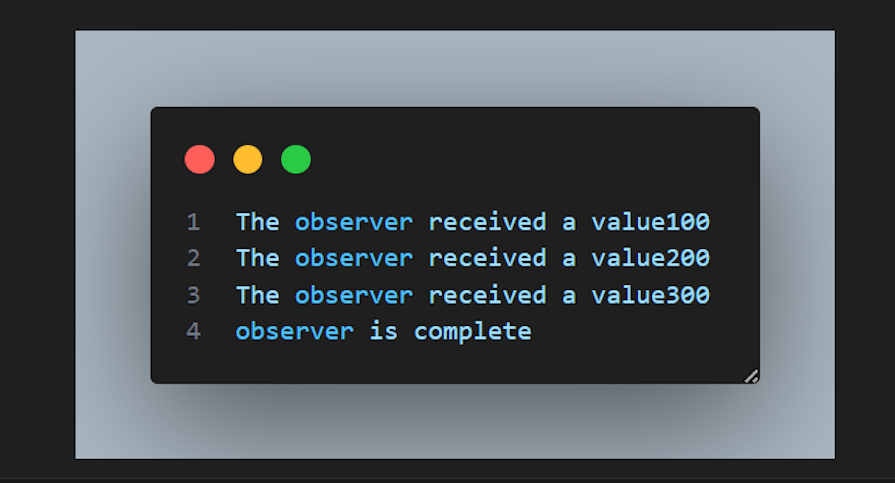
});If you remember, an Observer is an object that has optional next(), error(), and complete() methods. We’ll use these methods like so:
next()logs the received value to the consoleerror()logs the received error to the consolecomplete()logs that the observable has been completed
Let’s create our Observer now:
//create an Observer
const observer = {
    next: (value) => console.log("The observer received a value" + value),
    error: (error) => console.log("The observer received an error" + error),
    complete: () => console.log('observer is complete')
}
Lastly, we have to connect the Observable to the Observer with a Subscription:
//connect the observable and the observer
observable.subscribe(observer);
This single line calls the subscribe method on the Observable and passes the Observer as an argument. When the Observable is subscribed to, it starts emitting values. When we run the node index.js command, we will have the values logged below:
Now that we’ve demonstrated the basic concept, let’s try out a more realistic scenario involving something we might do every now and then as developers. We want our Observer to emit user data so we can limit access to our application to active users who are 18 and older:
data: [
    {
        status: "inactive",
        name: "John",
        age: 17
    },
    {
        status: "active",
        name: "Jane",
        age: 25
    },
    {
        status: "inactive",
        name: "Joe",
        age: 16
    },
    {
        status: "active",
        name: "Jill",
        age: 35
    },
    {
        status: "active",
        name: "Jack",
        age: 45
    },
    {
        status: "inactive",
        name: "Jill",
        age: 35
    },
    {
        status: "active",
        name: "Jill",
        age: 12
    }
]
This takes us to operators, Schedulers, and Subjects in RxJS. Let’s define these terms and get an understanding of how to apply them to our demo project.
Operators
Operators are crucial for composing complex asynchronous code in a clear and declarative manner. We can use operators to manipulate Observables. They come in two forms:
- Pipeable Operators: These operators are functions that can be chained together using the
.pipe()method on an Observable. Examples includemap,filter, andmergeMap. Pipeable Operators take an Observable as input and return a new Observable, allowing for more flexible data stream transformations - Creation Operators: These operators create new Observables from various sources, such as events, timers, or other data structures. Examples include
of,from, andinterval. We can use these operators to generate Observables from scratch, setting the stage for data stream processing
As mentioned above, we want to update our demo project to filter users that are inactive and are under 18 in age. Firstly, we have to emit the user data, so we get the data source as seen below:
const users = {
data: [
    {
        status: "inactive",
        name: "John",
        age: 17
    }, //fill in the remaining data...
]
}
Next, we will emit the user data to the subscribers:
const observable = new Observable((subscriber) => {
    subscriber.next(users.data);
    subscriber.complete();
})
To filter users according to their activity and age, we will need to import the map and filter operators from RxJS and apply them to the Observable using the .pipe() method. We’ll use map to transform the data emitted by the observable, and filter operator to conditionally exclude users who do not meet the specified criteria:
const observable = new Observable((subscriber) => {
subscriber.next(users.data);
subscriber.complete();
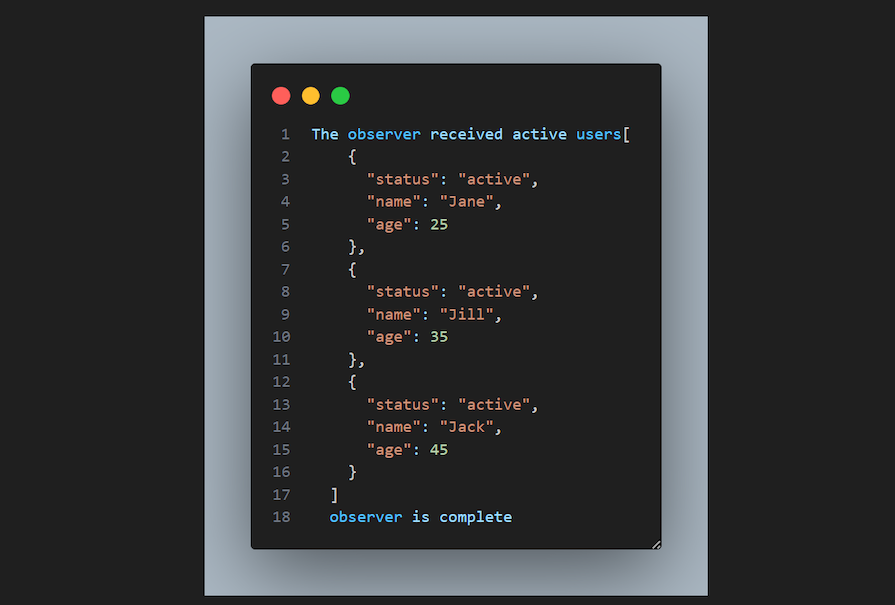
}).pipemap(users => users.filter(user => (user.status === 'inactive' && user.age < 18)))To see the result, replace the next Observer with this:
next: (value) => console.log("The observer received active users" + JSON.stringify(value,null, 2))And run the code:
Further reading:
- Using RxJS operators to consume Observables
Subjects
Subjects are special types of Observables that can be multicast, meaning more than one observer can subscribe to a single subject. In contrast, regular Observables can only be unicast and have a one-to-one relationship between the Observable and its Observers.
Every Subject is both an Observer and an Observable. This dual nature allows Subjects to not only receive data (like an Observer) but also to emit data (like an Observable).
Subjects can be multicast, which can be important in our real-world scenario. Let’s say you have multiple parts of your application that need to react to the filtered list of users. A Subject allows you to multicast the filtered results to all subscribers.
To use a Subject in RxJS, you will need to import these modules:
const { Subject } = require('rxjs');
const { map } = require('rxjs/operators');
This is the roadmap, or execution flow, that we will use to implement Subjects:
- Create
userSubject - Define
observer1andobserver2 - Subscribe both Observers to
userSubjectwith a pipe that filters the users userSubject.next(users.data)emits the user data- Both Observers receive the filtered list of inactive users under 18
userSubject.complete()is called, and both observers are notified that the stream is complete
Here’s the syntax to create a userSubject:
const userSubject = new Subject();In this case, userSubject is a new instance of a Subject. We’ll use it to emit the user data to our two Observers, which we can create like so:
const observer1 = {
    next: (value) => console.log("Observer 1 received: " + JSON.stringify(value, null, 2)),
    error: (error) => console.log("Observer 1 received an error: " + error),
    complete: () => console.log('Observer 1 is complete')
};
const observer2 = {
    next: (value) => console.log("Observer 2 received: " + JSON.stringify(value, null, 2)),
    error: (error) => console.log("Observer 2 received an error: " + error),
    complete: () => console.log('Observer 2 is complete')
};
We will then need to subscribe our Observers to the Subject:
userSubject.pipe(
    map(users => users.filter(user => user.status === 'inactive' && user.age < 18))
).subscribe(observer1);
userSubject.pipe(
    map(users => users.filter(user => user.status === 'inactive' && user.age < 18))
).subscribe(observer2);
Lastly, we will emit data and complete the Subject:
userSubject.next(users.data);
userSubject.complete();
By using a Subject, we can ensure that all the components or streams that need to display the filtered data receive the same updated data whenever the underlying data source changes.
Further reading:
- How to use Subjects to multicast observers in RxJS
Schedulers
So far, we’ve seen Observables, Observers, Subscriptions, operators, and Subjects. The last feature we’ll discuss is Schedulers.
We learned that Subscriptions connect Observables and Observers, but Schedulers manage the execution of these Subscriptions. A Scheduler controls when the Observables start executing, and when to deliver the values to the Observer.
Let’s break down Schedulers a bit using a simple example. In JavaScript, tasks are classified into microtasks and macrotasks, which affect their execution order in the event loop. Imagine you have several high-priority (microtasks) and regular (macrotasks) tasks to complete in a day:
Regular log: A quick phone call that you start immediatelyprocess.nextTick: An urgent text message you reply to as soon as you hang up the phonePromise.resolve: A high-priority email you send right after the urgent textsetTimeout: A lunch break scheduled for after the urgent taskssetImmediate: An afternoon tea break that happens after all other scheduled tasks are done
Tasks like process.nextTick and Promise.resolve() are microtasks and are handled immediately. Meanwhile, macrotasks like setTimeout and setImmediate are scheduled for a later time, ensuring regular tasks are completed after high-priority ones:
// Regular console log
console.log('Regular log');
// setTimeout
setTimeout(() => console.log('setTimeout'), 0);
// Promise.resolve
Promise.resolve().then(() => console.log('Promise.resolve'));
// setImmediate
setImmediate(() => console.log('setImmediate'));
// process.nextTick
process.nextTick(() => console.log('process.nextTick'));
If you run the code above, the result will look like this:
 Regular log
 process.nextTick
 Promise.resolve
 setTimeout
 setImmediate
Now, streams in RxJS could be synchronous and asynchronous. So what if we want to control in which context our streams are executed? There are key Schedulers for this, which include:
asyncScheduler— Executes the Observables asynchronouslyqueueScheduler— Executes the Observables synchronously in a queueanimationFrameScheduler— Schedules tasks before the next browser animation frame
To integrate a Scheduler, you will use the observeOn and subscribeOn operators to specify the Scheduler for observing and subscribing, respectively. Here’s how to integrate a Scheduler synchronously:
const { of, queueScheduler } = require('rxjs');
const { observeOn } = require('rxjs/operators');
// Synchronous task with queueScheduler
of('Synchronous task').pipe(
  observeOn(queueScheduler)
).subscribe(value => console.log(value));
And here’s how to integrate a Scheduler synchronously:
const { of, asyncScheduler } = require('rxjs');
const { observeOn } = require('rxjs/operators');
// Asynchronous task with asyncScheduler
of('Asynchronous task').pipe(
  observeOn(asyncScheduler)
).subscribe(value => console.log(value));
Pros and cons of RxJS
I’ve highlighted the features of RxJS already, but I want to explain a few reasons why I think it’s a great choice. To help you evaluate it fairly, I’ll also discuss some considerations to keep in mind.
Performance
Generally, RxJS is very fast, but its performance can vary based on how well the code is written and managed, particularly concerning Subscriptions and complex Observable structures. Operators are designed for high performance, but even so, it’s good to remember that executing less code will always be faster than more code.
Ease of use, DX, and learning curve
It can take a while to wrap your head around RxJS, and being experienced doesn’t exempt you from its steep learning curve.
To leverage RxJS effectively in real-world projects, you’ll have to go beyond the basic examples shown in this blog. Many developers don’t get that far, which is understandable since the naming convention of Operators and the advanced Operators themselves can be quite frustrating.
However, once you grasp the fundamentals of RxJS and start using it, everything becomes much more straightforward. You’ll start to appreciate how effectively RxJS works. If you can get past the learning curve, RxJS can be a powerful tool to leverage.
Bundle size
RxJS v7 boasts a significant size reduction from its previous version. If your application utilized all the operators from RxJS v6, it would have required 52 KB. However, with v7, this is slashed to just 19 KB.
Whether this impresses you or not, it’s important to remember that in regions with really bad internet connections, every kilobyte saved can notably impact performance and UX.
Community and ecosystems
RxJS has a strong community of over 11.2 million users, 500 contributors, and 30K stars in Github. These numbers show an active community with support for React, Angular, Vue, and SolidJS in the JavaScript ecosystem.
With this level of community support, you’re also unlikely to run into any problems that haven’t been solved already online. As a result, despite the somewhat steep learning curve, you have plenty of resources to turn to in your journey using RxJS.
Documentation
The RxJS docs go a long way in detailing everything needed to implement their Operators, which is crucial as it has over 100 Operators, each designed to perform specific tasks on Observables.
Despite having over 100 Operators to use, based on personal experience, you’ll most likely only need to know about 50 or fewer and use about 25 of those in your projects. Of course, this is subject to your particular use case, but it helps to have detailed docs that clearly explain which ones to use, why, and how.
Integrations with other libraries and frameworks
Integrating RxJS with various JavaScript libraries and frameworks is fairly straightforward. In Angular, RxJS is built-in and commonly used for handling asynchronous operations. RxJS also integrates with React, Node.js, Vue, Svelte, and SolidJS.
While RxJS may not always be the perfect option or a complete replacement for specific libraries — like React Query, a go-to for handling asynchronous data fetching in React — it’s still suitable for many other scenarios. But across the JavaScript ecosystem, RxJS provides powerful capabilities for managing complex asynchronous tasks and reactive programming.
Debugging
Debugging in RxJS involves using tools like the tap operator for logging Observable values and creating custom debug operators for flexible logging levels. This approach helps identify issues like memory leaks and multiple subscriptions early, enhancing code maintainability and performance monitoring.
While debugging can be a bit stressful, that problem isn’t particular to just RxJS. RxJS has evolved over the years, and while the experience may not be smooth on all frameworks, its benefits may well make it worth investing some time in learning.
Use cases for RxJS
RxJS is highly versatile. Here are just a few example use cases, with linked tutorials if you’d like to explore in more detail:
- State management in React: You can integrate RxJS with React Hooks for state management, providing a functional and reactive approach to handle state changes and asynchronous data flows
- Data transformation in TypeScript: RxJS is highly effective for transforming data streams in TypeScript, allowing developers to apply complex transformations and manipulations to Observable data
- Building a YouTube video search app: You can use RxJS to build a streaming app, showcasing its power in managing asynchronous HTTP requests and updating the UI reactively
Beyond this, RxJS is a great option to consider for any reactive programming and state management needs.
RxJS vs. Bacon.js vs. Signals
In this section we will be comparing the supposed alternatives of RXJS, highlighting their strengths as well;
| Criteria | RxJS | Bacon.js | Signals |
|---|---|---|---|
| Features | Reactive programming with observables, a rich set of operators, supports asynchronous events and data streams | Very similar to RxJS except that there are two types of Observables — EventStream and Property | Reactive state management for Angular; focuses on reactivity and change detection; integrates seamlessly with Angular’s ecosystem |
| Performance | Gives top performance when used correctly; depends on managing subscriptions and Observables | Has a good performance record | Optimized for Angular applications, improves performance by reducing change detection cycles, very efficient at handling reactive state. |
| Community | Large, active community with extensive support from different javascript ecosystems. | Growing community, with over 86+ contributors and 6.5k stars | The Angular community actively maintains and strongly supports Signals |
| Documentation/Resources | Comprehensive documentation, many tutorials and examples available everywhere online. One of the most supported reactive libraries | Very bogus documentation, but has well-detailed API use cases | Very detailed documentation and examples |
| Frameworks | React, Angular, and other frameworks | TypeScript-friendly frameworks such as Angular, React (with TypeScript), and Vue.js (with TypeScript) | Particular to Angular |
According to our comparison, RxJS excels in handling complex asynchronous operations and data streams. Meanwhile, Bacon.js also focuses on handling complex asynchronous operations, particularly within the React ecosystem. Lastly, Signal offers a functional approach to managing asynchronous and reactive programs particular to Angular.
Further reading:
- Angular signals vs. observables: How and when to use each
- Bacon.js API Docs
Conclusion
Adopting RxJS today will significantly improve your ability to handle asynchronous operations and build reactive applications. With the right knowledge in this article, you have enough reason to use RxJS. Try RxJS today!