Editor’s note: This article was last updated by David Omotayo on August 26, 2024 to include updates and new information.

Usually, when we want to pass data from a parent to a child component, we use props. Vue.js has made this straightforward and easy to do. But we’ve probably experienced frustration at some point when we need to pass data from a parent-level component to a deeply nested child component.
If we were to use props, we would end up passing the data one level up or down the component tree regardless of how deep the component is in the component tree hierarchy. This is called prop drilling and could cause our app to look more complex than it is. And if it were an application with a simple state, using Vuex in it would be overkill.
Luckily for us, Vue has the provide/inject API, and with the introduction of the Composition API in Vue 3, it has never been better.
Using the provide and inject pair, parent components can send data to children components regardless of how deep the component hierarchy is. The parent component has a provide function to supply data, and the child component has an inject function to start using this data.
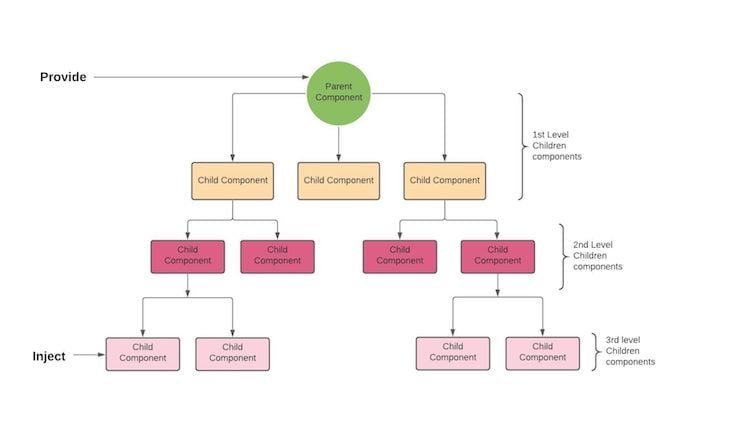
In the image above, we have three levels of children components. The data we want to pass is contained in the parent component, and the desired destination for the data is deeply nested in the third level of the component tree. We could achieve this using props, but at the expense of our code’s simplicity and readability. Let’s see how we can do this without sacrificing either.
First, we need to scaffold a new Vue app using create-vue:
npm create vue@latest
Using the provide API
The provide API is a function used to define the data or objects to be passed down to a child component.
To use the provide function, we start by explicitly importing it from vue within the script block. Then, within the component’s setup() function, we invoke provide to define the data or objects we want to pass down to child components.
But before you do that, you need to know that the provide function accepts two parameters:
- Injection key: This is the identifier used to retrieve the value in descendant components. It is usually a string or a symbol
- Value: This is the data associated with the injection key that will be available to the descendant component
<!-- src/components/MyMarker.vue -->
<script>
import { inject } from 'vue'
export default {
  setup() {
    const userLocation = inject('location', 'The Universe')
    const userGeolocation = inject('geolocation')
    return {
      userLocation,
      userGeolocation
    }
  }
}
</script>
After importing the provide function in the code above, we invoke it inside the setup function. Next, we pass the parameters for the first provide function as follows: the injection key – 'location' and a single value – 'North Pole'.
For the second provide function, we pass an object containing the latitude and longitude values and set its key as 'geolocation'.
Using the inject API
In contrast, the inject API is used to retrieve data that has been made available by an ancestor component, such as the provider component from the previous example, using the provide function.
As we did with the provide function, we also have to import the inject function from vue. This lets us call and use the function anywhere in our component.
The inject function also takes two parameters:
- Key — This is the key used to look up the value provided by an ancestor component. The key must match the injection key used in the
providefunction - Default value (optional) — This is the fallback value that would be returned if no value is found for the provided key
Let’s have a look at the code below:
<!-- src/components/MyMarker.vue -->
<script>
import { inject } from 'vue'
export default {
  setup() {
    const userLocation = inject('location', 'The Universe')
    const userGeolocation = inject('geolocation')
    return {
      userLocation,
      userGeolocation
    }
  }
}
</script>
First we import the inject function into our MyMarker component. Then, inside our setup function, we assign the first provide function with a property name 'location' to the userLocation variable. We also provide an optional default fallback value, 'The Universe'.
Next, we assign the second provide function with a property name of 'geolocation' to the userGeoLocation variable. We return both the userLocation and userGeoLocation variables, after which we are free to use their values anywhere in the MyMarker component.
Making the provide/inject pair reactive
Sadly, straight out the box, the provide/inject pair is not reactive. Thankfully, there is a way to go about making this happen by using either the ref or reactive function provided by the Vue API.
We first have to import them from vue, then we invoke the ref or reactive function. We’ll set its parameters to be the value(s) we want to pass to the desired child component and store the function in a variable. We then invoke the provide function and pass the injection key and its value.
Now, if anything changes in either property, the MyMarker component will automatically be updated as well!
We can now update our code as follows:
<!-- src/components/MyMap.vue -->
<template>
  <MyMarker />
</template>
<script>
import { provide, reactive, ref } from 'vue'
import MyMarker from './MyMarker.vue'
export default {
  components: {
    MyMarker
  },
  setup() {
    const location = ref('North Pole')
    const geolocation = reactive({
      longitude: 90,
      latitude: 135
    })
    provide('location', location)
    provide('geolocation', geolocation)
  }
}
</script>
After importing the ref and reactive functions, we invoke the ref function and give it a parameter (the value 'North Pole') and then assign the ref function to the location variable.
For the reactive function, we invoke it and pass it as a parameter in the form of an object. Then we assign the reactive function to the geolocation variable. After we’ve done this, we can call the provide function and pass it the property name and the value of the data we want to pass down.
In the first provide function, we set the injection key to 'location' and set its value equal to location, which is the value we assigned to the ref function.
More great articles from LogRocket:
- Don't miss a moment with The Replay, a curated newsletter from LogRocket
- Learn how LogRocket's Galileo cuts through the noise to proactively resolve issues in your app
- Use React's useEffect to optimize your application's performance
- Switch between multiple versions of Node
- Discover how to use the React children prop with TypeScript
- Explore creating a custom mouse cursor with CSS
- Advisory boards aren’t just for executives. Join LogRocket’s Content Advisory Board. You’ll help inform the type of content we create and get access to exclusive meetups, social accreditation, and swag.
While in the second provide function, we set its property name to 'geolocation' and its value equal to geolocation, which is the value we assigned to the reactive function.
Advanced use cases
Beyond simple data sharing, provide/inject can be used in several advanced scenarios to solve complex component interactions. Here are some advanced use cases:
Dependency injection patterns
These are techniques used in managing dependencies in vue applications using the provide/inject function pairs while avoiding pain points such as tightly coupled components. One such pattern is dependency injection for services.
Dependency injection for services is a technique of sharing services or utilities across multiple components without tightly coupling them to the service’s implementation. For instance, suppose we have a logging service that we want to inject into multiple components:
// Logger service
class Logger {
  log(message) {
    console.log(`[LOG]: ${message}`);
  }
}
With provide/inject, we can decouple the components from the logger service implementation while retaining the reusability of the components:
// Provide the logger service
provide('logger', new Logger());
// Inject the service
const logger = inject('logger');
logger.log('This is a log message');
Dynamic Injection with Symbols
When working in a large project, creating multiple provide and inject functions is inevitable, which increases the risk of key collision due to accidental overrides and conflicts when naming keys. However, this can be avoided with the use of symbols.
With symbols, you can create unique identifiers that make keys more explicit about the intended purpose of the provided value and reduce the risk of name collision.
To use symbols, first, create a symbol and provide a value in the provider component (parent):
import { Symbol } from 'vue'
const themes = Symbol('theme');
provide(themes, {
  color: 'blue',
  fontSize: '14px'
});
Then, inject the value in the injector component (child):
const theme = inject(themes);
console.log(theme) // outputs "theme"
As you can tell from the example above, symbols require declaring extra variables, which can easily lead to component bloat and maintenance issues. Luckily, we can create a separate utility javascript file that contains and exports all the keys needed throughout the application and dynamically use them in provider and injector components.
// keys.js
export const userFirstName = Symbol();
export const userLastName = Symbol();
export const userFullName = Symbol();
export const userAge = Symbol();
export const userTitle = Symbol();
export const userDescription = Symbol();
These keys can then be dynamically imported and used within the provider and injector components:
// provider component
import { userFirstName } from './keys.js'
provide(userFirstName, 'Luca');
// injector component
import { userFirstName } from './keys.js';
const firstName = inject(userFirstName);
console.log(firstName); // outputs 'Luca'
Plugin-like architecture
Given the provide/inject mechanism’s loosely coupled nature, we can use the function pairs to create a plugin-like system where components can register themselves to a parent or global context. A good example would be a notification system where components can register to a global notification center:
// provider component
provide('notify', (message) => {
  notificationCenter.add(message);
});
Then, inject a notify function that sends a message to the notification center similar to how plugins work:
// injector component
const notify = inject('notify');
notify('New message received');
Simplifying tests with provide/inject
Using provide and inject can significantly simplify testing in Vue applications, especially when you need to mock certain dependencies. Injecting mocked dependencies, state, or services can let you isolate components under test and control the behavior of its dependencies.
For example, if we have want to test our previous Logger service example in isolation:
// LoggerService.js
export class LoggerService {
  log(message) {
    console.log(message);
  }
}
// MyComponent.vue
<template>
  <div>{{ message }}</div>
</template>
<script>
export default {
  setup() {
    const logger = inject('logger');
    const message = 'Hello, World!';
    logger.log(message);
    return { message };
  }
};
</script>
We can inject a mock version of the LoggerService class instead of the real one, like so:
import { mount } from '@vue/test-utils';
import MyComponent from '@/components/MyComponent.vue';
test('logs the message on creation', () => {
  const mockLogger = {
    log: jest.fn(), // Mock the log function
  };
  const wrapper = mount(MyComponent, {
    global: {
      provide: {
        logger: mockLogger, // Inject the mock logger
      },
    },
  });
  expect(mockLogger.log).toHaveBeenCalledWith('Hello, World!');
});
With this approach, you can focus on testing the component’s behavior without worrying about the implementation details of the LoggerService class.
Controlling test environment
Another way to simplify testing is to create a controlled and predictable environment where components can be isolated and focus on its behavior without interfering with external factors.
A good example for this is determining whether a user is logged in, and in components, that depends on an authentication service:
// AuthService
export class AuthService {
  isAuthenticated() {
    return true; // Actual implementation
  }
}
// MyComponent
<template>
  <div v-if="isLoggedIn">Welcome back!</div>
  <div v-else>Please log in.</div>
</template>
<script>
export default {
  setup() {
    const auth = inject('auth');
    const isLoggedIn = auth.isAuthenticated();
    return { isLoggedIn };
  }
};
</script>
We can easily control the authentication state by injecting a mock AuthService:
import { mount } from '@vue/test-utils';
import MyComponent from '@/components/MyComponent.vue';
test('shows login prompt when user is not authenticated', () => {
  const mockAuth = {
    isAuthenticated: jest.fn().mockReturnValue(false), // Mock the auth service to simulate unauthenticated state
  };
  const wrapper = mount(MyComponent, {
    global: {
      provide: {
        auth: mockAuth, // Inject the mock auth service
      },
    },
  });
  expect(wrapper.text()).toContain('Please log in.');
});
test('welcomes the user when authenticated', () => {
  const mockAuth = {
    isAuthenticated: jest.fn().mockReturnValue(true),
  };
  const wrapper = mount(MyComponent, {
    global: {
      provide: {
        auth: mockAuth,
      },
    },
  });
  expect(wrapper.text()).toContain('Welcome back!');
});
This makes it simple to test different scenarios, in this case Authenticated and Unauthenticated, without changing the actual component code.
Pain points and how to avoid them
Like every other tool out there, the provide/inject function pair is not without its shortcomings. There are several pain points and potential drawbacks you can encounter while working with them.
Implicit dependency
The provide/inject mechanism can create hidden or hard-to-track dependencies which makes it harder to track which component relies on which data. This can lead to issues where it is unclear whether certain data is available or missing in a component, making the codebase harder to maintain, especially in large projects.
Solution:
Document the provide/inject relationships in your components and make sure to use clear and consistent naming conventions for provided keys to make it obvious what is being injected.
Limited debugging and tooling support
Debugging issues related to provide/inject can be challenging because the data flow is less linear than with props. Unlike props, injected values are not easily inspectable in development tools like Vue’s dev tool. This can lead to longer debugging sessions when trying to track down which data isn’t available in a particular component.
Solution:
There isn’t a written rule on how to debug provide/inject related issues. How you go about this will depend entirely on how frequently you use the function pairs. One way to avoid or lessen the need to debug is to temporarily log the injected values to ensure they are what’s expected.
Tightly coupled components
The provide/inject mechanism aimed to fix the issue of component coupling, which is a situation where components are heavily dependent on each other in a way that makes them difficult to modify or reuse. Ironically, the function pair can introduce a new form of coupling when components become heavily reliant on injected values.
This can make it challenging to reuse such components in different contexts where those values are not provided, ultimately reducing the reusability of components and making refactoring challenging.
Solution:
Avoid injecting highly specific data that makes the child components less reusable, and make sure to inject abstract services or interfaces instead of base implementations.
Unclear data flow
The data flow with provide/inject is less explicit compared to props. When data is passed through props, it is clear in the component’s interface what it expects and where its coming from. With provide/inject, this relationship is hidden, making the component’s architecture harder to reason about and to trace data origins.
Solution:
Use descriptive and self-explanatory keys for injected values to make what they represent is clear. Additionally, instead of injecting individual values, consider injecting a context object that groups related dependencies together.
When to use the provide inject function pair
The primary determinant for using the provide/inject mechanism is the simplicity or complexity of your application. The provide and inject function pair is the gray area between using props for small applications and adopting a state management tool for large, complex ones.
Here is a list of indicators for when to use the provide and inject function pairs:
- If the app has a fairly simple state and using Vuex would be overkill
- If your application has too many component levels, and the components in between don’t use the data before it’s passed to the desired component
- If the data is only used by a few components. But if the data will be used by many more components, Vuex would be a better solution
Conclusion
We’ve learned how to use the provide inject function pair to pass data between deeply nested components in Vue.js 3 with the Composition API. We’ve covered how to make it reactive and also the different use cases for when you should use it. To learn more about the provide inject function pair, visit the official documentation.