The many JavaScript runtimes available to us today all have unique features and advantages. Deno distinguishes itself with its prioritization of security. If security is a critical runtime feature you need for your project, Deno could be the right JavaScript runtime for you.

In this adoption guide, we’ll discuss everything you need to know about Deno, including reasons to use it, cases where it might not be ideal, how it compares to its predecessor Node, and more. Let’s jump right in.
What is Deno?
During JSConf EU 2018, Ryal Dahl, the creator of Node.js, expressed some of his regrets regarding several of its original design decisions. He took the opportunity to introduce Deno, a runtime tool he built to address his regrets with Node.
Dahl’s main concerns when developing Deno were:
- Omitting promises in API design
- Utilizing the outdated GYP build system
- Implementing
node_modulesandpackage.jsonfiles - Excluding file extensions in imports.
- Using a non-standard module resolution system that automatically includes
index.js - Compromising the V8 engine’s sandboxed security
He originally developed Deno in Go, which utilized Protocol Buffers to manage communication between the secure Go environment, which had system call access, and the V8 engine.
Due to the inefficiencies of managing two runtimes and additional garbage collection demands, Dahl switched from using Go to Rust and released its first known version on 23 August 2018.
How Deno works
Runtime environments are the backbone and support system for executing applications across various platforms and devices, from cloud-based servers to personal computers and mobile devices.
In this context, Deno is a JavaScript, TypeScript, and WebAssembly runtime. which over time has evolved on several modern technologies that enhance its security and developer performance. Below is a very brief breakdown of how it works. We’ll take a closer look later on in this article:
- V8 engine — The same engine that powers Google Chrome and Node JS, happens to power Deno. This engine is responsible for code execution
- Rust — For the sake of some security concerns associated with memory management and safety, Deno picked Rust over C++ which was used in Node.js
- TypeScript — Deno has an inbuilt supports TypeScript support, which handles the TypeScript compilation automatically, making the development process clean
- Tokio — Tokio is used for tasks like reading files or network calls, which allows Deno to handle many operations asynchronously
Getting started with Deno
For this quickstart guide to getting started with Deno, we’ll go over three key steps:
Let’s get into it.
Installing Deno
You can install Deno on either Mac, Windows, or Linux using the following easy commands.
On macOS devices, use this shell command:
curl -fsSL https://deno.land/install.sh | shOn Windows devices, use the PowerShell program:
irm https://deno.land/install.ps1 | iexOn Linux devices, use this shell command:
curl -fsSL https://deno.land/install.sh | shThere are other options to explore for installation; you can look at the Deno docs to check them out.
For the sake of this guide, I will be using PowerShell to install Deno. To follow along with me, run the command above and wait for it to install. This should take a few minutes.
When you are done installing, you should see something like this image below:
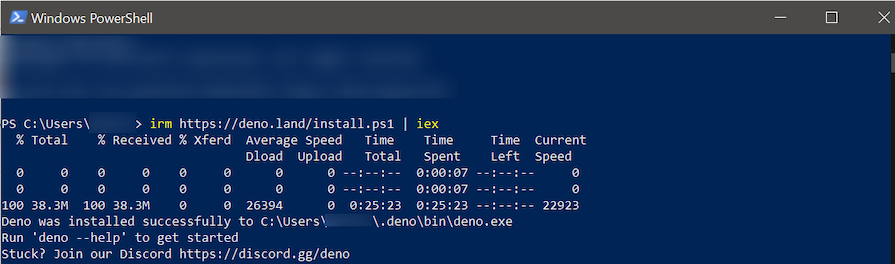
Afterward, run the deno --version command to be sure it was successfully installed. If it correctly prints the Deno version, then it was successfully installed
Setting up your development environment
Open your code editor. I’ll be using VS Code, but Deno has extensions for different IDEs if you’d prefer to use a different one. The Deno extension for VS Code ensures:
- Dynamic code analysis for both JavaScript and TypeScript, featuring auto-corrections, detailed tooltips, and advanced code completion features
- Synchronization with your local Deno CLI version to maintain consistency across your development environment
- Effective caching of externally sourced modules using Deno CLI’s strategy for module resolution
- Real-time code diagnostics and informational tooltips through Deno CLI’s linting tools
- Code adherence to standardized styling with Deno CLI’s code formatting tools
- Support for the use of import maps and TypeScript config files in conjunction with the Deno CLI settings
- Easy coding with smart suggestions for import statements
- Configuration options are specific to individual workspace folders
- Direct access to test suites through enhanced testing interfaces
- Customizable task configurations through the Deno CLI
Generally speaking, VS Code’s Deno extension gives developers a better development environment. To install it, go to the extensions marketplace in VS Code and search for Deno, click install.
You can also enable or disable the extension in your settings. It’s not a good practice to enable it globally — unless, of course, you only edit Deno projects with VS Code.
Running a simple Hello World script
Lastly, to see how Deno works, we will run a simple Hello World script:
interface Person {
    firstName: string;
    lastName: string;
    fullName?: () => string;  // Optional method to get full name
  }
  function greet(person: Person): string {
    // If fullName method exists, use it; otherwise, use firstName for greeting
    const nameToUse = person.fullName ? person.fullName() : person.firstName;
    return `Hello, ${nameToUse}!`;
  }
  const Logrocket: Person = {
    firstName: "Logrocket",
    lastName: "Developer Blog",
    fullName: function() {  // Implementing the fullName method
      return `${this.firstName} ${this.lastName}`;
    }
  };
  console.log(greet(Logrocket));
To run this script, use the deno run hello.ts command. The result should look like so:

Key Deno features you need to know
Deno provides unique inbuilt features that add a lot of value and, in many ways, change the game for runtimes. Let’s talk about some of the standout features you should know about before diving into Deno.
Security and permissions
Deno’s topmost priority is its security. This makes it possible to run codes you may not trust with confidence because, by default, a program run with Deno has no file, network, or environment access unless you specifically enable it.
Deno security is enhanced by requiring explicit permission flags for accessing sensitive functionalities. These permissions include access to the environment, system information, high-resolution time, network, foreign function interfaces, and the file system.
It’s important to note that each permission can be specifically allowed or denied using flags. You can also specify lists of allowable or deniable entities, like specific environment variables, system APIs, network addresses, or file paths.
This system allows for smooth control over what Deno scripts can and cannot do, substantially reducing the risk of security vulnerabilities. You can visit Deno’s Security and permissions documentation for more detailed information regarding all the available permissions and flags.
Below is a basic example of how to use Deno permission flags when running a script. This example demonstrates how to run a Deno script that requires network access to a specific domain:
deno run --allow-net=Logrocket.com script.tsIn this command, --allow-net=Logrocket.com is the permission flag that allows the script network access only to Logrocket.com. This specific flag restricts network requests to the specified domain, enhancing security by limiting the script’s ability to interact with other internet resources.
For broader access, you could modify the flag to allow all domains, like this:
deno run --allow-net script.tsThis command grants the script unrestricted network access. Deno’s permissions flags are versatile and designed to provide smooth control over what a script can do, tailoring access as needed for different scenarios.
Further reading:
- What is Deno, and how is it different from Node.js?
- Deno Permissions Documentation
TypeScript support
Deno treats TypeScript as a first-class citizen, just like it treats JavaScript. It allows direct execution or importation of TypeScript files without additional installations beyond the Deno CLI.
To clarify a little further about how this works, keep in mind that Deno employs the TypeScript compiler and a Rust library to transform TypeScript into JavaScript, storing the transformed code in a cache to speed up future executions. At the same time, it supports JSX and TSX and enforces strict type-checking by default.
Deno’s approach ensures efficient handling and clear distinctions between file types based on extensions or media types.
Further reading:
- Deno’s TypeScript support
- Understanding Deno’s file system
ES modules, standard modules
Deno standardizes module handling using the ECMAScript modules system for both JavaScript and TypeScript. One of Deno’s special features is its ability to import modules directly from URLs or local paths, with explicit file extensions required, which eliminates the traditional node_modules approach.
Deno caches imported modules for performance, supports import maps for aliasing, and utilizes permissions for security. It works seamlessly with both local and remote modules, ensuring a unified approach irrespective of the module’s origin.
Here’s an example demonstrating importing and using a local module in Deno:
// arithmetic.ts
export function add(a: number, b: number): number {
  return a + b;
}
export function multiply(a: number, b: number): number {
  return a * b;
}
// main.ts
import { add, multiply } from "./arithmetic.ts";
function totalCost(outbound: number, inbound: number, tax: number): number {
  return multiply(add(outbound, inbound), tax);
}
console.log(totalCost(10, 20, 1.5)); // Output: 45
Meanwhile, here’s how you can import a module directly from a URL in Deno:
// Importing a specific module directly from a URL
import { serve } from "https://deno.land/std/http/server.ts";
console.log("HTTP server module imported from Deno's standard library");
// Example of using the imported module
serve({ port: 8000 }).then(server => {
  console.log("Server running on port 8000");
});
Await syntax (without async function)
There is something in Deno called top-level await, which allows you to use the await keyword outside of asynchronous functions.
Some scripts perform asynchronous operations, such as fetching resources or waiting for timers. The top-level await feature simplifies this kind of script without wrapping them in async functions.
Here’s an example of using top-level await in Deno:
// Fetching JSON data from an API directly at the top level
const response = await fetch("https://api.example.com/data");
const data = await response.json();
console.log("Fetched data:", data);
Node and npm modules
Most likely, we’ll always want to utilize code and libraries that are built in Node. Deno goes a step further to offer tools for using Node and npm modules within its environment. This is facilitated through several methods, including npm: and node: specifiers, along with compatibility settings in the package.json file.
Additionally, developers can access npm modules via CDNs, simplifying the use of existing JavaScript libraries within Deno. This integration is part of an ongoing project, with some features still marked as unstable, requiring developers to opt-in for compatibility testing and use.
For more detailed information, visit the Deno manual on Node and npm modules.
Why choose Deno?
Hopefully, seeing Deno’s great built-in features has already given you plenty of reasons why Deno could be a good choice for you. If you need more convincing, let’s talk about some other reasons why you should use Deno.
Performance
Deno has a great performance history thanks to the usage of things like modern Rust for the runtime and the V8 engine for JavaScript execution. This influences both its security, efficiency and overall speed in the execution of scripts.
We ran a little speed test on how fast Deno executes scripts, and the results were mind-blowing. We used the hello.ts script above that returns Hello, Logrocket Developer Blog!. The test results are as follows:
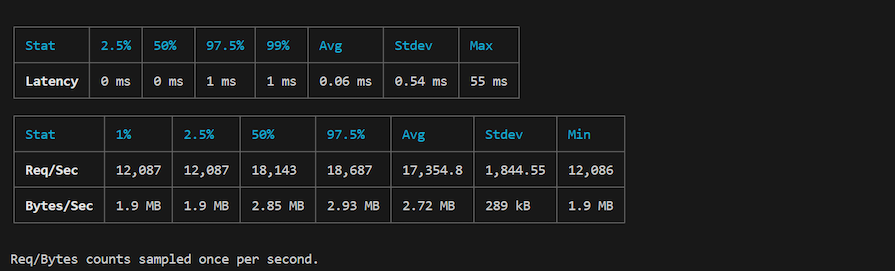
These performance metrics indicate that the Deno server is highly efficient and capable of handling a large number of requests with very low latency.
The consistent performance across different percentiles and the high average requests per second suggest that the server is well-suited for high-traffic applications. The low standard deviation in latency indicates stable and reliable performance.
The Deno docs also provide benchmarks you can check out to see how well it performs across a wider variety of metrics.
Ease of use / DX
Deno introduces top-tier features for a better developer experience. Three things that come to mind immediately:
- Use of very simplified dependency management with URL imports
- Secure-by-default approach requiring explicit permission for file, network, and environment access
- Inbuilt TypeScript support, eliminating the need for additional installation of tools
Community & ecosystem
Deno is a growing runtime, but it has quickly been adopted by the developer community. While it has fewer libraries compared to other runtimes (especially Node), with a community of over 4k users, 600+ contributors, and 93k stars on GitHub, you can count on good support for any features you need and questions or issues you might run into.
Learning curve/ documentation
Developers deeply integrated into the Node.js ecosystem may find it a bit challenging to shift to Deno. However, with the help of Deno’s well-detailed documentation, adding it to your next project will be a breeze, and its many excellent features will help get the job done faster.
Use cases for Deno
Deno’s use cases are many and varied. For example:
- API development — A good choice for building secure and scalable rest APIs due to its security model, TypeScript support, and general performance
- Cron jobs — Efficient for scheduling and running periodic tasks with its robust and secure runtime environment
- Full-stack development — Compatible with web standards and can run in both server and browser environments, making it ideal for full-stack development
- Simplified deployment — Has a secure and bundled execution environment
- Testing — Offers built-in testing API, facilitating comprehensive and maintainable tests
- Real-time needs — Bidirectional real-time communication using WebSockets
- Security via JWT — Secure applications by integrating JSON web tokens with Deno
There are many more use cases for Deno in your projects. You can check out some of LogRocket’s practical tutorials using Deno for some inspiration.
Further reading:
- How to create a REST API with Deno and Postgres
- Setting up cron jobs in Deno
- Ruck vs. Aleph.js for building React apps in Deno
- Exploring test-driven development methods in Deno
- Using WebSockets with Deno
- Using JSON web tokens in Deno
- Develop, test, and deploy Cloudflare Workers with Denoflare
- How to create a Deno plugin in Rust
Exploring Deno Deploy features and deployment options
A Deno overview is not complete until we talk about its great deployment features. Deno Deploy is a serverless platform that allows developers to deploy JavaScript and TypeScript applications globally with ease. It claims to offer super fast deployments, scaling to billions of requests monthly.
Deno Deploy offers a wide range of features:
- Global deployment: Deploy applications globally for low latency.
- Scalability: Automatically scales to handle billions of requests.
- Built-in APIs: Provides key/value databases and job queues.
- GitHub integration: Seamless CI/CD integration with GitHub.
- Framework support: Compatible with various frameworks and databases, including React, Fresh, Hono, Astro, Vue, express, Solid, and SvelteKit
- High performance: Utilizes V8 isolates for efficient execution
- Global redundancy: Ensures high availability and fault tolerance
- Edge computing: Runs code close to users for optimal performance
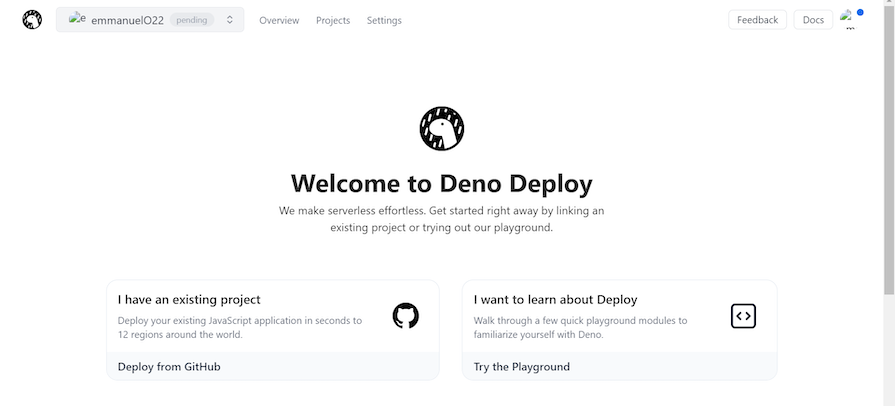
For the deployment itself, you have two options — Deploy from GitHub and Try the Playground:
Using Deno Deploy with GitHub offers a seamless and efficient workflow for deployment by pushing your application to GitHub and connecting it to Deno. Here’s a detailed approach:
- Push to GitHub — Begin by pushing your project repository to GitHub
- Connect to Deno Deploy — Link your GitHub repository to Deno Deploy. This connection ensures that every push to your GitHub repository triggers an automatic deployment
- Instant deployment — Once connected, Deno Deploy handles the rest, deploying your application almost instantaneously
This method leverages the integration between GitHub and Deno Deploy, offering developers a quick and straightforward way to get their applications live. For a detailed guide on this process, you can read more in the article on simpler project creation with Deno Deploy.
Deno vs. Node.js
Although Deno and Node share a common lineage, Deno distinguishes itself with several improved and evolving features. Below is a detailed comparison of these two JavaScript runtimes:
| Comparison | Deno | Node.js |
|---|---|---|
| Features | Deno is secure by default. It comes with built-in TypeScript support and a simplified module system. Deno provides a single executable with a standard library and uses async functions as default. | Node.js offers a much more mature ecosystem with an extensive package manager (npm), but It requires third-party support for TypeScript and uses a traditional module system. |
| Performance | Deno generally offers good performance, comparable to Node.js. Its runtime is built on Rust and V8, which can provide efficiency. | Node.js has a mature and stable performance, optimized over years of development. It has broad support for various use cases, making it a reliable choice for heavy-performing applications. |
| Bundle size | Deno typically has a smaller bundle size due to its built-in tooling and single-executable nature, eliminating the need for external package managers. | Node.js tends to have a larger bundle size as it happens to rely on multiple dependencies and package managers. |
| Community | Deno has a growing community with increasing support. | Node.js has a large, established community with extensive resources, libraries, and tools. |
| Documentation/resources | Deno’s documentation is improving and the official documentation is comprehensive. Community resources are steadily growing. | Node.js has extensive documentation with a vast number of tutorials, guides, and community resources. |
This table should help you compare these two options at a glance and determine whether adopting Deno is the right choice for your needs.
Further reading:
- What is Deno, and how is it different from Node.js?
Conclusion
A runtime should not be chosen solely based on speed and benchmark results. While both Deno offers great performance and unique strength, your decision should consider various factors such as security, ease of use, community support, documentation, and most especially the specific needs of your project.
Deno’s features and built-in TypeScript support make it an appealing choice for developers seeking a secure and streamlined development experience. On the other hand, if you’re seeking a mature ecosystem, extensive resources, and broad community support, it may be best to stick with Node at this point.
Ultimately, the best choice depends on your project’s requirements and your priorities as a developer.