Creating an ecommerce website involves handling a large amount of data that includes product images, descriptions, and prices. Manually fetching and integrating this data from external APIs can be time-consuming and error-prone. The difficulties include writing and maintaining code for the API requests, managing API endpoints, combining data from different sources, and ensuring seamless scalability and uniformity.
One solution to overcome these challenges is remote data fetching. Remote data fetching allows you to extract data from external sources such as APIs and seamlessly integrate them into your websites.
In this article, we will explore remote data fetching and Hygraph, a tool that makes use of remote data fetching to simplify content management in websites and applications. We will walk through the process of setting up Remote Sources in Hygraph, configuring fields to fetch information, and integrating this data into an Astro-based project to create a functional replica of Pexels, the stock photo platform.
Manually fetching data from external APIs
Fetching data from external APIs involves making an HTTP request to the endpoint to get images or metadata. For example, making a request to https://api.pexels.com/v1/search?query=nature will fetch images of nature. Here’s a simple example:
- We will send a request to the Pexels API endpoint with the query parameter (query=nature)
- We’ll receive the response and we need to parse the JSON to extract the image information we need (URLs and IDs)
- Then, we will use this image data in our app
This is simple enough for a small app but as the app grows, it becomes more complicated. The app can face scalability issues, data consistency when dealing with large datasets, maintenance challenges, and the complexity of handling different API endpoints, structures, and authentication mechanisms, all of which increase the risk of errors.
There’s a better way to do this. In this tutorial, we’ll see how a Headless CMS, Hygraph, can serve as a central hub for managing external data sources in a more manageable way.
Introducing Hygraph
Hygraph is a headless Content Management System (CMS) that acts as a GraphQL-native, API-first platform, offering a unique approach to data management and integration through its Content Federation capabilities and delivering it to any frontend platform via an API, offering flexibility in application design and development.
Hygraph supports both RESTful and GraphQL APIs. This removes the need to handle separate API calls with different structures by providing a unified API for various data structures. It offers a single, unified GraphQL endpoint that allows developers to query data from multiple sources, regardless of the original format. Hygraph automatically transforms these various structures into a common GraphQL schema, making data access easier for your application.
Hygraph has built-in caching, CDN integration, and great infrastructure for fast and reliable data delivery. It minimizes the latency and downtime when fetching data from multiple external APIs. It also has strong security features like API key management, OAuth, and role-based access control to secure data fetching and protect sensitive information.
Understanding Hygraph Remote Sources
Remote Sources is a Hygraph feature that is used to integrate data from other systems into your Hygraph project. For example, instead of manually adding product images, you can set up a Remote Source to retrieve images and related data directly from an external API, ensuring that your contents are managed in a centralized location and are always current and connected across your platform.
Remote Sources offers several advantages:
- Supports RESTful or GraphQL APIs for integration with various services
- Offers a user-friendly interface for configuring Remote Sources, which are accessible to developers with less coding experience
- Lets you combine your internal Hygraph content with external data
- Instead of managing data in multiple places, you can centralize access through Hygraph
Obtaining the Pexels API key
As we mentioned, the demo project for this tutorial will be a Pexels clone. To begin, we need to first obtain the API keys and endpoint from Pexels. Create a new account and copy the API endpoint and key from the dashboard. Keep them safe for authentication and data fetching to Hygraph later.
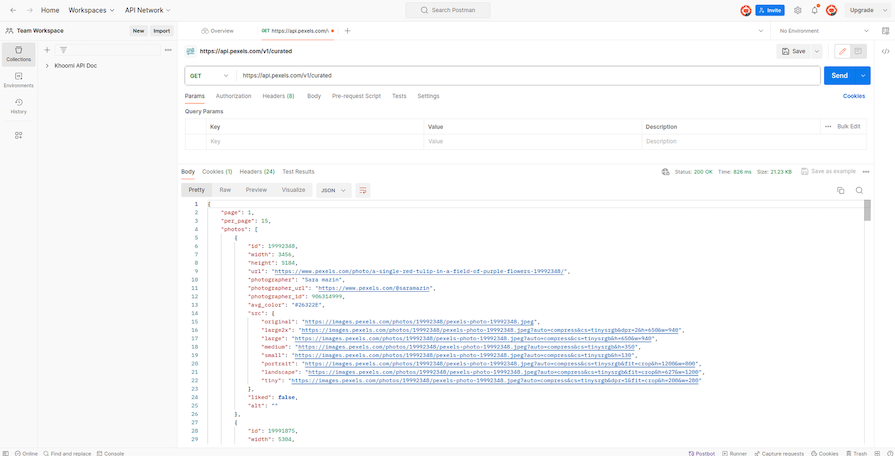
You can use Postman to make a request to the Pexels endpoint to see the data you are getting:
https://api.pexels.com/v1/curated
You should get a response similar to the image below:
The response above has to be converted into a Schema Definition Language (SDL) schema so that GraphQL can understand it. Convert the JSON response into an SDL, using JSON to SDL converter. Then, copy and paste the response from Postman.
Rename the AutogeneratedMainType type to PhotosResult and the photos type to Photo. This will improve the readability of your schema.
The following should be the final SDL schema:
type Src {
  original: String
  large2x: String
  large: String
  medium: String
  small: String
  portrait: String
  landscape: String
  tiny: String
}
type Photo {
  id: Int
  width: Int
  height: Int
  url: String
  photographer: String
  photographer_url: String
  photographer_id: Int
  avg_color: String
  liked: Boolean
  alt: String
  src: Src
}
type PhotosResult {
  page: Int
  per_page: Int
  total_results: Int
  next_page: String
  photos: [Photo]
}
We also want to be able to search for photos; Pexels provides another endpoint to get search identifiers. Repeat the Postman procedure above using https://api.pexels.com/v1/search?query=sport to see the response. The data format is the same as the one above, so there is no need to convert the JSON into an SDL. Also, because both endpoints share the same base URL, we won’t need to create a new Remote Source.
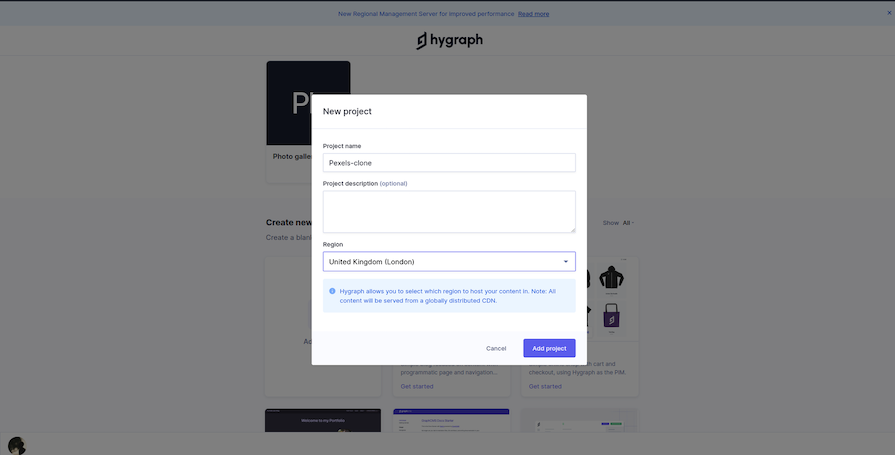
Using Hygraph to integrate external data
To start integrating external data, we’ll first visit the Hygraph website and sign up. After signing up, create a new project and fill out the form with the project name, description, and data storage region:
Adding and configuring Remote Sources
Hygraph’s Content Federation feature allows users to integrate external data sources into their account, allowing easy access to all data from a single GraphQL endpoint. This section demonstrates integrating the Pexels data source to access data from the Hygraph endpoint.
To do this, click Schema > REMOTE SOURCES > Add, fill in basic details like the name and description of the Remote Source, choose the type of source REST, and add the base URL of the Pexels endpoint: https://api.pexels.com/v1. In Headers, add the authorization key and API_KEY value. This will allow administrators to retrieve all data available in Pexels from the GraphQL endpoint.
In the Custom type definition section, add the schemas generated above:
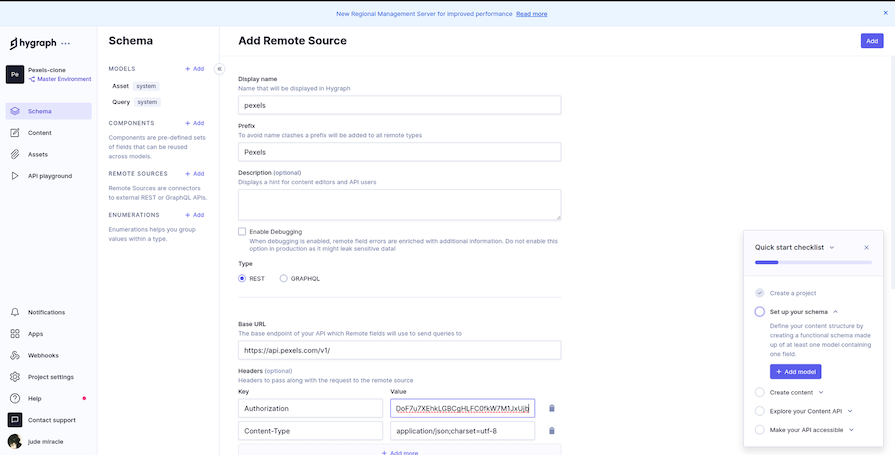
Replace API_KEY with the key you obtained from the Pexels dashboard.
Click Add, and your Remote Source is ready.
Creating and managing models in Hygraph
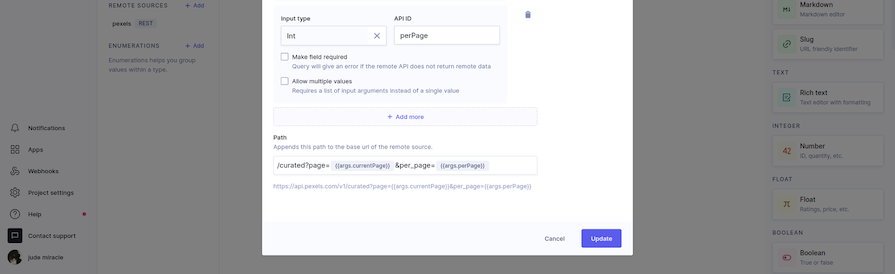
Models are the foundation for the data, and they define what’s inside. To create a remote source model in Hygraph, navigate to Schema > MODELS and click Add. Fill in the name of the model, pexels-photo, and save.
This model will hold the photo details received from the API. On the right pane of your screen, scroll down and choose the REST option from the model’s sidebar and give it a suitable name, such as photos. Add details about the endpoint, including the method GET and return type PhotosResult. Also, fill out the input argument section.
The form should look like the following images:
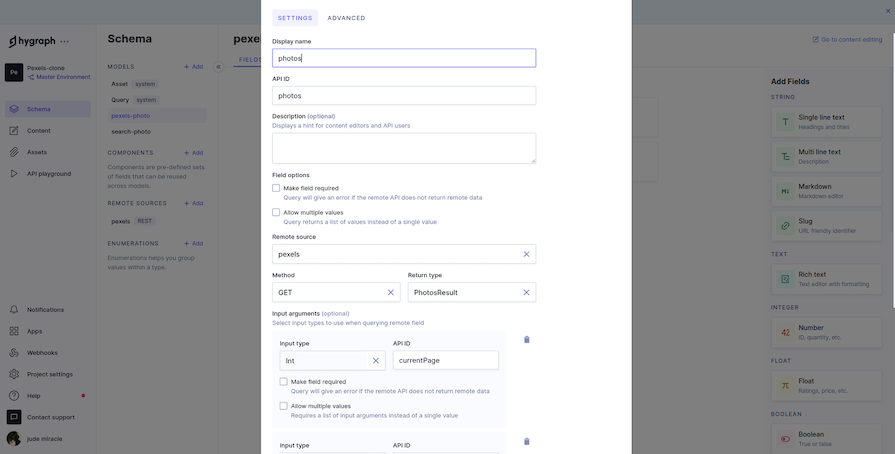
Finally, create a text field with a single line and call it desc. The dashboard of your model should look like this image:

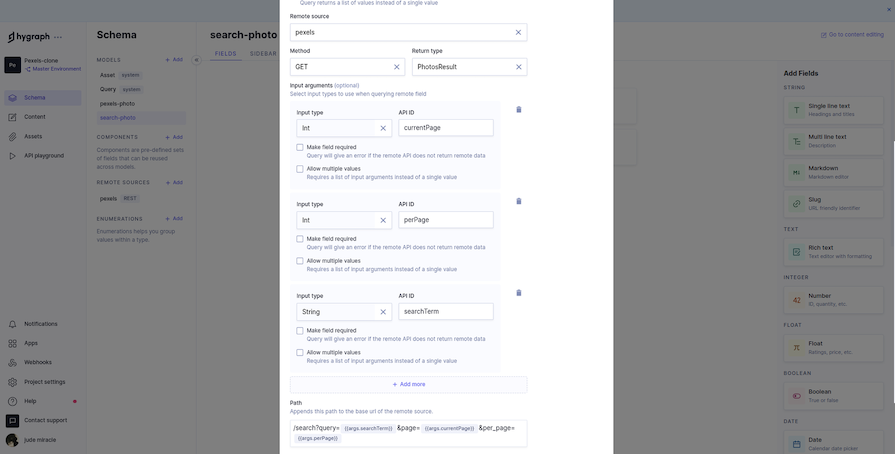
The same can be done for our search data model:
Adding content
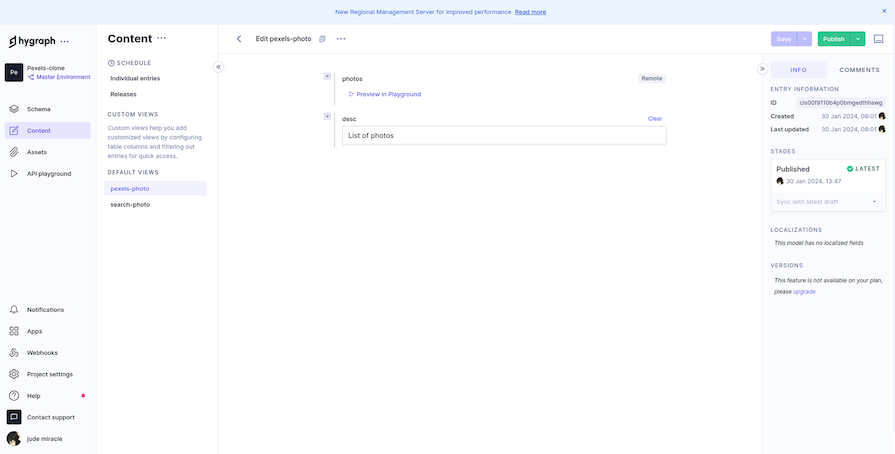
Now that the data models of the app are ready to use, we will add content to them from the Hygraph content menu so we can display them to your users.
On the left pane, select the Content tab. Your models should be visible in the DEFAULT VIEWS section. Select pexels-photo, followed by the ADD ENTRY button on the top right. Fill in the desc field, and click Save & Publish. Repeat this process for the search photo as well:
Hygraph provides an API Playground where we can test out API calls by experimenting with querying and mutating data. You can test it out by navigating to the API playground tab.
Setting Hygraph permissions
Now let’s set up Hygraph permissions to access the data in your application.
Hygraph provides the necessary endpoints, but they are inaccessible by default unless sufficient permissions are provided. To make the endpoints accessible, click on Project Settings > ACCESS > API Access > Permanent Auth Tokens and click on Add Token. Give your token a name and click Add & configure permissions. This will create an authenticated token for you:

Copy the token and keep it somewhere safe. We will need it to authenticate and fetch data to our frontend later.
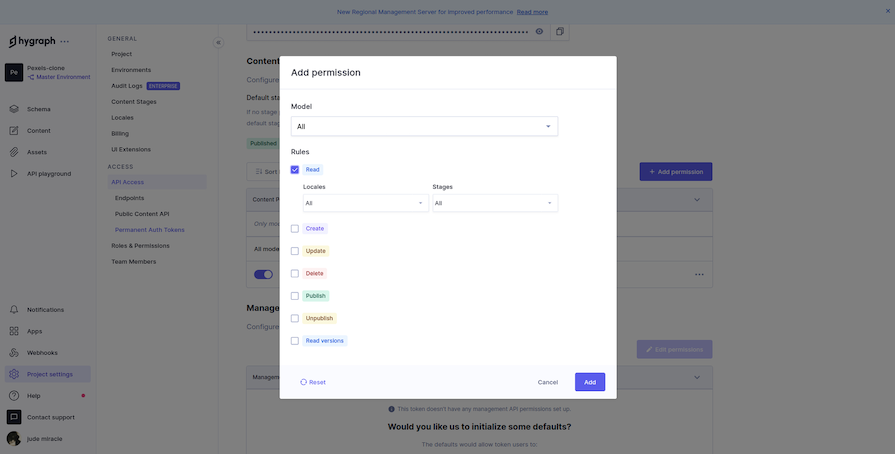
The Content API endpoint is the primary method for accessing the data. Go to the Content API section and click Add Permission. Select the Read permission, as shown below, and save:
Hooray! We have completed our Hygraph setup. Let’s move on to developing our frontend using Astro and fetching our data from Hygraph.
Building the frontend with Astro
In this section, we will create our Pexel clone application using the data obtained from Hygraph. If you’re already comfortable with Astro, go to GitHub and grab the code. Open the terminal, run the following command, and select the template you need:
npm create astro@latest
Before building our application, create a .env file in our root folder and paste it into your Hygraph API endpoint and the permanent auth token:
PUBLIC_HYGRAPH_PERMANENTAUTH_TOKEN="your auth token"
PUBLIC_HYGRAPH_ENDPOINT="your public content endpoint"
Swap out HYGRAPH_PERMANENT_AUTH_TOKEN and HYGRAPH_PUBLIC_CONTENT_ENDPOINT for the tokens from your Hygraph dashboard.
Building our application UI
At a basic level, your Pexels clone app needs a navigation bar, a hero section, and the ability to display cards representing photos. You can create a basic navigation component and display it on all pages using Layout.astro inside the layouts folder. Update the layouts/Layout.astro file by adding the following code to it:
<! --- components/Layout.astro --->
---
import Navbar from "../components/Navbar.astro"
interface Props {
    title: string;
}
const { title } = Astro.props;
---
<!doctype html>
<html lang="en">
  <head>
    <meta charset="UTF-8" />
    <meta name="description" content="Astro description" />
    <meta name="viewport" content="width=device-width" />
    <link rel="icon" type="image/svg+xml" href="/favicon.svg" />
    <meta name="generator" content={Astro.generator} />
    <link rel="stylesheet" href="https://unicons.iconscout.com/release-pro/v4.0.0/css/solid.css">
    <title>{title}</title>
  </head>
  <body>
    <Navbar />
    <slot />
  </body>
</html>
The code above is straightforward. It renders the imported Navbar and slot components. The slot component is a placeholder where content from other components or nested Astro content can be inserted. We will not cover the styles in this article; you can grab them from the GitHub repo.
Inside the components folder, create a new file, Navbar.astro, and add the following code:
<! --- components/Navbar.astro --->
---
import Searchbar from "./SearchBar"
import "./Navbar.css"
---
<nav class="navbar">
    <div class="container">
        <div class="left">
            <a href="/" class="logo-wrapper">
                <img
                    class="Logo"
                    src={"/assets/logo.svg"}
                    alt="logo"
                />
                <h2>Pexels-Clone</h2>
            </a>
            <Searchbar
                client:load
            />
        </div>
        <div class="right">
            <div class="dropdown">
                <p class="dropbtn">Explore</p>
                <div class="dropdown-content">
                    <a href="#">Discover Photos</a>
                    <a href="#">Popular Searches</a>
                    <a href="#">Free Videos</a>
                    <a href="#">Free Videos</a>
                </div>
            </div>
            <p>License</p>
            <button class="join">Join</button>
        </div>
    </div>
</nav>
You will notice that in Navbar.astro, we have a SearchBar component. We want to reuse the SearchBar component for our hero section as well.
Create a SearchBar.tsx file inside the components folder and add the following code:
// components/SearchBar.tsx
import { navigate } from "astro:transitions/client";
import React, { useState } from "react";
import "./SearchBar.css";
function Searchbar() {
  return (
    <form>
      <div className="search-box">
        <input
          type="text"
          name="searchTerm"
          aria-label="search-img"
          placeholder="Search for free photos"
        />
        <button type="submit">
          <i className="uis uis-search"></i>
        </button>
      </div>
    </form>
  );
}
export default Searchbar;
If you try to run the server, you’ll get an error because React has not been configured in the project. Run the command below to add React:
npx astro add react
After running the command on your terminal, Astro will update your configuration file and install any necessary dependencies.
Creating a homepage and displaying our data
Now create a Card.tsx component file in the components directory to display data about the photos from Hygraph:
// components/Card.tsx
import { useState } from "react";
type TProps = {
  src: string,
  alt: string,
  photographer: string,
  original?: string,
};
const Card = ({ src, photographer, alt, original }: TProps) => {
  return (
    <>
      <li className="card">
        <img src={src} alt={alt} />
        <div className="details">
          <div className="photographer">
            <i className="uis uis-camera"></i>
            <span>{photographer}</span>
          </div>
          <button>
            <span>Download</span>
            <i className="uis uis-import"></i>
          </button>
        </div>
      </li>
    </>
  );
};
export default Card;
On the main index.astro page inside the pages directory, you will be connecting to the Hygraph API and mapping the Photos objects to Card components.
To fetch our data from the backend, you will send a POST request to Hygraph using the fetch function:
<!--- pages/index.astro --->
---
import Card from "../components/Card";
import Layout from "../layouts/Layout.astro";
import type { Photo } from "../types/index";
import Hero from "../components/Hero.astro";
const response = await fetch(import.meta.env.PUBLIC_HYGRAPH_ENDPOINT, {
  method: "POST",
  headers: {
    "Content-Type": "application/json",
    Accept: "application/json",
    Authorization: `Bearer ${import.meta.env.PUBLIC_HYGRAPH_PERMANENTAUTH_TOKEN}`,
  },
  body: JSON.stringify({
    query: `
            query Pexels($perPage: Int) {
              pexelsPhotos {
                photos(perPage: $perPage) {
                  photos {
                    id
                    alt
                    photographer
                    src {
                      large2x
                      original
                    }
                  }
                }
              }
            }
        `,
    variables: { perPage: 9 },
  }),
});
const data = await response.json();
const results = data?.data?.pexelsPhotos;
---
<Layout title="Hygraph Pexels Clone">
  <Hero />
  <main class="container">
    <section class="gallery">
      {results.map((result: any) => (
      <ul class="images">
        {result.photos.photos.map((photo: Photo) => (
        <Card
          alt="{photo.alt}"
          photographer="{photo.photographer}"
          src="{photo.src.large2x}"
          original="{photo.src.original}"
          client:idle
        />
        ))}
      </ul>
      ))}
      <a href="/photos" class="load-more" style="text-decoration: none"
        >Show More</a
      >
    </section>
  </main>
</Layout>
The code above defines a query to fetch photos from Hygraph. It uses the fetch API to make a POST request to the Hygraph endpoint after setting headers and the query document in the body, extracting relevant information such as alt text, photographer name, and image source from the response, and will display nine photos on our homepage.
You might have noticed the prop client:idle that was passed to the search component. Astro provides a few directives that are used to control the loading and execution of components into the DOM. Here, the client:idle is used to tell Astro to wait until the browser is idle before downloading and initializing the JavaScript associated with the component. This can be a powerful tool for optimizing website performance.
Inside the components directory, create a Hero.astro file and add the following code:
<! --- components/Hero.astro --->
---
import Searchbar from "./SearchBar"
---
<header class="search">
  <img
    src="https://images.pexels.com/photos/1629236/pexels-photo-1629236.jpeg?auto=compress&cs=tinysrgb&w=600"
    alt="search-img"
  />
  <div class="content">
    <h1>Pexel Clone Photos Gallery with Astro</h1>
    <p>Search, preview and download any images within a second</p>
    <div class="header-search">
      <Searchbar client:idle />
    </div>
  </div>
</header>
This is what the image directory will look like:
Integrating search functionality
Next, we want to add a search query to our application so that users will be able to search for different photos.
Navigate to components/SearchBar.tsx and update it with the code below:
// components/SearchBar.tsx
import { navigate } from "astro:transitions/client";
import React, { useState } from "react";
import "./SearchBar.css";
function Searchbar() {
  const [searchTerm, setSearchTerm] = useState<string>("");
  const handleChange = (event: React.ChangeEvent<HTMLInputElement>) => {
    setSearchTerm(event.target.value);
  };
  const handleSubmit = (event: React.FormEvent<HTMLFormElement>) => {
    event.preventDefault();
    if (searchTerm.trim()) {
      navigate(`/search/${searchTerm}`, history);
    } else {
      window.alert("input a text");
    }
  };
  return (
    <form onSubmit={handleSubmit}>
      <div className="search-box">
        <input
          type="text"
          name="searchTerm"
          aria-label="search-img"
          placeholder="Search for free photos"
          value={searchTerm}
          onChange={handleChange}
        />
        <button type="submit">
          <i className="uis uis-search"></i>
        </button>
      </div>
    </form>
  );
}
export default Searchbar;
Now if we search for a photo, nothing will happen. First, we need to create the corresponding dynamic route path in the pages directory. Inside the pages directory, create a search/[searchTerm].astro file and add the following code:
<!--- search/[searchTerm].astro --->
---
import Layout from "../../layouts/Layout.astro";
import Card from "../../components/Card";
import type { Photo } from "../../types";
const { searchTerm } = Astro.params;
const data = await fetch(import.meta.env.PUBLIC_HYGRAPH_ENDPOINT, {
  method: "POST",
  headers: {
    "Content-Type": "application/json",
    Accept: "application/json",
    Authorization: `Bearer ${import.meta.env.PUBLIC_HYGRAPH_PERMANENTAUTH_TOKEN}`,
  },
  body: JSON.stringify({
    query: `
        query pexels($searchTerm: String) {
          searchPhotos {
            search(searchTerm: $searchTerm) {
              photos {
                photographer
                id
                alt
                src {
                  large2x
                  original
                }
              }
            }
          }
        }
      `,
    variables: { searchTerm },
  }),
}).then((response) => response.json());
const results = data?.data?.searchPhotos;
---
<Layout title="`Search" Results for ${searchTerm}`>
  <div style="margin: 2rem auto; max-width: 90%; width: 100%">
    <h1>free {searchTerm}s photos</h1>
    <section class="gallery">
      {results.map((result: any) => (
      <ul class="images">
        {result.search.photos.map((photo: Photo) => (
        <Card
          alt="{photo.alt}"
          photographer="{photo.photographer}"
          src="{photo.src.large2x}"
          original="{photo.src.original}"
          client:idle
        />
        ))}
      </ul>
      ))}
    </section>
  </div>
</Layout>
Now, when you run the server, you’ll encounter the following error:
getStaticPaths()function is required for dynamic routes. Make sure that you export agetStaticPathsfunction from your dynamic route.
This is because, in Astro, if a page uses dynamic params in the filename ([searchTerm]), that component is required to export a getStaticPaths() function. Because Astro is a static site builder, it ensures that your entire site is built ahead of time.
Now that we know getStaticPaths is required on every dynamic page, we need a way to make it optional because we are getting the value based on what the user searched for before building the page.
Luckily, Astro provides us with on-demand rendering modes (server and hybrid) that enable pre-rendering individual routes. This benefits the performance of static sites and dynamic applications, especially for routes that require on-demand rendering. Read more on the Astro on-demand rendering output modes here.
Now navigate to your astro.config.mjs file and switch to hybrid rendering mode:
// astro.config.mjs
import { defineConfig } from "astro/config";
import react from "@astrojs/react";
// https://astro.build/config
export default defineConfig({
  output: "hybrid",
  integrations: [react()],
  images: {
    domains: ["media.graphassets.com"],
  },
});
The default rendering mode in Astro is output: "static", which generates the HTML for all your page routes at build time. Using the hybrid rendering mode means that all pages in your src/pages directory will be pre-rendered to HTML during the build process, which creates static HTML files for the pages.
Also, add this line of code at the top of your [search term].astro file inside of the --- block:
// pages/search/[searchTerm].astro
export const prerender = false;
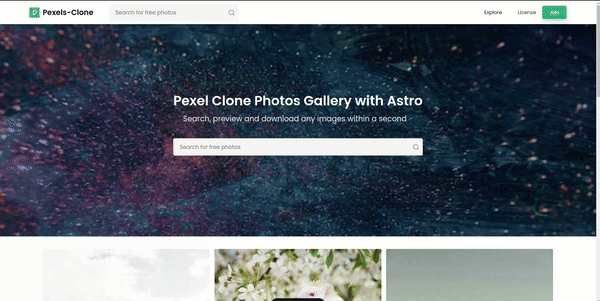
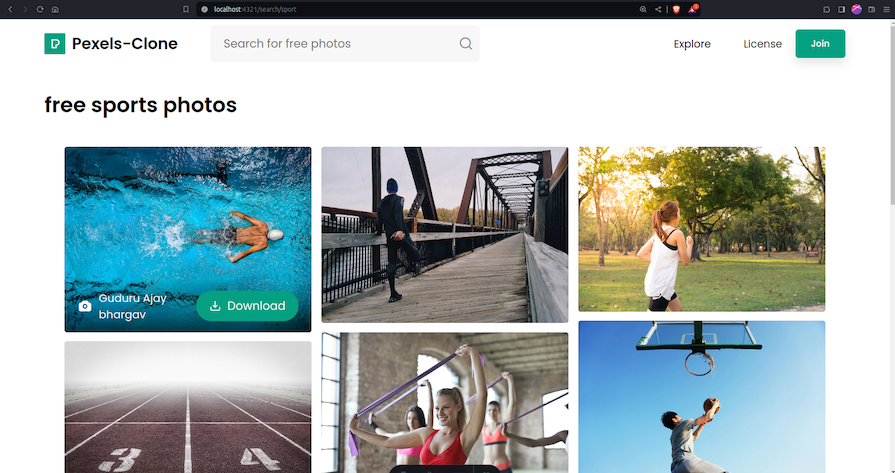
This makes the page server-rendered instead of static HTML, as it disables pre-rendering. Now rerun your development server and see the following result in your browser:
Conclusion
In this post, we looked at the challenges of manually fetching data from external APIs for websites and apps. We introduced the Hygraph CMS and how its remote data-fetching capabilities can help fetch data from external sources and manage it in a centralized location. We then walked through a practical example of setting up Hygraph with the Pexels API and an Astro project to build a working clone.
By using Hygraph Remote Sources and models, you can simplify data management, ensure content consistency, and build applications that integrate data from multiple sources. This saves development time and lets you focus on building a great user experience for your app.