
Asynchronous data mutation and handling is a necessary task in modern web applications. You may want to execute a standalone asynchronous function on the server to carryout tasks like saving data to the data store, sending emails, downloading PDFs, processing images, and so on.
Next.js provides us with Server Actions which are asynchronous functions that execute on the server. We can use server actions for data mutations on the server, but server actions can be invoked from both server and client components.
Server actions are a great way to handle form submissions by executing the action when the form data gets submitted. In this article, we will look into a practical use case of handling additional arguments in Next.js server actions.
If you are interested in learning Next.js Server Actions with design patterns and project building, I have created a crash course for you that you can find here.
Also, this article is also available as a video tutorial here:
Table of Contents
Why Would You Need to Pass Additional Arguments?
A Form with a Server Action
How to Pass Additional Arguments
What About the Hidden Fields?
Resources
Why Would You Need to Pass Additional Arguments?
When we execute a server action on a form submission, the server action gets the form data automatically. For example, take a look at the form below:
<form className="p-4 flex" action={updateUser}>
  <Input className="w-1/2 mx-2" type="text" name="name" />
  <Button type="submit">Update User Name</Button>
</form>
Here, we are executing a server action called updateUser when the form gets submitted. The updateUser function will receive the submitted form data as an argument which can be used to extract the form field values.
As you see in the code snippet below, the updateUser function gets a formData as an argument, and we can extract the value of the name field from it.
"use server"
export async function updateUser(formData) {
  const name = formData.get('name');
  console.log(name);
}
While this pattern covers most of the basic use cases, you may need to pass additional arguments programmatically to the server actions. These arguments are not part of the form or form data or user input data. They may be programmatically passed values to your server action.
To understand this, check the server action code snippet below. It’s the same server action we have seen before, but we have passed an additional userId argument along with the regular formData argument.
"use server"
export async function updateUser(userId, formData) {
  const name = formData.get('name');
  console.log(userId);
  console.log(name);
}
The userId value is something internal to the application – and you wouldn’t ask a user to submit the value as part of the form submission. Rather, you may need to pass it programmatically to your server action to perform further computations.
Right, that’s the use case we’re talking about. As we understand why we need it, let’s understand how to achieve it. But first, let’s create a form and a working server action for it.
A Form With a Server Action
Create a directory called actions under the app directory of your Next.js application. Now create a user.js file under the actions folder with the following code:
"use server"
export async function updateUser(formData) {
  const name = formData.get('name');
  console.log(name);
  // Do anything with the name, save in DB, create invoice, whatever!
}
This is how you create a server function in Next.js. It must have a ”use server” directive at the top of the file to tell Next.js that this is a special file with one or more asynchronous functions to execute on the server.
Then we have the server action (the async function) updateUser with formData as the argument. Inside the function definition, we extract out the name value and print it on the console.
Let’s now attach this server action to a form. To do that, create a folder called components under the project root folder. Create a file called user-form.jsx with the following code:
import { Input } from "./ui/input"
import { Button } from "./ui/button"
import { updateUser } from "@/app/actions/user"
const UserForm = () => {
  return(
    <form className="p-4 flex" action={updateUser}>
      <Input className="w-1/2 mx-2" type="text" name="name" />
      <Button type="submit">Update User Name</Button>
    </form>
  )
}
export default UserForm;
This is a simple React component with a form. The form has one input text field called name and a submit button to submit the form. The form has an action attribute with the server action updateUser as the value. Now, when the form gets submitted with a name value, the server action will get it as part of the form data as we discussed above.
Let’s test it out. To do that, we’ll create a Next.js route and page where we can use the UserForm component. Create a folder called extra-args under the app directory. Now, create a file called page.js under the app/extra-args directory with the following code:
import UserForm from "@/components/user-form";
const ExtraArgsDemo = () => {
  return (
    <UserForm />
  )
}
export default ExtraArgsDemo;
This is a simple React component where we have imported the UserForm component and used it in the JSX. Now run the local server and access this route localhost:3000/extra-args. You should see the form with a text field and a button.
Type some text inside the text field and click on the button.

Now, you will be able to see that the typed text has been printed on the server console. Why on the server console? Why not on the browser console? This is because server actions execute on the server, not on the client side browser.
So, with this we have now established a data flow like this:
Page => Form => Server Action
The page has a form. The form execute a server action on submission. The server action prints a form data on the server console.
Let’s now enhance these pieces to pass additional arguments to the server action.
Let’s pass a prop to the UserForm component from the page. We’ll pass a userId with a value to pretend that we are passing this userId programmatically to our form and to the server action from there.
import UserForm from "@/components/user-form";
const ExtraArgsDemo = () => {
  return (
    <UserForm userId={"1234"} />
  )
}
export default ExtraArgsDemo;
In the UserForm component, we accept the userId prop. Now, we have to do something special to pass this userId to the updateUser server action.
JavaScript has a magical method called bind() that helps us create a Partially Applied Function. With this partially applied function, you can create a function from another function’s preset arguments.
In our case, the updateUser function already has an argument called formData. Now we can pass userId as the additional argument using the bind() method to create a new function.
const updatedUserWithId = updateUser.bind(null, userId);
The first argument of the bind() method is the context you are binding the function to. The context handles the association of the function with the this keyword value. In our case, we can keep it null as we are not changing it. After that, we passed the new argument userId. It’s good to know that the bind() method works on both server and client components.
Here is the modified UserForm component (user-form.jsx file). Note that the form action value is now modified to the new function updatedUserWithId.
import { Input } from "./ui/input"
import { Button } from "./ui/button"
import { updateUser } from "@/app/actions/user"
const UserForm = ({userId}) => {
  const updatedUserWithId = updateUser.bind(null, userId);
  return(
    <form className="p-4 flex" action={updatedUserWithId}>
      <Input className="w-1/2 mx-2" type="text" name="name" />
      <Button type="submit">Update User Name</Button>
    </form>
  )
}
export default UserForm;
Now, the server action will receive the userId value as an argument. Let’s print that to the console as well.
"use server"
export async function updateUser(userId, formData) {
  const name = formData.get('name');
  console.log(userId);
  console.log(name);
  // Do anything with the user id and name, save in DB,
  // create invoice, whatever!
}
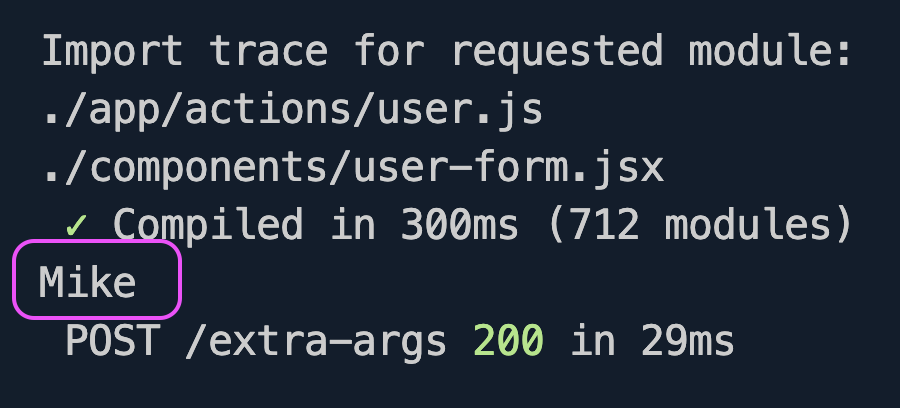
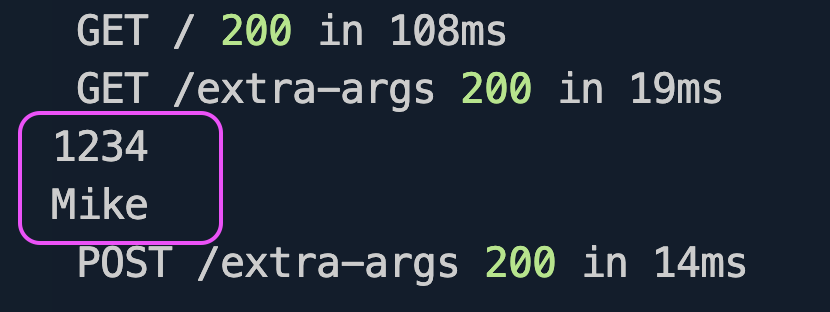
Now if you submit the form with a name value:
You’ll see that both userId and the name values are logged into the server console. Great! We have logged one value from the form data, and the other one was passed internally to the server action.
So, we learned how to pass the extra arguments to the server action along with the form data.
HTML supports a hidden type form field to pass client data to the server without accepting the input from the users. So this means that we could have used the hidden field to pass the userId value like this:
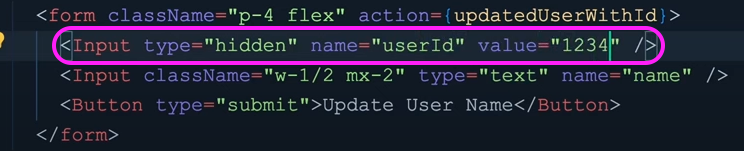
So why did we do all that with the bind() method? Well, because of security concerns. When you pass data using hidden fields, the value will be part of the rendered HTML, and it will not be encoded as well. So it’s better to handle it programmatically.
Resources
That's all for now. Did you enjoy reading this article and have you learned something new? If so, I would love to know if the content was helpful. Let me share a few additional resources you may need:
All the Source Code used in this article is on my GitHub.
Here’s the Server Action Crash Course with Patterns and Project.
Here’s the Server Action Official Documentation if you want to read more.
And you can read more about the bind() method here.
Additionally, you can connect with me by:
Subscribing to my YouTube Channel. If you are willing to learn
Reactand its ecosystem, likeNext.js, with both fundamental concepts and projects, I have great news for you: you can check out this playlist on my YouTube channel with 25+ video tutorials and 15+ hours of engaging content so far, for free. I hope you like them as well.Following me on X (Twitter) or LinkedIn if you don't want to miss the daily dose of up-skilling tips.
Checking out and follow my Open Source work on GitHub.
I regularly publish meaningful posts on my GreenRoots Blog, you may find them helpful, too.
See you soon with my next article. Until then, please take care of yourself, and keep learning.