Modern-day frontend frameworks pair well with their dedicated full-stack frameworks — like React with Next.js, Vue with Nuxt.js, and Svelte with SvelteKit. But the same ease of use and out-of-the-box support seems impossible when pairing a modern frontend solution like React with a traditional backend or server-side framework like Laravel.

This adaptability gap between JavaScript frontend solutions and traditional backend frameworks is filled by Inertia.js. In this adoption guide, we’ll learn how to use Inertia to build single-page apps (SPAs) with a traditional backend framework and a modern-day JavaScript frontend while maintaining server-side routing.
What is Inertia.js?
Inertia.js is a tool that allows developers to build modern SPAs with popular frontend and backend frameworks without needing an API in between. Created in 2019 by Jonathan Reinink, the main idea behind Inertia was to simplify the process of building modern SPAs while leveraging existing server-side frameworks.
In simpler words, Inertia works as a glue that holds your server-side and client-side frameworks together, ensuring efficient communication between the backend and the frontend. With Inertia, instead of maintaining two different codebases for the frontend and backend or server-side stuff, you develop the entire app in a single codebase like a monolith.
How has Inertia.js changed over time?
Initially, Inertia supported only Vue and Laravel. With its later releases, it evolved and extended its support for more frameworks.
The modern Inertia monolith provides important features such as server-side rendering (SSR), automated asset versioning, lazy loading for page components, TypeScript support, and more. We’ll explore its framework support later while discussing framework integration.
How Inertia.js works
Inertia functions like an adapter between frontend and backend. It differs from regular SPAs in the following aspects:
- Maintains server-side routing while providing a SPA-like experience
- Replaces full-page reloads with small fetch requests
- Receives JSON data in return from the server
- Requires less JavaScript for hydration
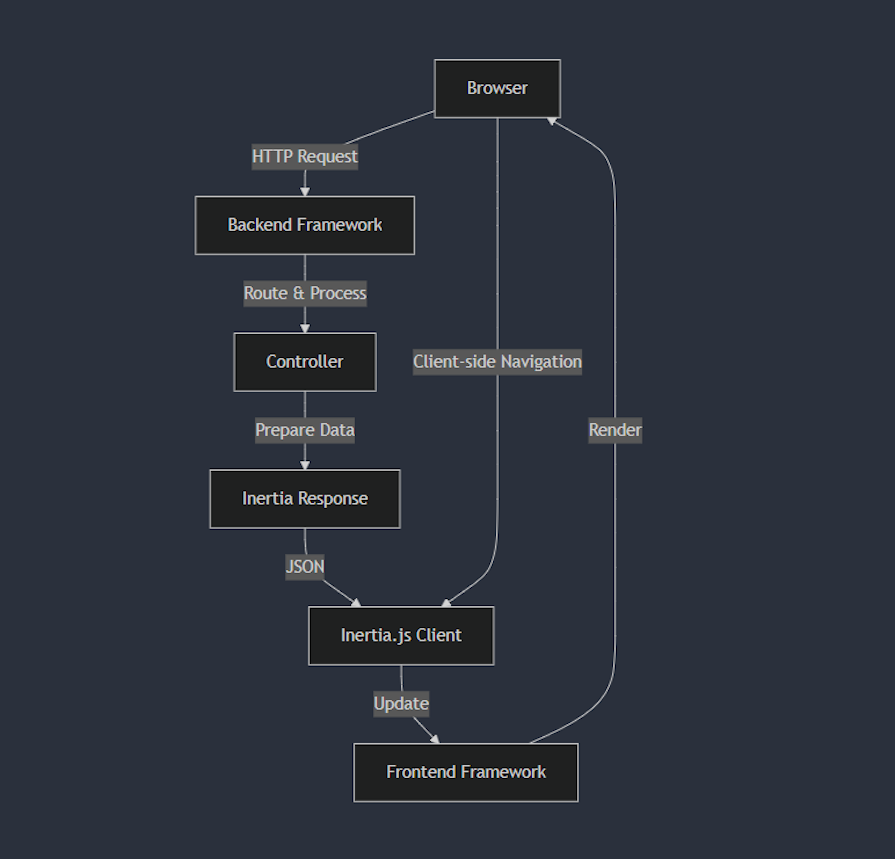
When a request is made from the browser using an Inertia-powered app, it reaches the backend first. As a result, an Inertia response is created, returning a full HTML document first with the Inertia JavaScript library to the browser through the Inertia client.
For subsequent navigations, the Inertia client makes fetch requests and receives JSON data in return from the server. Using this received data, the client then updates the frontend and changes are reflected on the app without a full page reload.
Here’s a flowchart explaining that whole process in a visual way:
Further reading:
- Introduction to Inertia.js
Why choose Inertia.js?
If you are in a situation where you must use a traditional backend framework for your SPA, but have the freedom to handle the frontend however you’d like, you should consider using Inertia or a similar tool.
Inertia is tailor-made for Laravel and provides greater stability in Laravel projects. If you are a Laravel developer and want to do more than what the Blade templating offers by default, Inertia is something you might want to try.
You may explore some more use cases where Inertia could be your friend. The next two sections cover some pros and cons of using Inertia, which will help you make an informed decision about choosing it for your app development.
Cons of Inertia.js
There are some known drawbacks of SPAs in general which we won’t be discussing here. Instead, we will touch on the disadvantages of Inertia as a development utility.
Less flexible
With Inertia, you maintain your app’s frontend and backend in a single codebase. This tight coupling makes Inertia unsuitable for projects that demand maintaining frontend and backend separately for better maintainability, separation of concerns, scalability, independent development, tech stack flexibility, and other such reasons.
Developer experience
Using a tool like Inertia adds one more utility to your stack to explore and learn. Understanding Inertia-specific patterns and conventions has a moderate learning curve, which can be a bit annoying and time-consuming.
Since adapting to tools like Inertia for frontend and backend is not mainstream yet, there are no standard ways to do things with them. Therefore, switching away from Inertia would take significant refactoring, especially on the frontend.
Also, the testing complexity, especially for API and unit testing, is bound to increase since the boundaries between frontend and backend coincide in a monolith.
Small community
Inertia has over 6,000 stars on GitHub and over 85 contributors. Its Laravel adapter has over 2,000 stars. All these stats combined are much lower than tools in the same category that don’t offer as many features and framework support as Inertia.
So there can be circumstances when you want to build something specific with it and can’t find enough references and guides to follow.
See the table below for a head-on comparison between Inertia.js and some of its contenders like Livewire.
Further reading:
- Livewire vs. Inertia.js: Comparing Laravel frontends
Technical considerations
Making your app offline first can be complicated with Inertia, as establishing a sensible caching strategy is not straightforward with this tool. You should also keep in mind that Inertia, by default, sends the full page component on each request, increasing the payload size, which can be solved with partial reloads.
Pros of Inertia.js
Inertia has some general advantages over traditional client-side rendered SPAs. Let’s discuss some of its major strengths one by one.
Seamless integration
Inertia integrates flawlessly with popular frontend and backend frameworks, and provides first-hand support for Vue in its demo builds. Supported frameworks and libraries, both frontend and backend combined, include Laravel, Rails, Phoenix, Django, React, Vue, and Svelte.
Laravel allows you to build your assets with Vite, giving you a much faster and more productive development experience than Webpack-based Laravel Mix. The Vite-based asset bundling fits the bill perfectly if your goal is to implement a JavaScript-based frontend.
Further reading:
- Getting started with Inertia.js, Vue.js, and AdonisJs
- Creating a single-page app with Laravel and Vue
Simplified development
Despite a slightly poor developer experience as described above, Inertia offers simplified integration, eliminating the need for a separate API to have the frontend and backend work together. Inertia allows you to use starter kits and provides manual installation guides to set up both client-side and server-side environments for development.
Performance
Instead of sending fully server-rendered HTML with a huge JavaScript bundle to the client, Inertia apps receive a minimal HTML shell with initial JSON data which renders comparatively faster on the client.
This makes Inertia-based apps slightly better in initial performance without added complexity than a regular client-side rendered SPA. It also adds to an overall better-quality UX and improves the First Contentful Paint, an important Core Web Vital metric.
Further reading:
- Core Web Vitals best practices for SPAs
SEO-friendly
Inertia-based apps use server-side routing, which results in neater, easily crawlable URLs. This makes handling metadata for each page pretty straightforward. Also, as discussed in the last point, these apps likely have better FCP scores due to the tiny amount of initial data sent to the client.
Both these features combined result in better SEO and give Inertia.js apps an edge over traditional SPAs.
Tip: If client-side rendering (CSR) is negatively impacting the FCP metric, you may opt for a fully server-rendered app with Inertia.js’s SSR plugin to improve the score.
Bundle size
Since Inertia.js acts as an adapter between the frontend and the backend, it’s nicely compact (as it should be), weighing only about 15kB minified and gzipped.
Documentation
Inertia documentation gets you started immediately, especially when using Laravel as your backend framework. It also has an upgrade guide for legacy versions and covers from general to advanced concepts all in one place.
Getting started with Inertia.js
Let’s learn how to set up Inertia with two of the most popular frontend and backend solutions: a Laravel-based backend with a React-powered frontend. You may find all the code covered in this tutorial in this GitHub repository.
Note that this setup doesn’t involve the use of TypeScript for the sake of simplicity.
Server-side installation
Assuming you have Laravel installed on your machine, let’s create a new Laravel project by using the Laravel installer command:
laravel new
You should see something like the below in your developer terminal:
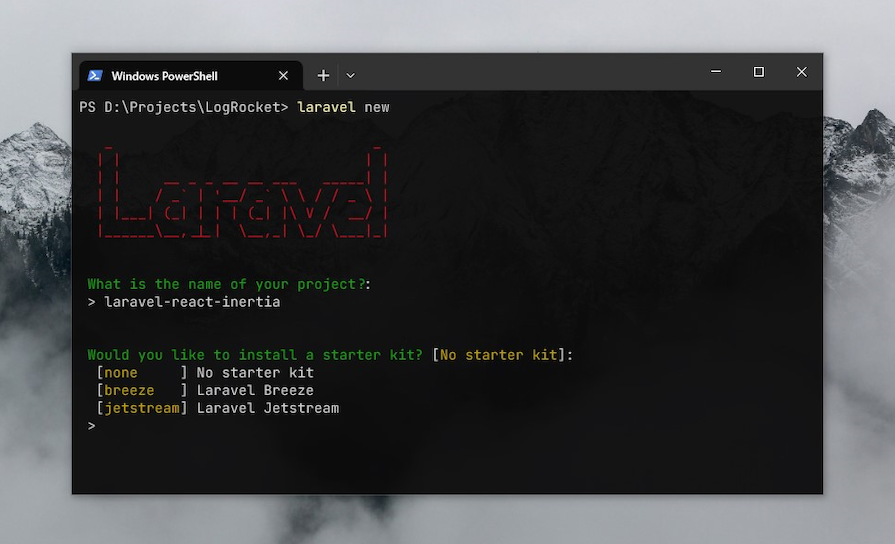
After executing that command in the terminal and providing a name for your project, the installer will ask you to choose a starting kit and a testing framework, initialize a Git repo, and go through other setup logistics.
Starter kits like Breeze or Jetstream provide some ready-made Inertia.js-based scaffolding with a demo app, but we don’t want that. We’ll set things up from scratch instead.
Further reading:
- Laravel Breeze’s Inertia-React stack vs. Next.js and Gatsby
- Laravel vs. AdonisJs: Which should you use?
By the end of the installation steps, you’ll be prompted to pick a database. I‘ve chosen pgsql as I’m using PostgreSQL to explain this article. Pick yours according to your database preference.
Next, we should install the Inertia.js integration for Laravel by running the following composer command in the terminal:
composer require inertiajs/inertia-laravel
The above command will install the Laravel adapter for Inertia and its dependencies. It will also set the ground for Laravel and Inertia to work together.
After that, let’s add the Inertia middleware to handle Inertia requests in Laravel. Use the following artisan command to do that:
php artisan inertia:middleware
Client-side installation
Instead of Laravel’s default Blade templates, we’ll use React to handle our pages and components. Let’s cd into our project folder and install React and React DOM using the following command. Use the Node package manager of your choice to do that:
pnpm add react react-dom
Let’s also install Vite’s React plugin as a development dependency, since we’ll be using Vite as our asset manager throughout the project:
pnpm add --save-dev @vitejs/plugin-react
Finally, add the Inertia support for React using the below command:
pnpm add @inertiajs/react
I’m also using Tailwind CSS with this setup, which is completely optional. If you also want to install Tailwind CSS, it involves the same steps you follow when installing Tailwind CSS with a React or Vue app.
Configuration
Firstly, locate the app.js file in the resources/js directory, rename it to app.jsx, and replace its contents with the following:
import { createInertiaApp } from "@inertiajs/react";
import { createRoot } from "react-dom/client";
import "../css/app.css";
createInertiaApp({
  resolve: (name) => {
    const pages = import.meta.glob("./Pages/**/*.jsx", { eager: true });
    return pages[`./Pages/${name}.jsx`];
  },
  setup({ el, App, props }) {
    createRoot(el).render(<App {...props} />);
  },
});
The changes above will help Inertia identify our pages and link them to the correct routes.
Next, let’s rename the welcome.blade.php file in the resources/view directory to app.blade.php and replace its contents with the following:
<!DOCTYPE html>
<html lang="en">
<head>
  <meta charset="UTF-8">
  <meta name="viewport" content="width=device-width, initial-scale=1.0">
  @viteReactRefresh
  @vite('resources/js/app.jsx')
  @inertiaHead
</head>
<body>
  @inertia
  <div id="app"></div>
</body>
</html>
Note that within the basic HTML structure for a webpage, this file contains some Inertia and Vite directives needed to inject certain scripts to run reloads, add scripts, and more.
Next, add the required middleware in the bootstrap/app.php file to handle Inertia-specific requests:
<?php
use Illuminate\Foundation\Application;
use Illuminate\Foundation\Configuration\Exceptions;
use Illuminate\Foundation\Configuration\Middleware;
use App\Http\Middleware\HandleInertiaRequests;
return Application::configure(basePath: dirname(__DIR__))
  ->withRouting(
    web: __DIR__.'/../routes/web.php',
    commands: __DIR__.'/../routes/console.php',
    health: '/up',
  )
  ->withMiddleware(function (Middleware $middleware) {
    $middleware->web(append: [
        HandleInertiaRequests::class,
    ]);
  })
  ->withExceptions(function (Exceptions $exceptions) {
    //
  })->create();
Let’s also configure the React plugin to work with Vite to enjoy the benefits it provides:
import { defineConfig } from "vite";
import laravel from "laravel-vite-plugin";
import react from "@vitejs/plugin-react";
export default defineConfig({
  plugins: [
    laravel({
      input: "resources/js/app.jsx",
      refresh: true,
    }),
    react(),
  ],
  resolve: {
    alias: {
      "@": "/resources/js",
    },
  },
});
Finally, let’s run Laravel and React both using the following commands:
# Laravel (backend)
php artisan serve
# React (frontend)
pnpm dev
We can write a Shell script to run these commands together in a single terminal window, but to keep things simple and easy, let’s run them in two separate terminals for now.
After these commands execute successfully, you can see the two local URLs. Run the Laravel one to see how your Laravel app looks. And with that, you’ve successfully set up a basic app with Inertia!
Key features of Inertia.js
You can do a lot with your Inertia app. Let’s take a look at some of the standout features you should know.
Pages and layouts
To better organize different layouts and pages, create two sub-directories in the resources/js directory. You can also manage your components in a separate directory here and use them in your pages as you like.
Here’s a quick example of our main layout:
// resources/js/Layouts/MainLayout.jsx
export default function MainLayout({ children }) {
  return (
    <div class="App-container">
      <Header />
      {children}
      <Footer />
    </div>;
  );
}
This is basically a component that serves as a base layout and is therefore placed in a dedicated layouts folder. The MainLayout can now be utilized as a component in our pages as shown in the following code:
// resources/js/Pages/Home.jsx
import MainLayout from "@/Layouts/MainLayout";
export default function Home({ name }) {
  return (
    <MainLayout>
      <h1>Welcome, {name}!</h1>
    </MainLayout>
  );
}
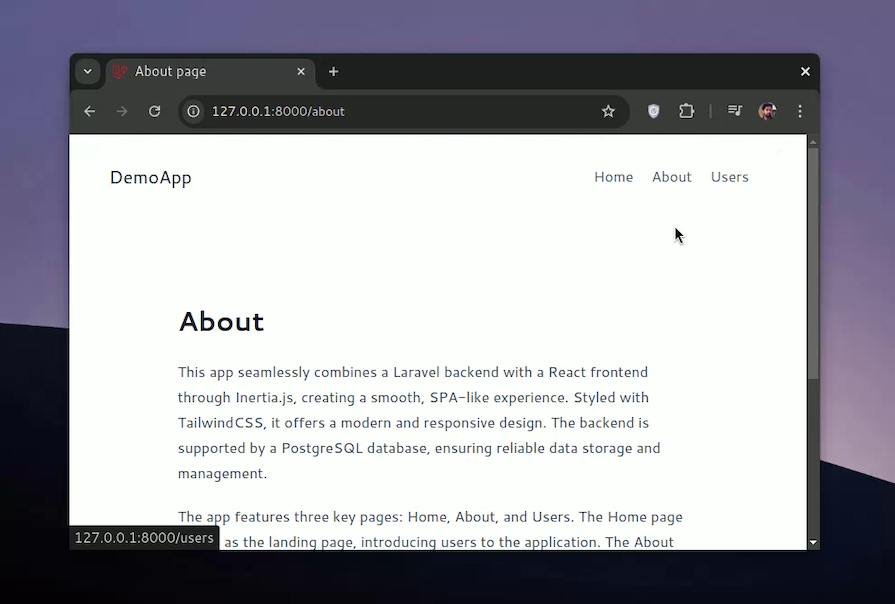
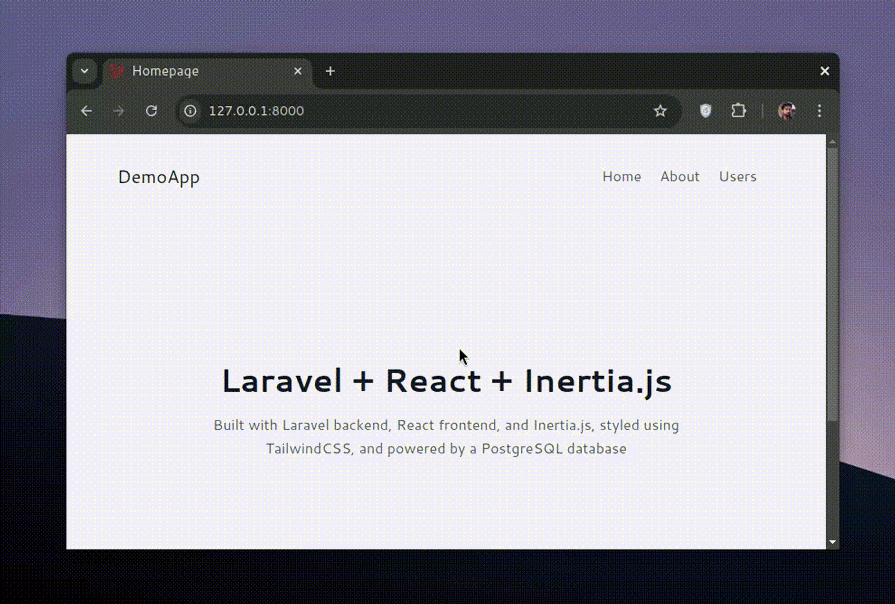
Here’s a glimpse of how MainLayout.jsx and About.jsx can together form a working page with styles provided by Tailwind CSS:
Links and routing
With traditional Laravel routing, it’s easy to create new routes and hook in the pages we learned about in the last segment. Even though it’s not file-based, routing is fairly simple to manage. If you’ve worked with JavaScript-based backend frameworks like Express and Fastify, you are already familiar with the way routing works in Laravel.
Navigate to the routes/web.php file, add new routes, and render the related page using Inertia’s render method as shown in the code below:
<?php
  // routes/web.php
  use Inertia\Inertia;
  Route::get("/", function () {
    return Inertia::render("Home", [
      "name" => "Rahul"
    ]);
  });
Dynamic linking in Inertia is similar to React and Next, and can be done using Inertia‘s Link component as shown below:
// resources/js/Layout/MainNav.jsx
import { Link } from '@inertiajs/inertia-react';
export default function MainNav() {
  return (
    <nav>
      <Link href="/">Home</Link>
      <Link href="/about">About</Link>
      <Link href="/contact">Contact</Link>
    </nav>
  );
}
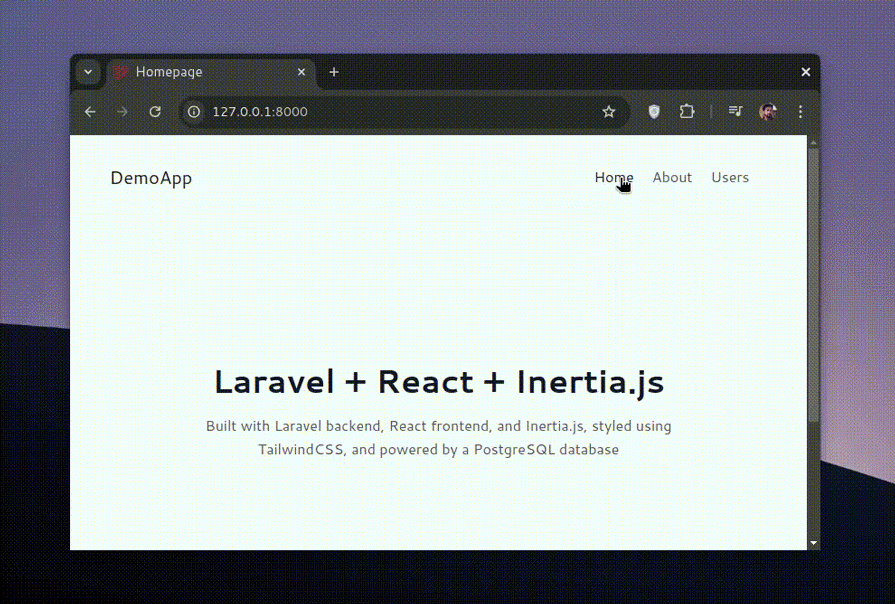
The below screen capture demonstrates the SPA-like dynamic behavior of the navigation we just learned creating in the above code blocks:
HTTP requests (GET/POST/non-GET requests)
Inertia provides a useForm hook to work with GET and POST requests for handling the state and form submissions. It also provides the usePage hook, which allows you to access shared data passed from the server to the client, such as a success or a failure message.
Here’s a simple example that makes GET and POST requests to load and send user data. Note that the GET request is implicitly handled by Inertia, while we make POST requests with the post method from the useForm hook to send data to the server:
import { useForm, usePage } from "@inertiajs/react";
import MainLayout from "@/Layouts/MainLayout";
export default function Users({ users }) {
  const { flash } = usePage().props; // Grab data provided by the Inertia.js middleware
  const { data, setData, post, processing, errors, reset } = useForm({
    name: "",
    email: "",
  });
  const handleSubmit = (e) => {
    e.preventDefault();
    post("/users", {
      preserveState: true,
      onSuccess: () => reset("name", "email"),
    });
  };
  return (
    <MainLayout>
      <h1>Users</h1>
      {flash.message && <div>{flash.message}</div>}
      {users.length ? (
        <ul>
          {users.map((user) => (
            <li key={user.id}>
              {user.name} - {user.email}
            </li>
          ))}
        </ul>
      ) : (
        <p>No users found</p>
      )}
      <form onSubmit={handleSubmit}>
        <input
          type="text"
          value={data.name}
          onChange={(e) => setData("name", e.target.value)}
          placeholder="Name"
          required
        />
        {errors.name && <div>{errors.name}</div>}
        <input
          type="email"
          value={data.email}
          onChange={(e) => setData("email", e.target.value)}
          placeholder="Email"
          required
        />
        {errors.email && <div>{errors.email}</div>}
        <button type="submit" disabled={processing}>
          Add User
        </button>
      </form>
    </MainLayout>
  );
}
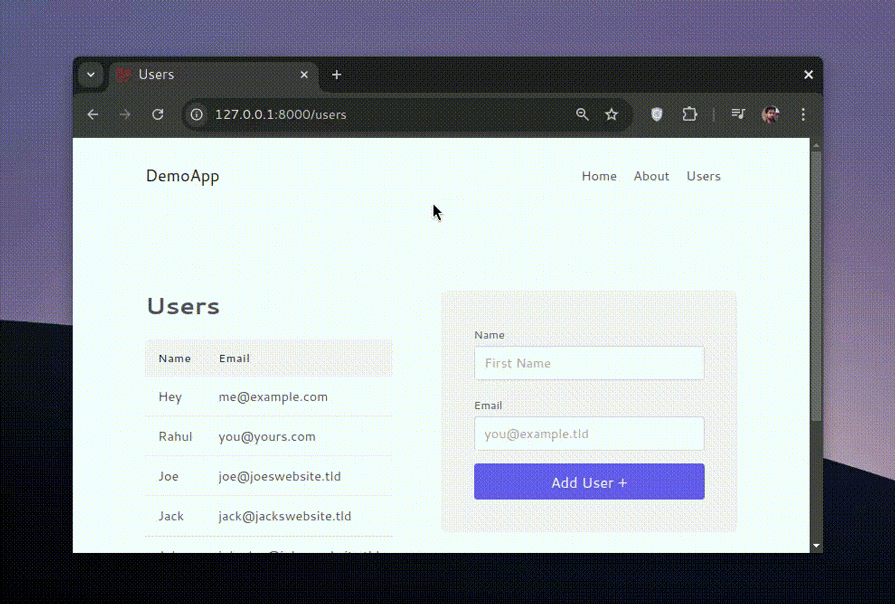
Using this approach, we can put together a page to get a list of data from the database, show it in an HTML table, and also add more of this data to the database using a form as shown below:
Progress indicators
Inertia.js provides NProgress-based progress indication. You can enable this while establishing the App.jsx file and provide configurational settings there for the progress indicator:
import "../css/app.css";
import { createInertiaApp } from "@inertiajs/react";
import { createRoot } from "react-dom/client";
createInertiaApp({
  resolve: (name) => {
    const pages = import.meta.glob("./Pages/**/*.jsx", { eager: true });
    return pages[`./Pages/${name}.jsx`];
  },
  setup({ el, App, props }) {
    createRoot(el).render(<App {...props} />);
  },
  progress: {
    // The delay after which the progress bar will appear, in milliseconds...
    delay: 250,
    // The color of the progress bar...
    color: "#29d",
    // Whether to include the default NProgress styles...
    includeCSS: true,
    // Whether the NProgress spinner will be shown...
    showSpinner: true,
  },
});
If you are not familiar with what NProgress loading animations look like, here’s a little peek into it:
Database integrations
If you work with Laravel regularly, it won’t take much for you to integrate and consume a database into your Inertia setup. Just add the required database credentials in the .env file, make sure you are using the right database driver, review the config/database.php file, and you’re good to go.
With an existing database, you can use Laravel’s migration system to define the required database schema. I didn’t have a database, so I created one and populated it with some fake user data using the Laravel Seeder mechanism to show on the frontend. Here are some steps I followed after that:
- Created a model for my user data in the
appdirectory and also created an HTTP controller to handle database requests regarding this data - Created a
Userspage in theresources/js/Pagesdirectory and provided it with a prop that takes a user array. This user array gets the required data through a GET request made intrinsically with Inertia. We can also make POST requests to add the data to the database - Defined a
usersroute in theroutes/web.phpfile and linked our HTTP controller to it
For someone new to the Laravel ecosystem or who doesn’t work with databases often with Laravel, this may take a little more than that when migrating and populating the database. In such cases, clearing the config cache may greatly help to get rid of errors caused by the cached configuration options.
Inertia.js use cases
The potential applications for Inertia are many and varied. Pairing Laravel with a modern JavaScript frontend using Inertia simplifies full-stack development for monolithic apps with robust backend features.
While it’s not suitable for every team or situation, here are a few use cases where you might find Inertia to be a good option:
- Apps that don’t want to rely on Blade for templating and want robust solutions to handle client-side functionality
- Old apps that use Laravel as their backend but want to take advantage of modern libraries that are majorly made and maintained for JavaScript-based frontend frameworks
- Modern apps that are planning to move to a Laravel-based backend to enjoy the leverage offered by the traditional server tech instead of serverless
- SPAs that want better visibility on search engines and also the performance benefits of SSR
- For those who love and want to work with both PHP and JavaScript
Inertia.js vs. Livewire vs. Hybridly
Inertia is not the only solution for bridging server-side and client-side frameworks and libraries. Livewire and Hybridly are two other popular tools with their own sets of benefits and drawbacks. When comparing your options, you may want to consider:
- Community — Inertia.js has a comparatively smaller community compared to Livewire but has a better one than Hybridly.
- Features — Livewire and Hybridly don’t provide support to implement frontend frameworks, while Inertia.js is known for its support for major JavaScript-based frontend solutions.
- Performance — It depends on the implementation mostly, but Inertia.js-based SPAs can provide better perceived performance while the server-rendered apps using Livewire and Hybridly can be better as most pages are server-rendered.
- Documentation — Livewire and Inertia.js have good documentation compared to Hybridly, which is fairly new and has a scope to improve further.
This table provides a helpful snapshot of how these three compare to inform your decision further:
| Feature | Inertia.js | Livewire | Hybridly |
|---|---|---|---|
| Server-side framework | Laravel, Rails | Laravel only | Laravel only |
| Client-side framework | Vue.js, React, Svelte | None (PHP-based) | Vue.js |
| SPA-like experience | Yes | Yes | Yes |
| Server-side rendering (SSR) | Optional | Yes | Yes |
| Real-time updates | No (needs additional setup) | Yes | Yes |
| Full-page reloads | No | No | No |
| Learning curve | Moderate | Low | Moderate |
| Component-based architecture | Yes | Yes | Yes |
| State management | Client-side | Server-side | Both |
| SEO-friendly | Good | Excellent | Excellent |
| Backend-driven UI | Partial | Full | Full |
| Progressive enhancement | Limited | Yes | Yes |
| File uploads | Supported | Native support | Supported |
| Pagination | Supported | Native support | Supported |
| Form handling | Client-side | Server-side | Both |
| Authentication | Supported | Native support | Supported |
| Authorization | Supported | Native support | Supported |
| Testing | Both client & server | Server | Both client and server |
| Ecosystem/Community | Small | Large | Small (newer) |
| Performance | Very good | Good | Very good |
| Bundle size | Larger (due to JS framework) | Smaller | Moderate |
| Offline support | Possible | Limited | Possible |
| Mobile app development | Possible | Not ideal | Possible |
Conclusion
In this adoption guide, we learned what Inertia.js is and how it is used to create a hybrid application utilizing a traditional backend framework like Laravel and a modern frontend library like React.
We learned about the pros and cons of using Inertia, some of its practical applications, and an example to set it up with Laravel. If you ever get stuck while following the guide, consider cloning this GitHub repository for the project we covered, or drop a comment and I’ll be happy to help you.