Playwright is a popular framework for automating and testing web applications across multiple browsers in JavaScript, Python, Java, and C#. However, as highlighted in our adoption guide, it lacks extensibility. This emerges when using it for tasks like web scraping through its library API.

The community addressed that limitation with [playwright-extra](https://github.com/berstend/puppeteer-extra/tree/master/packages/playwright-extra), or Playwright Extra, a library that wraps Playwright and extends it with plugin support. The project now has over 6.4k stars on GitHub and provides features like stealth browsing, CAPTCHA solving, and proxy management through dedicated Playwright extensions.
In this article, you will learn how to set up playwright-extra, explore the plugins it offers, and discover how to use them in both basic and advanced scenarios.
Playwright Extra setup guide
For working with Playwright Extra, you need to install the [playwright-extra](https://www.npmjs.com/package/playwright-extra) package along with playwright as a peer dependency. You can add both packages to your project’s dependencies with the following command:
npm install playwright playwright-extra
To download the browser executables required by Playwright, you also need to launch:
npx playwright install
Now, you can import the chromium, firefox, and webkit objects for browser automation directly from playwright-extra:
import { chromium } from "playwright-extra";
// or
import { firefox } from "playwright-extra";
// or
import { webkit } from "playwright-extra";
Or, if you are a CommonJS user:
const { chromium } = require("playwright-extra");
// or
const { firefox } = require("playwright-extra");
// or
const { webkit } = require("playwright-extra");
These three objects are extensions of the original browser objects from the standard Playwright Library API. Just like in regular Playwright, chromium from playwright-extra allows you to control Chromium-based browsers, firefox enables you to automate Firefox-based browsers, and webkit gives you the ability to connect to WebKit-based browsers.
You’re now ready to start extending Playwright with plugins.
Exploring all official Playwright plugins
The chromium, firefox, and webkit objects from playwright-extra are different from their equivalent objects in the regular Playwright Library API because they provide an additional use() method:
chromium.use(plugin)
// or
firefox.use(plugin)
// or
webkit.use(plugin)
This method allows you to register an extension to the browser instance.
As of this writing, the playwright-extra project has three official plugins:
[puppeteer-extra-plugin-stealth](https://www.npmjs.com/package/puppeteer-extra-plugin-stealth)— To apply several evasion techniques to try to elude anti-bot measures[puppeteer-extra-plugin-recaptcha](https://www.npmjs.com/package/puppeteer-extra-plugin-recaptcha)— To automatically solve reCAPTCHA and hCaptcha challenges[plugin-proxy-router](https://www.npmjs.com/package/@extra/proxy-router)— To handle multiple proxies with flexible per-host routing, authentication, and more
These Playwright plugins all come from [puppeteer-extra](https://github.com/berstend/puppeteer-extra), a project to extend Puppeteer with a similar plugin system. Since the team behind playwright-extra and p``uppeteer``-e``xtra is the same, their goal is to create plugins that are interoperable between both tools. Find out more about these two tools in our Playwright vs Puppeteer comparison guide.
Note that other community-based plugins are available.
Now, let’s explore how to integrate and use the official Playwright extensions!
puppeteer-extra-plugin-stealth
Advanced bot detection systems such as Cloudflare, Cloudfront, and Akamai can detect Playwright-controlled browsers as bots and block them:

This occurs because the specific settings applied by Playwright in the browser instances expose them as automated. Thus, the browsers controlled by Playwright and those used by regular users do not share the same low-level configurations.
[puppeteer-extra-plugin-stealth](https://github.com/berstend/puppeteer-extra/blob/HEAD/packages/puppeteer-extra-plugin-stealth), also known as Playwright Stealth, tries to address that issue.
It overrides Playwright’s default behavior to reduce leaks that expose automated browsers as bots.
For example, it removes the [navigator.webdriver](https://developer.mozilla.org/en-US/docs/Web/API/Navigator/webdriver) property and deletes “HeadlessChrome” from the User-Agent header set by Chromium in headless mode. The goal is to make a headless instance of Chromium pass common fpscanner, Intoli, and [areyouheadless](https://arh.antoinevastel.com/bots/areyouheadless) bot detection tests.
As highlighted in the official documentation, bot detection bypass is a cat-and-mouse game. No matter how effective the Stealth plugin becomes, there will likely always be ways to detect an automated headless Chromium instance.
The aim of the plugin is just to make detection considerably harder, not impossible. As a result, there are no ethical concerns with using this extension.
Note that the Stealth plugin does not support firefox and webkit but only works with chromium.
Install the Playwright Stealth plugin with:
npm install puppeteer-extra-plugin-stealth
Then, import it with:
import StealthPlugin from "puppeteer-extra-plugin-stealth";
Or, if you are a CommonJS user:
const StealthPlugin = require("puppeteer-extra-plugin-stealth");
Next, register the plugin in chromium with use():
chromium.use(StealthPlugin());
Now, verify that the extension works by targeting the Intoli bot detection test and take a screenshot of the entire page:
import { chromium } from "playwright-extra";
import StealthPlugin from "puppeteer-extra-plugin-stealth";
// register the Playwright Stealth plugin
chromium.use(StealthPlugin())
chromium.launch({ headless: true }).then(async (browser) => {
  const page = await browser.newPage();
  // connect to the target Intoli bot detection page
  await page.goto("https://bot.sannysoft.com", { waitUntil: "networkidle" });
  // take a screenshot of the entire page
  await page.screenshot({ path: "screenshot.png", fullPage: true });
  await browser.close();
});
Execute the script, and it will produce the following screenshot.png file:
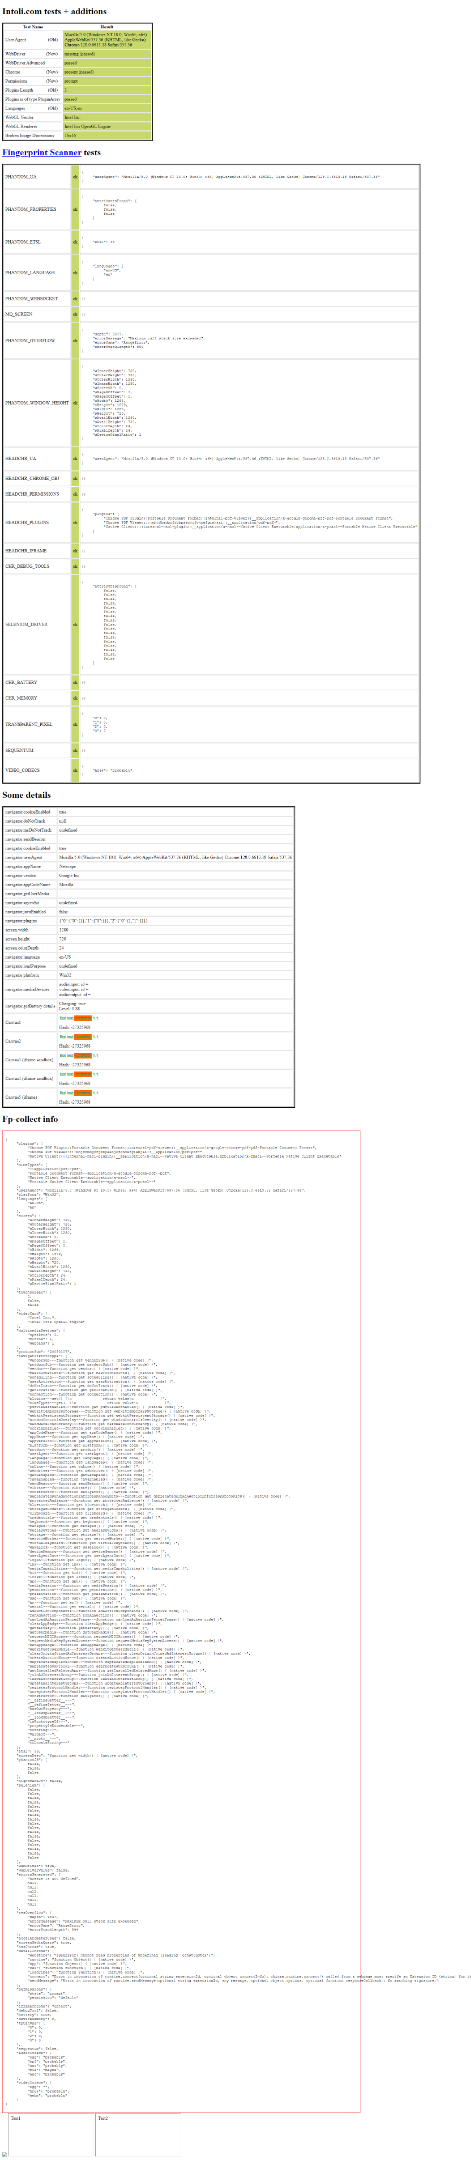
As you can see, all tests are green, which means they have all been passed.
If you relaunch the script without the Playwright Stealth plugin, you will get:

In this case, some tests do not pass. Here is why anti-bot solutions can detect and block your Playwright scripts.
puppeteer-extra-plugin-recaptcha
CAPTCHAs are designed to be easy for humans to solve but difficult for bots, making them a threat to browser automation. When you encounter a CAPTCHA, you cannot simply automate the steps to solve it in your code. If you could, the whole purpose of CAPTCHAs would be defeated.
[puppeteer-extra-plugin-recaptcha](https://github.com/berstend/puppeteer-extra/tree/39248f1f5deeb21b1e7eb6ae07b8ef73f1231ab9/packages/puppeteer-extra-plugin-recaptcha) provides a page.solveRecaptchas() method to take care of reCAPTCHAs and hCaptcha challenges. reCAPTCHA is the leading CAPTCHA provider from Google, while hCaptcha is another provider that has gained popularity due to its collaboration with Cloudflare.
As of now, the plugin supports the following types of CAPTCHAs:
- reCAPTCHA v2
- reCAPTCHA v3
- invisible reCAPTCHA
- hCaptcha
- invisible hCaptcha
puppeteer-extra-plugin-recaptcha is not magic and works thanks to integration with 2Captcha, the well-known CAPTCHA solving service. To use the plugin, you need a 2Captcha API key and some funds in your account. As explained in the docs, other providers are supported through custom implementation.
Install puppeteer-extra-plugin-recaptcha with this command in your terminal:
npm install puppeteer-extra-plugin-recaptcha
Then, import it in your Node.js script:
import RecaptchaPlugin from "puppeteer-extra-plugin-recaptcha";
Or, if you are a CommonJS user:
const RecaptchaPlugin = require("puppeteer-extra-plugin-recaptcha");
Let’s target the reCAPTCHA demo page shown in the GIF below:
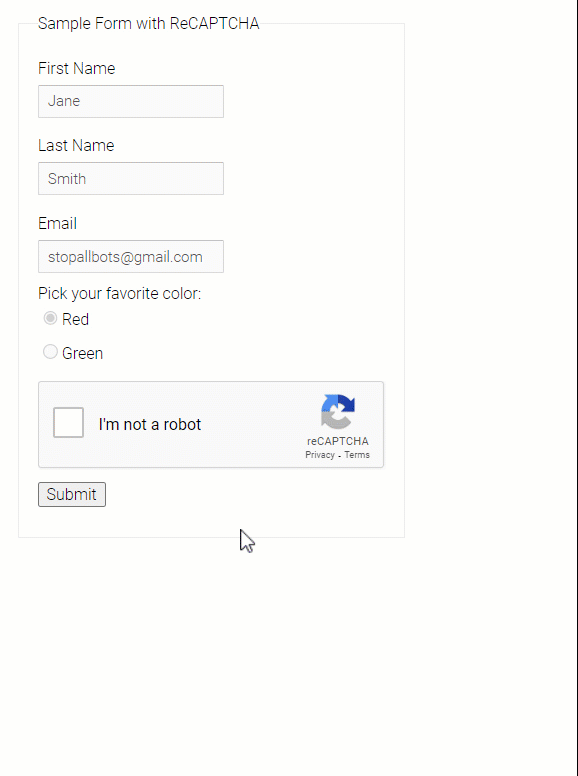
Register the plugin with use() and call the page.solveRecaptchas() method to handle the CAPTCHA on the page:
import { chromium } from "playwright-extra";
import CaptchaPlugin from "puppeteer-extra-plugin-recaptcha";
// register the reCaptcha plugin in Playwright
chromium.use(
  CaptchaPlugin({
    // 2Captcha integration
    provider: {
      id: "2captcha",
      token: "<YOUR_2CAPTCHA_API_KEY>",
    },
  })
);
chromium.launch({ headless: false }).then(async (browser) => {
  const page = await browser.newPage();
  // connect to the reCAPTCHA demo page
  await page.goto("https://www.google.com/recaptcha/api2/demo");
  // solve the reCAPTCHA on the page
  await page.solveRecaptchas();
  // click the "Submit" button, which triggers a DOM change
  await page.click("#recaptcha-demo-submit");
  // wait for the success message to appear
  await page.waitForSelector(".recaptcha-success");
  // take a screenshot of the new page
  await page.screenshot({ path: "screenshot.png", fullPage: true });
  await browser.close();
});
When you call page.solveRecaptchas(), CaptchaPlugin will:
- Identify any active reCAPTCHA or hCaptcha challenges that are currently visible on the page
- Extract their configuration
- Pass that configuration to 2Captcha or the configured custom provider
- Solve the CAPTCHA, which may trigger the associated optional callback function
Before calling the solveRecaptchas() method, it is your responsibility to perform the required actions to trigger the CAPTCHAs. Calling this method on a page without CAPTCHAs will not cause any issues, and your code will execute normally.
Run the script, and the following screenshot.png image will appear in your project’s folder:

Good — The “Verification Success… Hooray!” message confirms that the reCAPTCHA on the demo form has been solved.
plugin-proxy-router
Proxy servers act as intermediaries, receiving your requests, forwarding them to the target site, and returning the server’s response back to you. This way, the target site see your requests as coming from the proxy server and not from you.
Proxies are widely used in automation to hide your IP and protect your identity. That mechanism is especially useful for avoiding IP bans when making a lot of automated requests within a short time.
Browsers based on Chromium and Firefox support proxy integration via command-line flags. At the same time, this approach comes with a couple of major limitations:
- You can only set a single proxy per browser instance
- It does not support proxy authentication
[plugin-proxy-router](https://github.com/berstend/puppeteer-extra/tree/39248f1f5deeb21b1e7eb6ae07b8ef73f1231ab9/packages/plugin-proxy-router) addresses these limitations by offering the following features:
- Integration of multiple proxies in
chromium,firefox, andwebkit, in both headed and headless modes - Support for proxy authentication
- Flexible proxy routing based on host/domain
- Ability to change proxies dynamically after browser launch
- Collection of traffic statistics per proxy and host
You can install plugin-proxy-router via the [@extra/proxy-router](https://www.npmjs.com/package/@extra/proxy-router) package:
npm install @extra/proxy-router
Then, import it into your code with:
import { ProxyRouter } from "@extra/proxy-router"
Or, for CommonJS users:
const ProxyRouter = require("@extra/proxy-router")
The ProxyRouter plugin supports several options and can be configured for different scenarios.
You can set it up for declaring a single proxy for all browser connections as below:
const proxyProuter = ProxyRouter({
  proxies: {
    DEFAULT: "http://user:pass@proxyhost:port",
  },
})
Note that http://user:pass@proxyhost:port must be replaced with the URL to your proxy server.
To dynamically set different proxies based on the host, configure ProxyRouter as follows:
const proxyRouter = ProxyRouter({
  // replace the URLs below with your proxy URLs
  proxies: {
    DEFAULT: "http://user:pass@proxyhost:port",
    DATACENTER: "http://user:pass@proxyhost2:port",
    ROTATING_RESIDENTIAL: "http://user:pass@proxyhost3:port",
  },
  // flexible proxy routing logic
  routeByHost: async ({ host }) => {
    if (host.includes("google")) {
      // use a direct connection with no proxy
      return "DIRECT";
    }
    if (host.endsWith("wikipedia.org")) {
      return "DATACENTER";
    }
    if (host === "amazon.com") {
      return "ROTATING_RESIDENTIAL";
    }
    // everything else will use the DEFAULT proxy
  },
})
In this example, different proxies are configured depending on whether you are visiting Amazon, Wikipedia, or any other site. Instead, Google pages will be accessed without a proxy. If you do not specify the routeByHost option, the DEFAULT proxy will be used for all connections.
You can then register the plugin as usual:
chromium.use(proxyRouter)
Now, when you visit a page in the controlled browser, the plugin will route the request to the configured proxy server.
After navigating to pages in Playwright, you can access these useful statistics:
proxyRouter.stats.connectionLog— Lists the proxies used for each visited hostproxyRouter.stats.byProxy— Gets the data (in bytes) used by each proxyproxyRouter.stats.byHost— Returns the data (in bytes) used by each host
For complete examples, refer to the official documentation.
Advanced usage with Playwright Extra
Let’s explore some advanced scenarios with Playwright Extra.
TypeScript setup
Playwright Extra and all official plugins come with built-in TypeScript support. That means you do not have to install any additional typing packages.
Follow the steps below to set up a TypeScript project using playwright-extra and puppeteer-extra-plugin-stealth.
- Initialize a new Node.js project:
npm init -y - Install the basic TypeScript developer dependencies:
npm install –save-dev typescript @types/node esbuild esbuild-register - Create a
[tsconfig.json](https://www.typescriptlang.org/docs/handbook/tsconfig-json.html)with the required configurations:
yarn tsc –init –target ES2020 –lib ES2020 –module commonjs –rootDir src –outDir dist - Install
p``laywright,playwright-extra, and the plugins:
npm install playwright playwright-extra puppeteer-extra-plugin-stealth - Create a source folder
/srcfor your TypeScript script:
mkdir src - Inside the
srcfolder, create anindex.tsfile as follows:
import { chromium } from “playwright-extra”;
import StealthPlugin from “puppeteer-extra-plugin-stealth”;chromium.use(StealthPlugin());chromium.launch({ headless: true }).then(async (browser) => {
const page = await browser.newPage();console.log(“Testing the stealth plugin..”);
await page.goto(“https://bot.sannysoft.com”, { waitUntil: “networkidle” });
await page.screenshot({ path: “stealth.png”, fullPage: true });console.log(“All done, check the screenshot. ✨”);
await browser.close();
}); - Run the TypeScript code without compiling it first using the command below:node -r esbuild-register src/index.ts
Awesome! You are now ready to use Playwright Extra with TypeScript.
Using multiple browser instances
Each Playwright plugin adds different capabilities to the controlled browser. For complex automation scenarios, you might need to configure different browser instances, each with its own set of extensions.
For example, you may need one Chromium instance with proxy integration and CAPTCHA solving capabilities, and another with anti-bot bypass configurations. You could then use these instances in different situations based on the target page you are dealing with.
The first idea you might have to tackle this use case is to import the same browser multiple times with different aliases:
import { chromium as chromium1 } from "playwright-extra";
import { chromium as chromium2 } from "playwright-extra";
Unfortunately, this approach will not work!
The problem is the default chromium, firefox, and webkit exports from playwright-extra always return the same underlying browser instance.
In other words, chromium1 and chromium2 refer to the same underlying browser. So, if you register a plugin in chromium1, it will also be registered in chromium2.
To address this limitation, playwright-extra provides the addExtra() function:
import { addExtra } from "playwright-extra";
This function allows you to define independent browser instances, as in the following example:
import playwright from "playwright";
import { addExtra } from "playwright-extra";
// plugin imports...
// create two independent Chromium instances
const chromium1 = addExtra(playwright.chromium);
const chromium2 = addExtra(playwright.chromium);
// register plugins for the first Chromium instance
chromium1.use(ProxyPlugin);
chromium1.use(CaptchaPlugin);
// register plugins for the second Chromium instance
chromium2.use(StealthPlugin);
// use chromium1 and chromium2 as needed...
Mission complete! chromium1 and chromium2 are now completely independent and can be used separately.
How to migrate from Playwright to Playwright Extra
Suppose you have a simple web scraping script based on the Playwright Library API that targets playwright.dev:
import { chromium } from "playwright";
(async () => {
  const browser = await chromium.launch();
  const page = await browser.newPage();
  // connect to the Playwright site
  await page.goto("https://playwright.dev");
  // extract the page title and print it
  const title = await page.title();
  console.log(`Title: ${title}`);
  await browser.close();
})();
Your goal is to convert this script to Playwright Extra so that you can use the Stealth plugin.
Follow these steps to migrate your script.
- Add
playwright-extrato your project’s dependencies:
npm install playwright-extra - Replace the
chromiumimport fromplaywrighttoplaywright-extra:
import { chromium } from “playwright-extra”;
// for CommonJS users:
// const chromium = “playwright-extra”;
You can now use the use() method to register plugins.
- Install the
puppeteer-extra-plugin-stealthpackage, import it, and apply it as follows:
import { chromium } from “playwright-extra”;
import StealthPlugin from “puppeteer-extra-plugin-stealth”;// add the Stealth plugin
chromium.use(StealthPlugin());(async () => {
const browser = await chromium.launch();
const page = await browser.newPage();// connect to the Playwright site
await page.goto(“https://playwright.dev”);// extract the page title and print it
const title = await page.title();
console.log(Title: ${title});await browser.close();
})();
Et voilà! You successfully migrated your script from Playwright to Playwright Extra.
Conclusion
In this article, we explored what Playwright Extra is, how it works, and the features it adds to vanilla Playwright. We learned how it supports dedicated extensions for tasks like bot detection elusion, CAPTCHA solving, and proxy integration. With these Playwright plugins, you can take your browser automation scripts to the next level!
If you have any further questions about using Playwright Extra with JavaScript or TypeScript, feel free to comment below.