Tauri is an excellent toolkit for building lightweight, secure, and cross-platform desktop applications using web technologies. Since its alpha release in 2019, Tauri has become a compelling alternative to established tools like Electron.

What sets Tauri apart is its unique approach to desktop app development. Unlike Electron, which bundles a full Chromium engine with each application, Tauri leverages the host operating system’s native webview.
This comprehensive guide will cover Tauri capabilities and use cases. You’ll learn everything you need to know about Tauri, and how it compares to other existing toolkits for developing desktop applications. By the end of this guide, you’ll be well informed about adopting Tauri into your next desktop application project.
What is Tauri?
Tauri is an open source framework for building small, fast, and secure desktop applications using web technologies. It allows developers to create cross-platform apps for Windows, macOS, and Linux using HTML, CSS, and JavaScript or TypeScript for the frontend, while leveraging Rust for core functionality and native OS interactions.
Tauri was created in 2019 as a response to the challenges faced by developers using Electron, particularly regarding application size and resource usage. The project was initiated by Daniel Thompson-Yvetot and Lucas Fernandes Gonçalves Nogueira, who sought to create a more efficient alternative for building desktop applications.
Their main goals when creating Tauri were to reduce application bundle sizes, improve performance and resource usage, enhance security, and provide a more flexible framework for desktop app development.
Since its inception, Tauri has evolved significantly. By early 2020, Tauri had reached its alpha stage, attracting attention from the developer community. Then, June 2022 marked the release of Tauri 1.0, a major milestone that brought stability and production-readiness to the framework.
Subsequent releases have introduced features like custom protocols, improved plugin systems, and enhanced mobile support, expanding Tauri’s capabilities and use cases.
Tauri’s architecture is fundamentally different from Electron’s, which contributes to its efficiency:
- Core written in Rust — Rust is known for its performance and safety. Using it at Tauri’s core provides a secure and efficient foundation for the framework
- Native webview — Instead of bundling a full web browser, Tauri uses the operating system’s native webview. On Windows, it uses Microsoft Edge WebView2; on macOS, WKWebView; and on Linux, WebKitGTK
- Frontend agnostic — Developers can use any JavaScript framework or vanilla JavaScript for the frontend, providing flexibility in development
- IPC bridge — Tauri uses a custom Inter-Process Communication (IPC) bridge that allows the frontend to communicate with the Rust backend securely
- Customizable build process — Tauri provides a CLI tool that allows developers to customize the build process, including which native APIs are exposed to the frontend
- Plugin system — Tauri has a robust plugin system that allows developers to extend functionality and interact with native APIs
Why use Tauri?
Tauri stands out as a superior choice for desktop application development, particularly for projects where performance, security, and resource efficiency are very important.
Let’s see some evaluation of its strengths and potential challenges to help inform your decision regarding whether to adopt Tauri:
- Performance — Tauri applications achieve lightning-fast speed by leveraging the native webview of the operating system you’re on instead of bundling a full browser engine. The challenge with this approach is that you’re dependent on the installed version of the system webview on your local machine, which can lead to inconsistencies across different machines. But if you prioritize speed and efficiency, then Tauri’s performance benefits far outweigh the potential inconsistencies, which can often be mitigated through careful development practices
- Ease of use — Tauri offers you a streamlined experience. Its CLI tool simplifies project setup and building while allowing you to use familiar web technologies for the frontend, and Rust for the backend. Keep in mind that the integration of Rust for backend logic might be challenging for you if you have no prior Rust experience
- Bundle size — Tauri applications are incredibly lightweight. Without a bundled browser engine, your Tauri apps can be up to 100 times smaller than its equivalent Electron apps. A basic Tauri app can be as small as 600KB, compared to 120MB+ for a basic Electron app
- Community & ecosystem — Tauri has a growing, enthusiastic community. The ecosystem is growing quickly with new plugins and tools being developed regularly. Tauri’s ecosystem might not be as mature as its counterparts but this also means the opportunity to contribute to the ecosystem maturity
- Learning curve — If you’re a frontend developer, then much of Tauri development will feel familiar as it uses standard web technologies. Your existing frontend experience and skill are easily transferable here as the web tools you’re already accustomed to are as well used for developing your desktop application
- Documentation — Tauri provides a very well-organized and comprehensive documentation, covering everything from its basic setup to advanced features. The quality of existing documentation combined with the active community means you’re well-supported in your development process
- Integrations — On integration, Tauri is designed to be flexible, allowing integration with any JavaScript framework or even vanilla JS. This means you’re not locked into a particular ecosystem. You can choose the right tools for your project, and Tauri’s plugin system allows for extending functionality as needed
Even though Tauri has great benefits when it comes to developer experience, it doesn’t suit everyone and also has its defects. Listed below are some Tauri downsides that you must know before using it:
- Lack of Web APIs — The lack of a full browser engine within Tauri means some Web APIs might not be available out-of-the-box, requiring additional plugins or custom implementations. This means occasionally you will have to come with additional implementations to meet your project needs for some Web APIs
- Learning curve — As mentioned earlier, the Rust component of Tauri can be challenging for you if you’re new to systems programming languages. Getting proficient enough with Rust and understanding Tauri’s architecture can take time
Getting started with Tauri
Getting started with Tauri is straightforward, especially if you’re familiar with web development. This quickstart guide will walk you through setting up a simple Tauri application, then explain the project structure and how to set up both the frontend and backend.
You will need Node.js (v14 or later) and Rust (latest stable version) for this quickstart guide to Tauri. Make sure to install them on your local machine. Next, let’s create a new Tauri project using the Tauri CLI tool:
npm init tauri-app hello-tauriThis above command will prompt you for choices of web technologies to use for the project setup like below:
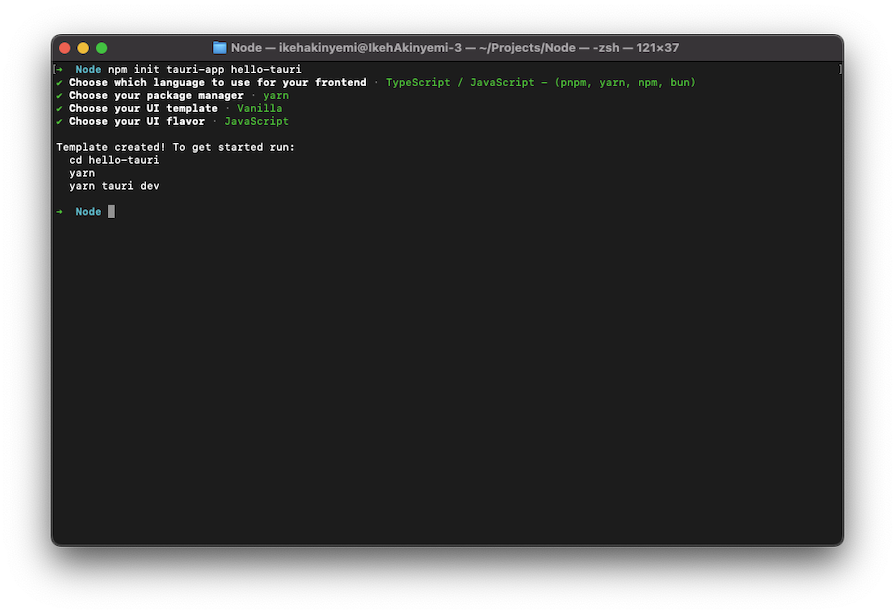
The command creates a new Tauri project named hello-tauri with the below project structure:
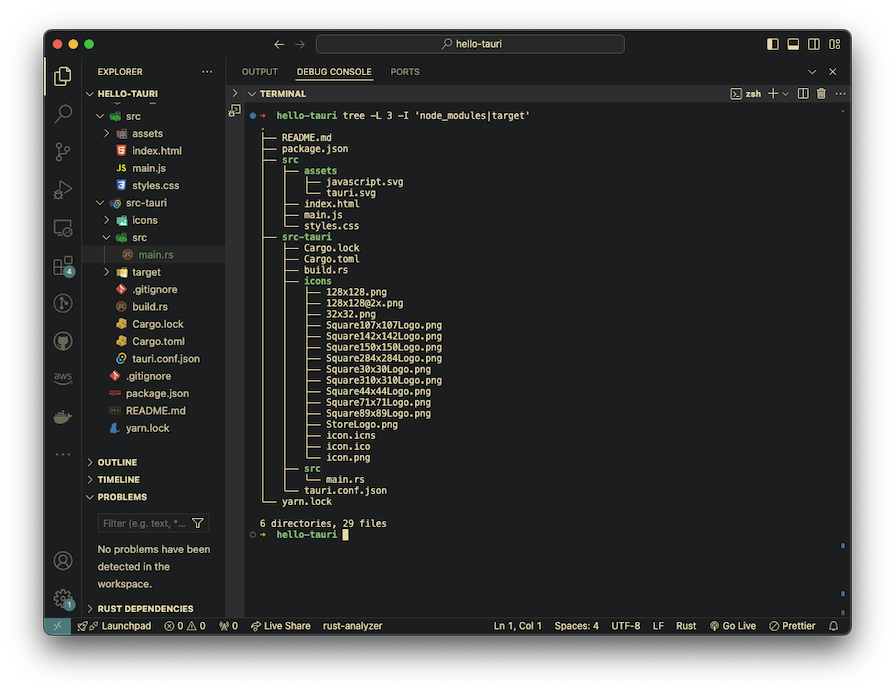
The src/ folder contains your frontend application source code, and src-tauri/ contains the Rust backend code. This simple template generated can help you get started with a sample desktop application you can hack on. Use the below command to run the Tauri application in development mode:
yarn tauri devThis command will start both the frontend development server and the Tauri application with the below UI:
Key Tauri features to know
Tauri offers a rich set of features that make it a powerful framework for desktop application development. Let’s explore some of the key features you should know, with code samples to demonstrate their use.
Custom errors
Tauri allows you to create custom errors that you can easily handle in both the Rust backend and the JavaScript frontend. Update the src-tauri/src/main.rsfile with following error implementation:
...
#[derive(Debug, thiserror::Error)]
enum MyError {
   #[error("Custom error: {0}")]
   Custom(String),
}
impl serde::Serialize for MyError {
   fn serialize<S>(&self, serializer: S) -> Result<S::Ok, S::Error>
   where
       S: serde::ser::Serializer,
   {
       serializer.serialize_str(self.to_string().as_ref())
   }
}
...
#[tauri::command]
fn greet(name: Option<&str>) -> Result<String, MyError> {
   match name {
       Some(string) => Ok(format!("Hello, {}! You've been greeted from Rust!", string)),
       None => Err(MyError::Custom("No name provided".into()))
   }
}
...
Then update your src/main.js file to handle the error like below:
...
async function greet() {
  ...
  try {
   greetMsgEl.textContent = await invoke("greet", {  });
 } catch (error) {
   console.error(error)
 }
}
...
Models
Tauri uses serde for serialization and deserialization, allowing you to easily define and use complex data models between Rust and JavaScript:
#[derive(serde::Serialize, serde::Deserialize)]
struct User {
   id: u32,
   name: String,
   email: String,
}
#[tauri::command]
fn get_user(id: u32) -> User {
   User {
       id,
       name: "John Doe".into(),
       email: "[email protected]".into(),
   }
}
Sending API requests
Tauri also provides a way to make HTTP requests from your Rust backend, which can be useful for interacting with external APIs:
use reqwest;
#[tauri::command]
async fn fetch_data() -> Result<String, String> {
   let response = reqwest::get("https://jsonplaceholder.typicode.com/todos/1")
       .await
       .map_err(|e| e.to_string())?;
   let body = response.text().await.map_err(|e| e.to_string())?;
   Ok(body)
}
Builder function
Tauri uses a builder pattern for configuring the application. This involves some common tasks you might perform when setting up a Tauri application, such as creating custom commands, manipulating windows, and adding menus. This allows for a flexible and readable way to set up your app:
use tauri::Manager;
#[tauri::command]
fn my_custom_command(name: &str) -> String {
   format!("Hello, {}! This is a custom command.", name)
}
fn main() {
   tauri::Builder::default()
       .setup(|app| {
           // Perform setup tasks
           #[cfg(debug_assertions)]
           {
               let window = app.get_window("main").unwrap();
               window.open_devtools();
               window.close_devtools();
           }
           // Create a new window
           tauri::WindowBuilder::new(
               app,
               "secondary",
               tauri::WindowUrl::App("index.html".into())
           ).build()?;
           println!("Setup complete!");
           Ok(())
       })
       .invoke_handler(tauri::generate_handler![my_custom_command])
       .menu(tauri::Menu::os_default("My Tauri App"))
       .run(tauri::generate_context!())
       .expect("error while running tauri application");
}
Helper functions
Helper functions in Tauri provide a good starting point for common tasks in a Tauri application. You can use helper functions to access the app’s config, log a message from the frontend to the backend console, open a new window or focus an existing one with the given label, and more:
#[tauri::command]
fn get_app_name(app_handle: tauri::AppHandle) -> Option<String> {
   app_handle.config().package.product_name.clone()
}
#[tauri::command]
fn get_app_version(app_handle: tauri::AppHandle) -> Option<String> {
   app_handle.config().package.version.clone()
}
#[tauri::command]
fn log_message(message: String) {
   println!("Frontend log: {}", message);
}
#[tauri::command]
fn open_window(app_handle: tauri::AppHandle, label: String) -> Result<(), String> {
   if let Some(window) = app_handle.get_window(&label) {
       window.set_focus().map_err(|e| e.to_string())?;
   } else {
       tauri::WindowBuilder::new(&app_handle, label, tauri::WindowUrl::App("index.html".into()))
           .build()
           .map_err(|e| e.to_string())?;
   }
   Ok(())
}
Layouts
While Tauri doesn’t directly handle frontend layouts, it allows you to use any web framework for your UI. Here’s an example using a simple HTML structure:
<!DOCTYPE html>
<html>
 <head>
   <title>Tauri App</title>
   <script type="module" src="/main.js" defer></script>
   <style>
     body {
       display: flex;
       flex-direction: column;
       align-items: center;
     }
     #content {
       width: 80%;
       max-width: 800px;
     }
   </style>
 </head>
 <body>
   <h1>My Tauri App</h1>
   <div id="content">
     <!-- Your app content goes here -->
   </div>
 </body>
</html>
Testing
Tauri supports testing both the Rust backend and the web frontend. For Rust tests:
#[cfg(test)]
mod tests {
   use super::*;
   #[test]
   fn test_get_user() {
       let user = get_user(1);
       assert_eq!(user.id, 1);
       assert_eq!(user.name, "John Doe");
       assert_eq!(user.email, <&str as Into<String>>::into("[email protected]"));
   }
}
For your frontend testing, you can use any JavaScript testing framework, like Jest. Here’s a simple example:
test('button click shows greeting', async () => {
 document.body.innerHTML = '<button id="greet">Greet</button><p id="greeting"></p>';
  const greetButton = document.getElementById('greet');
 const greetingElement = document.getElementById('greeting');
 greetButton.click();
 // Wait for the Tauri command to complete
 await new Promise(resolve => setTimeout(resolve, 100));
 expect(greetingElement.textContent).toBe('Hello, Tauri User!');
});
These features showcase Tauri’s versatility in creating desktop applications. You can leverage these features to build robust, efficient, and user-friendly applications.
Use cases for Tauri
Tauri’s unique blend of performance, security, and cross-platform compatibility makes it an excellent choice for a wide range of desktop applications. Let’s discuss some business and practical use cases where you expect Tauri to truly shine:
- Cross-platform desktop applications — Tauri’s ability to compile to multiple platforms from a single codebase makes it a great choice for businesses looking to reach users across different operating systems without maintaining separate codebases. Examples of cross-platform desktop applications can include games, file managers, photo and video applications, and others.
- Lightweight applications — Tauri is perfect for building lightweight and efficient applications. Its small bundle size and quick startup time make it ideal for tools that users frequently open and close throughout their workday. And also, in cases where the applications need to process large amounts of data or perform complex calculations, Tauri’s performance benefits shine. The ability to offload heavy computations to Rust while maintaining a responsive UI is invaluable.
Further reading:
- Building a pomodoro timer with Tauri using React and Vite
- Rust, SolidJS, and Tauri: Create a cross-platform desktop app
Styling and animating Tauri apps
One of Tauri’s strengths is its flexibility in frontend development. Since Tauri uses web technologies for the user interface, you have access to the full power of CSS for styling and web animations for creating dynamic, engaging user experiences.
Let’s explore both native support and third-party options for styling and animating your Tauri applications.
Native support
Tauri fully supports standard CSS, allowing you to style your applications just as you would a web application. This support includes CSS grids and flexbox for layout, CSS variables for theming, media queries for responsive design. You can also use native CSS animation to add motion to your Tauri application.
For more complex and dynamic animations, you can use the Web Animations API:
document.querySelector('.animate-me').animate([
    { transform: 'scale(1)', opacity: 1, offset: 0 },
    { transform: 'scale(.5)', opacity: .5, offset: .3 },
    { transform: 'scale(1)', opacity: 1, offset: 1 }
], {
    duration: 2000,
    easing: 'ease-in-out',
    delay: 10,
    iterations: Infinity,
    direction: 'alternate',
    fill: 'forwards'
});
Third-party tools/libraries
While native CSS and JavaScript animations are powerful, you might want to use third-party libraries or CSS frameworks like TailwindCSS for more complex animations or to speed up development. You can use existing CSS libraries in Tauri like Framer Motion, GSAP, Anime.js, and others, just as you would in a web application:
<div class="bg-blue-500 text-white p-4 rounded hover:bg-blue-600 transition-colors duration-300">
    Hover me!
</div>
Deploying your Tauri project
Deploying a Tauri project involves building your application, packaging it for different platforms, and distributing it to your users. You can build and distribute your Tauri application directly from your own website or server. Also, you can leverage the official app stores (like Microsoft Store, App Store or Snap Store) for wider reach and easier updates.
To build your Tauri application for production, use the following command:
npm run tauri buildThis command will create optimized, production-ready builds for your target platforms. Remember to always test your production build thoroughly before deployment.
After building, you have to package your app for different platforms. Tauri can generate installers for Windows (.msi, .exe), macOS (.dmg, .app), and Linux (.AppImage, .deb, .rpm).
To specify which installers to build, you can modify the tauri.conf.jsonfile to include more options. Make sure to set a unique identifier for your application and include the necessary metadata (description, copyright, etc.). Also, code signing is important for distribution, especially for macOS and Windows.
For macOS:
npm run tauri build -- --target universal-apple-darwinFor Windows:
npm run tauri build -- --target x86_64-pc-windows-msvcOnce your application is built and signed, you’re ready to distribute it either on your own website or any supported app store.
Tauri vs. similar (e.g. Electron)
Tauri and Electron are both popular frameworks for building cross-platform desktop applications using web technologies. However, they have significant differences in their approach, performance, and ecosystem. Let’s compare these frameworks across various aspects:
| Tauri | Electron | |
|---|---|---|
| Features | – Uses the system’s native webview, resulting in smaller app sizes – Allows using any frontend framework – Provides a plugin system for extending functionality | – Bundles Chromium and Node.js with every app – Has a large ecosystem of pre-built components and tools – Offers a more mature set of APIs for desktop integration |
| Performance | – Smaller application size (often <10MB) due to using the system’s webview – Faster startup times – More efficient CPU and battery usage | – Larger application size (often >100MB) due to bundling Chromium – Slower startup times – More resource-intensive, which can impact battery life on laptops |
| Community | – Rapidly growing community – Increasing number of plugins and tools being developed – Strong focus on performance and security | – Large, established community – Vast ecosystem of plugins, tools, and resources – Long history of production use in major applications |
| Learning curve | Steeper (requires Rust knowledge) | Gentler (JS-based) |
| Documentation | – Comprehensive official documentation – Growing number of tutorials and guides | – Extensive official documentation – Vast array of tutorials, books, and courses available |
When choosing between Tauri and Electron, consider your project requirements, team expertise, and target audience. Tauri is ideal for applications where performance and security are critical, while Electron might be preferable for projects that require extensive OS integration or benefit from its large ecosystem of tools and plugins.
Further reading:
- Tauri vs. Electron: A comparison, how-to, and migration guide
- Exploring the top Rust web frameworks #Tauri
- The state of Rust GUI libraries #Tauri
Conclusion
Tauri has, over time, become a compelling framework for building lightweight, secure, and cross-platform desktop applications using web technologies. Its unique approach of leveraging the host operating system’s native webview, combined with a Rust backend, offers significant advantages in terms of performance, security, and resource efficiency.
While Tauri has a steeper learning curve due to its Rust component, it compensates with excellent documentation, a growing community, and a robust set of features. Its custom error handling, small bundle sizes, quick startup times, and flexible development options make it an attractive choice for developers seeking to create efficient desktop applications.
Tauri’s ability to integrate with any JavaScript framework for the frontend, coupled with its support for native styling and animation capabilities, provides the needed flexibility to create sophisticated user interfaces.