Custom HTML elements have been around for a long time and can be very useful in many cases. However, React has struggled with custom elements for various reasons, the biggest being that it treated unrecognized props as attributes instead of properties.

In this article, we will take a detailed look at what custom elements are and how they work, the challenges of using them with React, and the latest changes in React 19 that address these challenges.
What are Custom HTML elements?
Custom HTML elements are HTML elements that you define yourself. Their behavior is completely customizable. For example, you can set up your own properties, methods, and event listeners based on what you need. While HTML offers many built-in elements that cover most basic features, there are times when creating custom elements makes sense.
Here are a few reasons why you might want to use custom HTML elements:
- Custom functionalities: Encapsulating complex HTML functionalities into a single custom HTML component can be more efficient and easier to reuse. This approach is similar to creating components in frameworks like React
- Code organization and readability: Custom HTML elements can help make your code more organized and readable. Standard HTML/CSS/JS web apps can get cluttered quickly, but custom elements allow you to organize things similarly to frameworks like React
- Enhanced reusability: You can re-use these elements virtually anywhere within your HTML as long as the JavaScript used to define the element is present
However, it’s important to keep in mind that custom elements are not always the best solution. Often, existing HTML elements serve most purposes, and frameworks offer better tools for handling multiple components.
Creating your own custom element
Firstly, it’s important to understand a few naming rules for custom HTML elements:
- The name has to start with a lowercase ASCII character
- The name must contain a hyphen (
-). This ensures that the browser knows that the element is custom. For example,<my-custom-element></my-custom-element> - Self-closing tags, such as
<img />tags, are not allowed
After choosing a suitable name for our element, we need to define it using JavaScript. To define a custom element, we make use of a class that extends the built-in HTMLElement class, which is the base class for all HTML elements.
This essentially gives our element the standard behavior of an HTML element. An important point to remember here is that you can customize other existing elements, such as HTMLParagraphElement, which is a standard paragraph element that can be further customized:
class MyElement extends HTMLElement {
  constructor() {
    super();
  }
}
Inside the constructor, we attach a shadow DOM to encapsulate our element’s DOM and CSS. You can define event listeners, set attributes, and initialize properties within the constructor. Any functions are defined outside the constructor. In the example below, we are assigning a click event listener to our element:
class MyElement extends HTMLElement {
  constructor() {
    super();
    this.attachShadow({ mode: 'open' });
    const span = document.createElement('span');
    span.textContent = 'Click me!';
    // Append the span element to the shadow root
    this.shadowRoot.appendChild(span);
    // Add an event listener to the span
    span.addEventListener('click', this.handleClick);
  }
  handleClick() {
    alert('Element clicked!');
  }
}
The code above simply displays a span with the text Click me!. When you click on the span, an alert will be shown. Lastly, you need to register your custom element with the browser using the customElements.define method. The first argument is the name of our custom element and the second argument is the class that defines its behavior (MyElement).
The implementation above is more or less enough to get a grasp on custom elements and get started with your implementations. In the following sections, we’ll discuss properties and attributes and the issues with custom elements in React.
Custom elements in React
Before discussing the challenges React faces when it comes to custom elements, let’s look at how to use custom HTML elements with React. There are several different approaches to using custom elements in React. The most common of these are using JSX and refs.
Implementing custom elements using JSX
The simplest way to use custom elements in React is to replicate the JavaScript approach in your React code. Let’s use the example we discussed earlier and implement it in React:
import React from "react";
class MyElement extends HTMLElement {
  constructor() {
    super();
    this.attachShadow({ mode: "open" });
    const span = document.createElement("span");
    span.textContent = "Click me!";
    this.shadowRoot.appendChild(span);
    span.addEventListener("click", this.handleClick);
  }
  handleClick() {
    alert("Element clicked!");
  }
}
customElements.define("my-element", MyElement);
const App = () => {
  return (
    <div>
      <my-element></my-element>
    </div>
  );
};
export default App;
As you can see, the same basic concept is being used here. A class is defined outside the functional component and the custom element is used within the component. The issue with this approach is that JSX doesn’t provide direct access to the custom element instance, making it harder to call methods or interact with properties directly.
Implementing custom elements using refs
Refs allow you to access DOM nodes directly. This means that we can easily call methods, set properties, and add event listeners. This also makes it easier to interact with features like states, for example. We will be using this approach for the rest of the article.
To create a custom element using refs, we will use the useRef Hook to create a reference and assign it to our custom element. To bind event listeners and properties to our elements, we will use the useEffect Hook. Our previous example using refs will look something like this:
import React, { useRef, useEffect } from "react";
class MyElement extends HTMLElement {
  constructor() {
    super();
    this.attachShadow({ mode: "open" });
    const span = document.createElement("span");
    span.textContent = "Click me!";
    this.shadowRoot.appendChild(span);
  }
}
customElements.define("my-element", MyElement);
const App = () => {
  const myElementRef = useRef(null);
  useEffect(() => {
    const myElement = myElementRef.current;
    if (myElement) {
      const handleClick = () => {
        alert("Element clicked!");
      };
      const span = myElement.shadowRoot.querySelector("span");
      span.addEventListener("click", handleClick);
      return () => {
        span.removeEventListener("click", handleClick);
      };
    }
  }, []);
  return (
    <div>
      <my-element ref={myElementRef}></my-element>
    </div>
  );
};
export default App;
Similar to the JSX approach, we create a class for the base definitions of our element. However, the event listener is attached using refs and effects.
Now, let’s add an attribute to our element that is linked to our event listener. Basically, we will have a data-text attribute defined for our element. The value of this attribute will be shown inside the span when it is clicked. The complete code and demo can be seen below:
Custom-elements-React-Demo
Custom-elements-React-Demo by saleh_mubashar using react, react-dom, react-scripts
Challenges with custom elements in React
Although the examples and implementations discussed in the previous section work quite well, there are a few issues that often come up when using custom elements with React. Before we discuss the latest updates that have resolved some of them, let’s take a look at some of these issues.
Props treated as attributes
React treats unrecognized props passed to components as attributes rather than properties. Usually, this is not an issue with regular elements. However, with custom elements, this causes issues as setting an attribute might not trigger the same internal logic as setting a property. Let’s look at an example:
import React from "react";
if (!customElements.get("my-element")) {
  class MyElement extends HTMLElement {
    constructor() {
      super();
      this.attachShadow({ mode: "open" });
      this.span = document.createElement("span");
      this.shadowRoot.appendChild(this.span);
    }
    set dataText(value) {
      this.span.textContent = value;
    }
    get dataText() {
      return this.span.textContent;
    }
  }
  customElements.define("my-element", MyElement);
}
const App = () => {
  return <my-element dataText="Hello, World!">h</my-element>;
};
export default App;
This code should theoretically display the following:
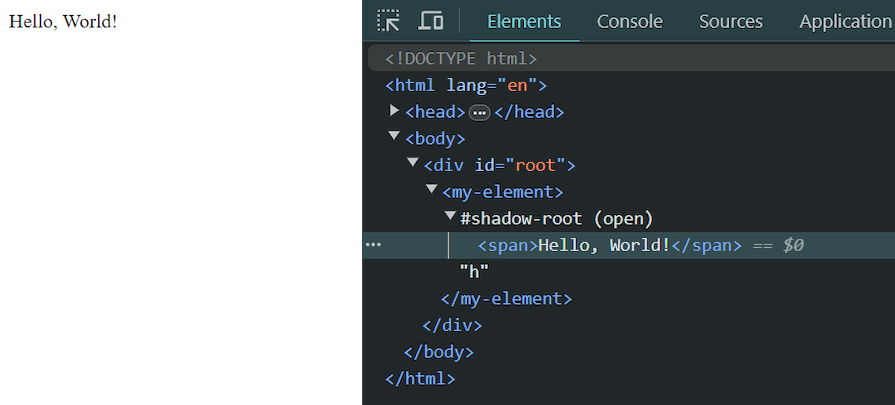
However, in React versions earlier than 19, the result is the following:
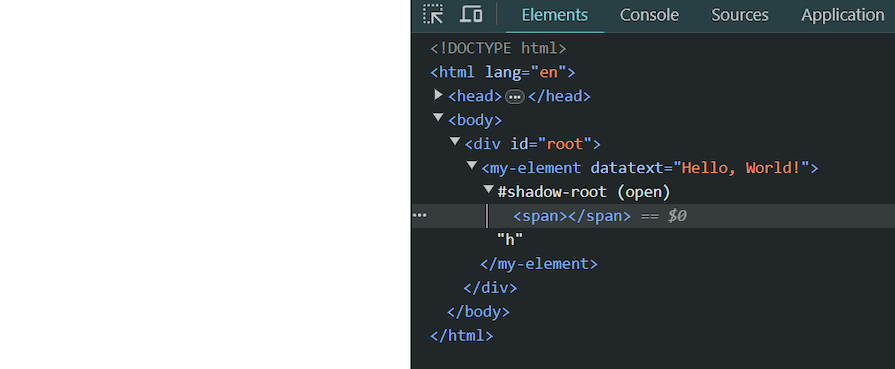
As you can see, the text content of the <span> element is empty. The reason for this is that dataText is treated as an attribute, not a property. The dataText property setter on the custom element is not triggered. As a result, the text content of the span inside the shadow DOM is not set.
SSR and CSR compatibility
Another issue that arises with custom elements in React is server- and client-side rendering errors due to the mishandling of the properties. Similar to the previous issue, React treats the attributes as properties. This can result in unexpected behavior and additional re-renders on the client side.
React 19 changes
To fix the issues above, React 19 introduced the following changes:
- For server-side rendering, any props passed to the custom element will be considered props and not attributes if their type is a primitive value like a string or a number. Non-primitive types like objects will simply be omitted
- For client-side rendering, any property that is defined in the custom element instance will not be treated as an attribute. Otherwise, they will be assigned as attributes
You can view a detailed review of the updates to React custom elements here. The first two sections show the differences between React v18.2.0 and the latest v19, which is currently in beta.
Remember the example we looked at in the previous section? Because dataText is defined in our custom element instance, it will be considered a property, and the text content of the span inside the shadow DOM will be set.
Conclusion
Custom HTML elements can be very useful in the right situations. While working with them in React used to be tricky, the updates in React 19 have made things much smoother by fixing issues with props and attributes. Hopefully, this article has made the technical side of things a bit clearer for you to understand.
Would you be interested in joining LogRocket's developer community?
Join LogRocket’s Content Advisory Board. You’ll help inform the type of content we create and get access to exclusive meetups, social accreditation, and swag.