Behind every successful, high-quality software product is a well-defined, well-managed UI/UX design process. UI/UX designers collaboratively research, analyze, and design product prototypes before developers start developing the actual software product. These can be either a low-fidelity prototype or high-fidelity ones based on the closeness to the design.
Low-fidelity or high-fidelity, a software prototype delivers the visual and behavioral idea of the planned software product without initiating the software development process.
In this article, I’ll share all about low-fidelity prototypes by discussing their importance, benefits, and differences with high-fidelity prototypes. We’ll also learn practical low-fidelity prototyping by creating a sample prototype and delineating best practices.
What is a low-fidelity prototype?
A low-fidelity prototype, also known as a low-fi prototype, is an early-stage, simple product prototype that delivers the core concept of a specific product.
Here, “low-fidelity” refers to the level of detail in the visual segments. So, a low-fidelity prototype may use mono-color (usually black, grey, and white) placeholder images, shapes, simple drawings, and texts as design building blocks instead of using modern, colorized UI elements that the actual product will use:
UI/UX designers typically start creating low-fidelity prototypes whenever they need to experiment with their ideas in the UX research analysis stage according to their preferences and organization guidelines. A low-fidelity prototype can be:
- A digital prototype developed using a UI/UX prototyping tool or graphic designing software
- A drawing or sketch created with a digital freehand drawing tool on a tablet or smart whiteboard
- A sketch that is drawn on a physical whiteboard or paper during a UX design meeting
- A physical paper design assembled with parts of paper-based simple UI element blocks
When designers improve the level of detail of a low-fidelity prototype, it becomes a high-fidelity prototype.
Benefits of low-fidelity prototyping
UI/UX designers consider creating low-fidelity prototypes during the early stage of the product design process because of speed and cost-effectiveness, better user-flow focus, and easy iterative design. I’ll talk about these benefits more now:
1. Speed and cost-effectiveness
An artist may spend a lot of time creating a painting if the particular painting’s objects require higher details. Similarly, the prototyping process becomes time-consuming if UI elements are more real-product-like. Low-fidelity prototypes are typically sketches or simple digital designs with fewer details. So, UI/UX designers can create, update, or re-create them quickly, proving the low-fidelity prototyping method is faster and more cost-effective.
2. Focus on the functionality and user flow
Low-fidelity prototypes are simple to create and edit, so UI/UX designers don’t need to spend time adding more visual details to bring the prototype closer to the actual product visual level. Designers can keep their focus on the required functionality and user flow since they don’t need to worry about visual improvements and standards.
3. Encourages iterative design and feedback
Not all product design processes are waterfall-model-like and non-iterative — a typical product UI/UX design process is iterative and has frequent stakeholder involvement. UI/UX designers and stakeholders collaboratively improve design prototypes. Low-fidelity prototypes can be easily modified and re-created, encouraging stakeholders to experiment with new ideas and improve current implementations.
How to create a low-fidelity prototype?
Initial low-fidelity prototyping typically begins whenever designers need to visualize their design ideas during the user research analysis stage. Later, during each iterative design cycle, designers can modify the current low-fidelity prototype based on stakeholder ideas or turn it into a high-fidelity one.
Here are generic steps that you can follow to create a new low-fidelity prototype for any software product:
Step 1: Identify goals and requirements
You might need to create a low-fidelity prototype for the user login and registration flow. Or you may need to go some steps forward and make a low-fidelity prototype to cover several user flows or your entire product if it’s not complex. Sometimes, you need to test a new design idea for a part of a user flow .
So, first, decide what you need to prototype and identify what should be included in it.
Step 2: Decide on the level of details
There are no strict rules for controlling the level of detail in a low-fidelity prototype. So, decide on the prototype detail level based on your team’s preference and time allocation. You may create a somewhat real button-like mono-color rectangle with text for a button or a rectangular box with some shorthand text.
Step 3: Select a tool for prototyping
The previous steps will help you determine the prototyping method/tool you want to use.
If you need online collaboration, greater details, and interactivity in your prototype, you may choose a fully featured prototyping tool like Figma to create your low-fidelity prototype.
Creating a quick sketch on the whiteboard is great if you need to present and discuss a design idea during a meeting.
Step 4: Create your prototype
Turn your design idea or written UX research analysis into visuals by creating a low-fidelity prototype. Make sure to create visuals based on low-fidelity design characteristics, such as using basic shapes, text, placeholder images, etc.
Step 5: Test your prototype
Verify that your low-fidelity prototype delivers the idea you planned to implement for the expected audience. Make sure that your prototype is easy to read and has self-explanatory visuals. A prototype that adheres to UX and HCI principles easily passes the prototype testing step.
Step 6: Present it and continue with the design cycle
Creating a low-fidelity prototype aims to drive the UX design cycle by actively gathering feedback from stakeholders. Once you finalize your prototype, continue with the design process by presenting it to the intended audience.
Use insights and feedback to improve the current low-fidelity prototype or start creating a new high-fidelity prototype (or converting your low-fidelity prototype into a high-fidelity one).
Low-fidelity prototypes vs. high-fidelity prototypes
Low-fidelity and high-fidelity prototypes differ based on the closeness to the actual software product.
Here’s a quick summary of the differences between these two prototypes:
| Comparison factor | Low-fidelity prototype | High-fidelity prototype |
| The key goal of prototyping | Testing a product idea in a cost-effective way | Creating a read-to-develop product design targeting the design handoff process |
| A collaboration of | UI/UX designers, product managers, and users | UI/UX designers, product managers, users, and developers |
| Design cost and time | Low | High |
| The level of detail (closeness to the real product interface) | Low | High |
| Frequency of changes in design iteration cycles | Rapid, since designers often have to test multiple ideas | Only when needed, since primary design ideas are already selected using low-fidelity prototypes |
| Primary focus during designing | Core product functionality based on user flows | Overall functionality and higher details that help the prototype behave like the real product, i.e.,implementing dropdown menu states |
| Prototype connections | Static, usually drawn with arrows | Dynamic, usually implemented with real user actions/events |
| Prototyping methods and tools | Freehand drawings, graphic design software, interface design tools like Figma, and dedicated wireframing tools like Balsamiq | Interface design tools like Figma |
Choose a prototype type based on your situation by comparing your requirements with the facts in the above comparison table.
In summary, low-fidelity prototypes are helpful in early design cycles where you experiment with new design ideas and actively request stakeholders’ input.
High-fidelity prototypes are very close to the actual product from visual and behavioral perspectives and won’t often be changed compared to low-fidelity prototypes. They are helpful in later design cycles when you are ready to initialize the design handoff process.
Examples of low-fidelity prototypes
Let’s create a low-fidelity prototype for a practical app idea to learn how to do low-fidelity prototyping.
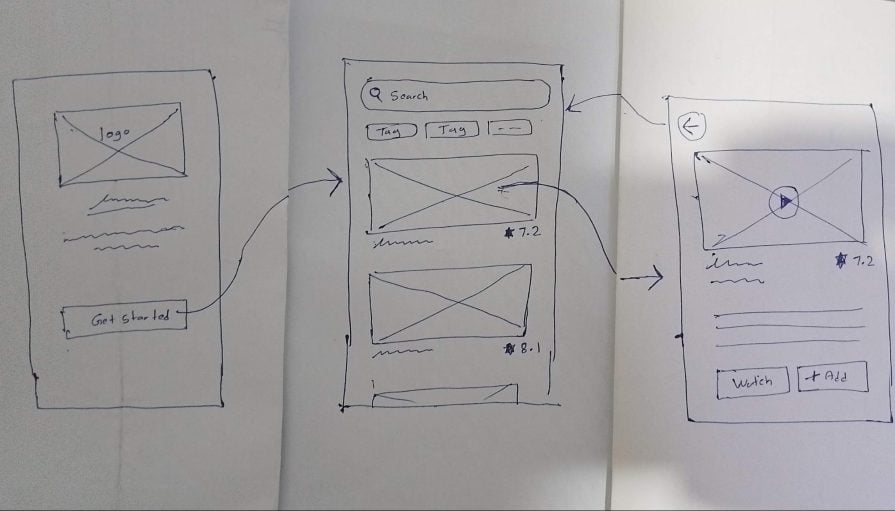
We’ll create a paper-based sketch and a digital wireframe for a simple movie-searching app based on the following requirements: The movie-searching app will have three main screens:
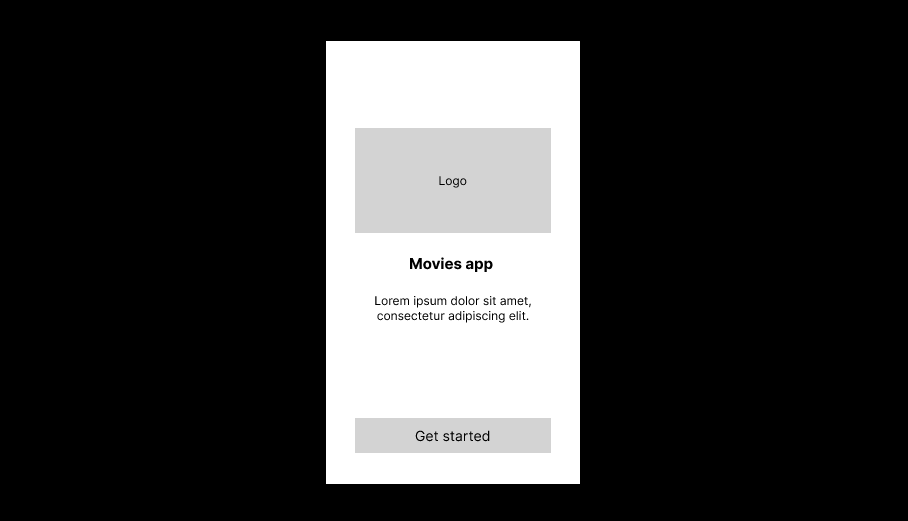
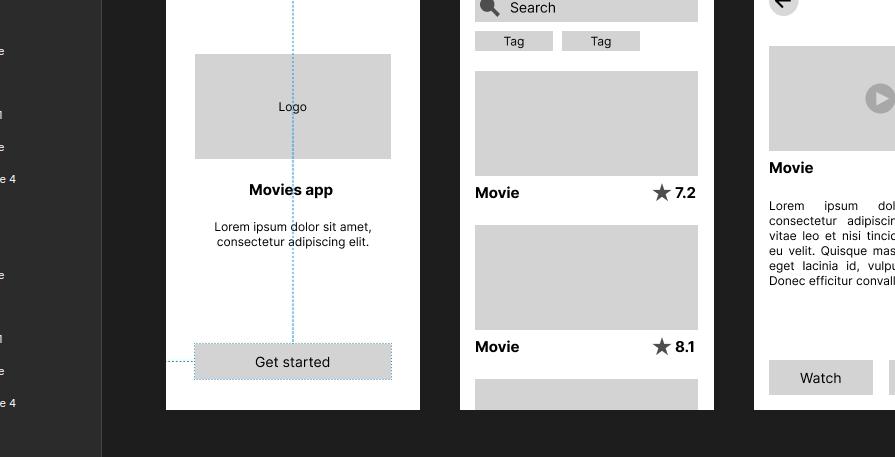
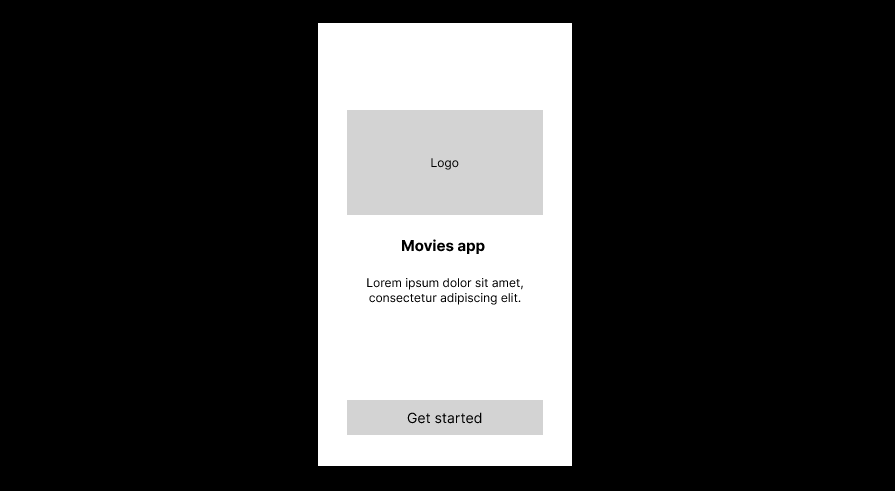
- Welcome screen — with the app logo, some introductory text, and a get started button that opens the movie list
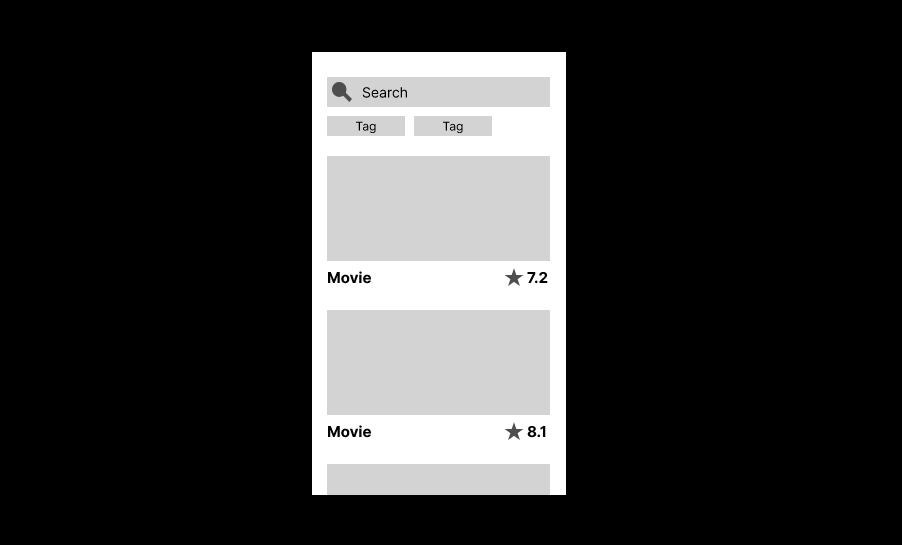
- Movies list — showing movie thumbnails, and the user can filter results by search query and activate tags
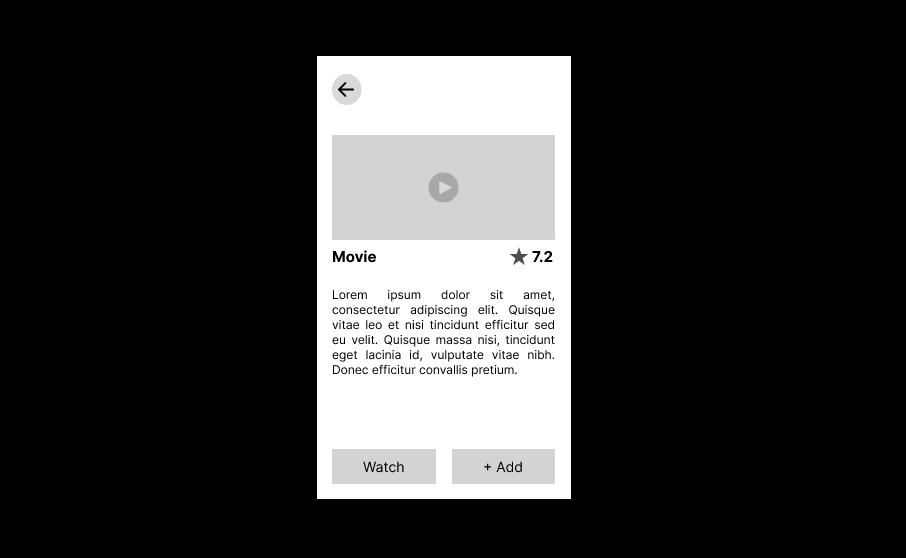
- Movie details page — will be displayed with the selected movie information once the user clicks a certain movie, and has a back button to go back to search results
Creating a paper-based low-fidelity prototype
Get a pen and an empty piece of paper for prototyping. Remember the level of details — we’ll use rough element representations with fewer details since this is a low-fidelity prototype that will be changed so often. Also, we need to complete this as quickly as possible since low-fidelity prototyping should be cost-effective.
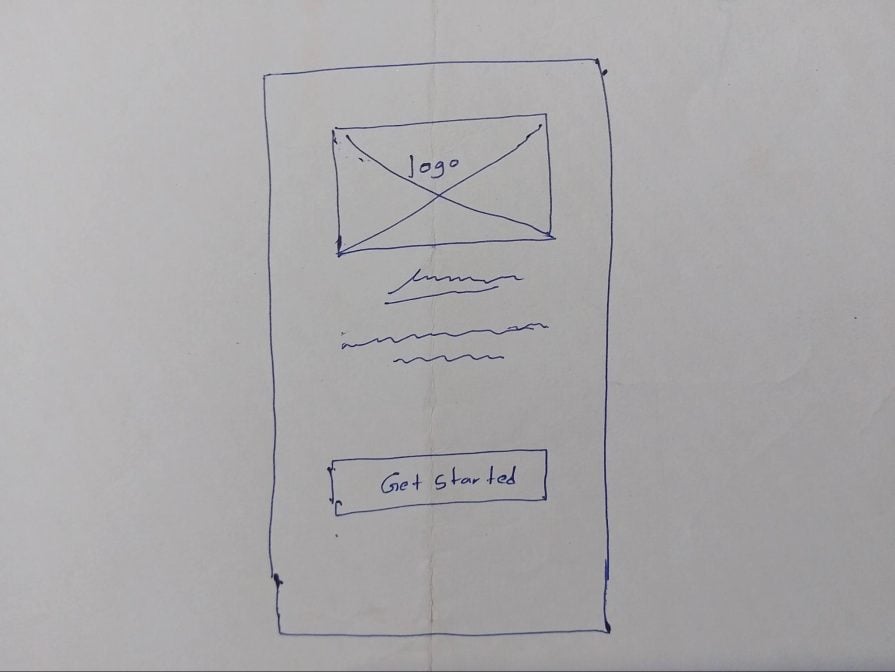
Create the welcome screen by drawing a placeholder box for the logo and a simple text button:
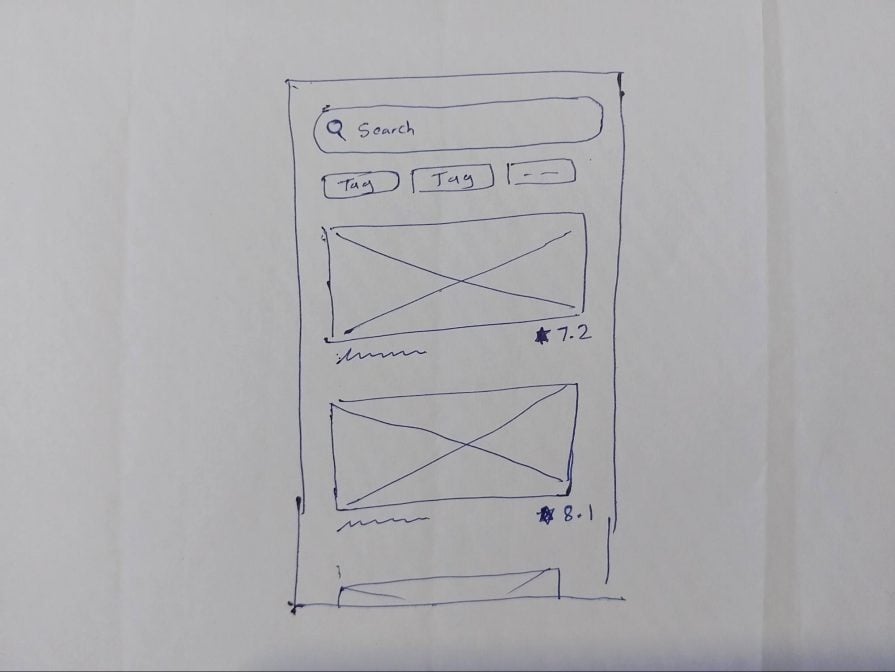
Next, create the movie list by drawing a search bar, tags, and search results. Use placeholder image boxes and some freehand drawing lines for movie names as follows:
Draw the movie details page using the same low-fidelity prototyping characteristics:
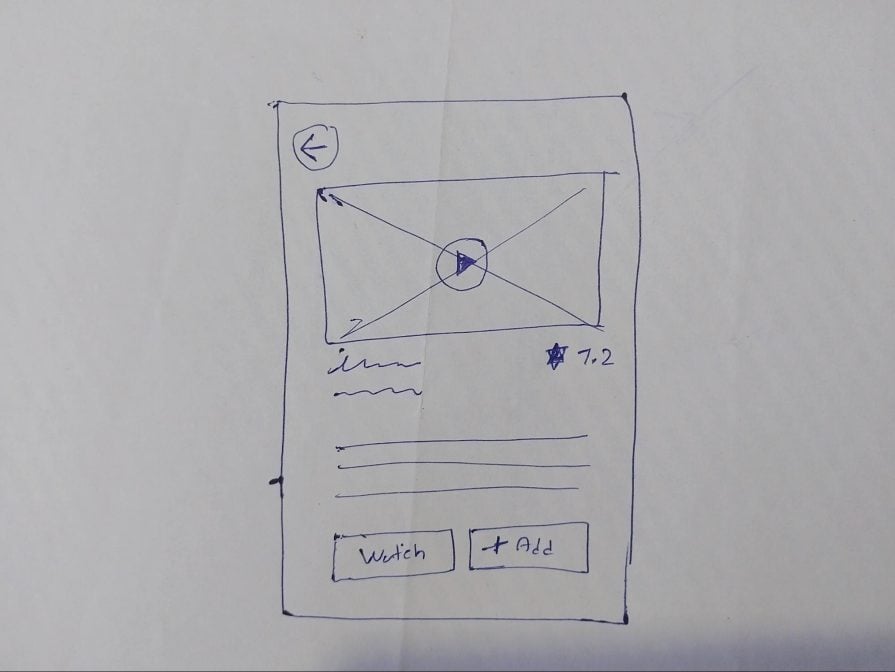
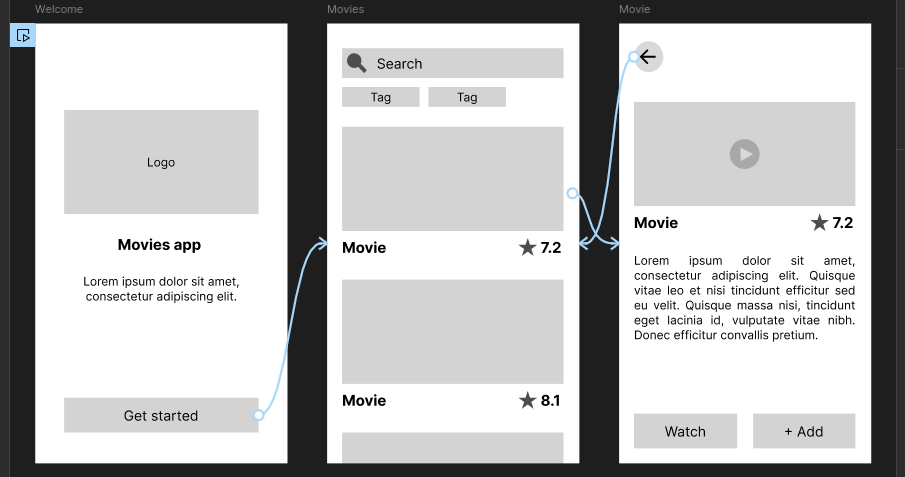
Finally, draw navigation actions using simple arrow drawings to complete the low-fidelity prototype, as shown in the following snapshot:
Creating low-fidelity prototypes using freehand drawing is a great idea to present design ideas during meetings or instantly test your design ideas alone. If designers are physically present at a UX design meeting, you can conduct real-time collaboration using a whiteboard and several marker pens.
Creating a digital low-fidelity prototype with Figma
Some UX designers prefer creating digital low-fidelity prototypes even when experimenting with design ideas. If your team has remote UI/UX designers, using a collaborative digital prototyping tool is the undoubted solution.
Let’s create the same prototype using the popular interface design tool, Figma. Figma typically offers more features for high-fidelity design, but we can use its basic shapes, text, and vector drawing to create low-fidelity prototypes.
Use a frame and text to create a placeholder for the logo. Create text segments with some Lorem ipsum placeholder text, but use the right text for the get started button as follows:
Imagine drawing UI elements in the movie list screen — you’ll have to draw a search icon and a star shape. Since this is a low-fidelity prototype, you don’t need to import icon packages and create pixel-perfect icons. The star shape is already in the Figma toolbox, but how can we quickly create a simple search icon?
Unleash your problem-solving skills and construct a simple search icon with an ellipse and rectangle, as demonstrated in the following preview:
Create the movie list using star shapes, a simple search icon, and other atomic Figma elements. Here is a sample design for the movie list:
The movie details screen has a play icon. We can assemble a simple play icon using ellipses and polygon shapes, which are built into the Figma toolbox. Here is a sample design for the movie details screen:
Finally, we can add navigation support by adding Figma prototype connections:
Now, stakeholders can evaluate your design idea using click navigations after you finalize testing the prototype functionality and visuals:
You can download the Figma design file of this sample low-fidelity prototype from this Figma community link. You can also use Figma wireframing kits and plugins to speed up the low-fidelity prototyping process using pre-designed UI elements. Moreover, AI-powered tools like Uizard can generate wireframes based on ChatGPT prompts.
Best practices for low-fidelity prototyping
There are no strict rules for low-fidelity prototyping — designers use various drawing techniques and methods. Some designers use placeholder elements with digital design tools and name the resultant prototype as a wireframe. Others love to make paper or whiteboard drawings for prototyping and name resultant designs as sketches. All these are low-fidelity prototypes.
However, regardless of the prototyping method, every UI/UX designer can follow the following best practices to create a better low-fidelity prototype that stakeholders can understand without any confusion:
- Strive to save time with placeholder text and elements, but draw key elements properly
- Use mono-colors or just black and white. Color themes are less important here, so don’t spend time selecting color themes
- Draw only required prototype connections to reduce complexity. If you use a paper-based method, every connection arrow is visible all the time, so draw the necessary connections
- Don’t try to improve element details beyond the required level. Adhere to low-fidelity prototype characteristics and create prototypes with lower detail levels
- Separate complex screens into sections. If the app flow isn’t simple, use Figma sections or new sheets of paper to separate screens
- Don’t hesitate to make rapid changes and experiments. Edit, erase, and re-create till you see an optimal representation of your design idea
- Be open to stakeholder ideas
- Maintain consistency. Drawing consistent element shapes improves the quality of the low-fidelity prototype
Conclusion
This article explored low-fidelity prototyping by learning its characteristics, design methods, creation steps, and tools. We also created a sample low-fidelity prototype using two design methods: the pen-and-paper method and Figma.
We compared low-fidelity prototypes with high-fidelity versions and understood how to create better low-fidelity prototypes with best practices that every experienced UI/UX designer should know.
The key goal of low-fidelity prototyping is to create a quick visual representation of a design idea for stakeholder evaluation, so we should always strive to create simple, concise, low-fidelity prototypes with self-explanatory UI elements.
There are no strict rules for low-fidelity prototyping, but make sure to follow best practices to deliver a clear prototype and avoid unwanted meetings.
gd2md-html: xyzzy Mon Aug 12 2024