In the evolving landscape of cloud computing, public cloud vendors play a pivotal role in enabling organizations to scale and innovate rapidly. Among the leading public cloud providers, Google Cloud Platform (GCP) ranks third in popularity, following Amazon Web Services (AWS) and Microsoft Azure. GCP stands out for its robust infrastructure, advanced data analytics capabilities, and comprehensive suite of services that cater to businesses of all sizes.
One of the key offerings from GCP is its managed Kubernetes service, Google Kubernetes Engine (GKE). This service simplifies the deployment, management, and scaling of containerized applications, allowing developers to focus on building features rather than managing infrastructure. GKE is designed to offer a seamless experience, integrating with GCP's extensive ecosystem and providing powerful tools for monitoring, security, and automation.
Infrastructure as code (IaC) tools like Terraform provide a way to efficiently manage infrastructure on GCP and provision resources like GKE cluster. Terraform enables the declarative management of cloud resources, making it easier to automate the provisioning process, enforce consistency, and maintain infrastructure state across environments.
In this post, you will learn the basics of automating the provisioning of a managed Kubernetes cluster on Google Kubernetes Engine, using the Standalone VPC networking option, for deploying a Spring Boot microservices architecture generated with the JHipster framework.
This tutorial was created with the following tools and services:
Build a microservices architecture with JHipster
Create a Java microservices architecture using JHipster, Spring Boot, and Consul. JHipster is an excellent tool for generating a microservice stack with Spring Boot, Angular/React/Vue.js, and other modern frameworks. To deploy the application of this demo, you can either generate it using JHipster JDL or clone the sample repository from GitHub. Here is how you can build your microservices stack using JHipster:
Option 1: Generate the architecture with JHipster Domain Language (JDL)
mkdir jhipster-microservice-stack
cd jhipster-microservice-stack
# download the JDL file.
jhipster download https://raw.githubusercontent.com/indiepopart/jhipster-terraform-gke/main/apps.jdl
# Update the `dockerRepositoryName` property to use your Docker Repository URI/Name.
# scaffold the apps.
jhipster jdl apps.jdl
Option 2: Clone the sample repository
git clone https://github.com/oktadev/jhipster-terraform-gkeUpdate kubernetes/invoice-k8s/invoice-deployment.yml, kubernetes/product-k8s/product-deployment.yml, and kubernetes/store-k8s/store-deployment.yml with your Docker Repository URI/Name instead of your-docker-repo.
Create a GKE cluster using Terraform
Create a folder for the Terraform configuration and some *.tf files:
mkdir terraform
cd terraform
touch providers.tf
touch cluster.tf
touch outputs.tf
touch variables.tf
touch terraform.tfvars
Edit the file providers.tf and add the following content:
# terraform/providers.tf
terraform {
  required_version = ">=1.8"
  required_providers {
    google = {
      source  = "hashicorp/google"
      version = "~> 6.7.0"
    }
  }
}
Edit the file cluster.tf and add the Standalone VPC and GKE cluster configuration:
# terraform/cluster.tf
provider "google" {
  project     = var.project_id
  region      = var.location
}
resource "google_compute_network" "default" {
  project = var.project_id
  name    = "example-network"
  auto_create_subnetworks  = false
  enable_ula_internal_ipv6 = true
}
resource "google_compute_subnetwork" "default" {
  project = var.project_id
  name    = "example-subnetwork"
  ip_cidr_range = "10.0.0.0/16"
  region        = var.location
  stack_type       = "IPV4_IPV6"
  ipv6_access_type = "EXTERNAL"
  network = google_compute_network.default.id
  secondary_ip_range {
    range_name    = "services-range"
    ip_cidr_range = "10.1.0.0/24"
  }
  secondary_ip_range {
    range_name    = "pod-ranges"
    ip_cidr_range = "10.2.0.0/16"
  }
}
resource "google_container_cluster" "default" {
  project = var.project_id
  name    = "example-autopilot-cluster"
  location                 = var.location
  enable_autopilot         = true
  enable_l4_ilb_subsetting = true
  network    = google_compute_network.default.id
  subnetwork = google_compute_subnetwork.default.id
  ip_allocation_policy {
    stack_type                    = "IPV4_IPV6"
    services_secondary_range_name = google_compute_subnetwork.default.secondary_ip_range[0].range_name
    cluster_secondary_range_name  = google_compute_subnetwork.default.secondary_ip_range[1].range_name
  }
  # Set `deletion_protection` to `true` will ensure that one cannot
  # accidentally delete this instance by use of Terraform.
  deletion_protection = false
}
The declarations above create a Standalone VPC network named example-network, and a sub-network in the selected region, which will host the Kubernetes cluster. Notice the subnet defines two secondary IP ranges for cluster pods and services. By allocating from a range separate from the range used for primary IP addresses, you can separate infrastructure (VMs) from services (containers) and set up firewall controls for VM alias IP addresses separately from the firewall controls for a VM's primary IP addresses. For example, you can allow certain traffic for container pods and deny similar traffic for the VM's primary IP address.
For the GKE cluster, the configuration enables Autopilot mode, which is a fully managed Kubernetes service that automatically adjusts the cluster's resources based on the workload requirements. Autopilot mode simplifies cluster management by automatically provisioning and scaling resources, optimizing the cluster for cost and performance, and providing a serverless experience for deploying applications.
Edit the file outputs.tf and add the following content:
# terraform/outputs.tf
output "cluster_name" {
  value = google_container_cluster.default.name
}
Edit the file variables.tf and add the following content:
# terraform/variables.tf
variable "project_id" {
  description = "project id"
}
variable "location" {
  description = "value of the location"
  default     = "us-east1"
}
Set the default Google project in the file terraform/terraform.tfvars:
# terraform/terraform.tfvars
project_id = "<google-project-id>"
You can find the project ID with gcloud CLI:
gcloud projects listNOTE: In general, a Shared VPC network is a commonly used architecture that suits most organizations with a centralized management team. Among other prerequisites, the Shared VPC must be created within an organization, which requires a company website and email address. For simplicity, in this post, the selected network topology is a Standalone VPC. Check out Google best practices for networking
Provision the cluster
With the Terraform configuration ready, ensure that you are logged in with the GCloud CLI:
gcloud auth application-default loginNext, initialize the Terraform workspace and plan the changes:
cd terraform
terraform init
terraform plan -out main.tfplan
Review the plan and make sure everything is correct. Then apply changes:
terraform apply main.tfplanOnce the GKE cluster is ready, you will see the output variables printed to the console:
Apply complete! Resources: 3 added, 0 changed, 0 destroyed.
Outputs:
cluster_name = "example-autopilot-cluster"
For kubectl commands, run the following GCloud CLI option for retrieving the cluster credentials:
gcloud container clusters get-credentials example-autopilot-cluster --location us-east1NOTE: If you check the cluster details with
kdashorkubectl get nodes, you will not see any nodes since GKE Autopilot clusters allocate nodes only when you start deploying workloads to it.
Set up OIDC Authentication using Auth0
Since you are using Terraform, you can set up the Auth0 application using the Auth0 Terraform provider. This will allow you to automate the setup of the Auth0 application and manage the addition of users, customizations, and such.
Find your Auth0 domain with the following Auth0 CLI command:
auth0 tenants listCreate a machine-to-machine Auth0 client for Terraform to identify at Auth0:
auth0 apps create \
  --name "Auth0 Terraform Provider" \
  --description "Auth0 Terraform Provider M2M" \
  --type m2m \
  --reveal-secrets
Set the clientId and clientSecret from the Auth0 CLI output as environment variables, as required by Terraform Auth0 provider:
export AUTH0_CLIENT_ID=<client-id>
export AUTH0_CLIENT_SECRET=<client-secret>
Find out the Auth0 Management API id and identifier:
auth0 apis listSet the API ID and API identifier as environment variables:
export AUTH0_MANAGEMENT_API_ID=<auth0-management-api-id>
export AUTH0_MANAGEMENT_API_IDENTIFIER=<auth0-management-api-identifier>
Then, retrieve all the scopes of the Auth0 Management API:
export AUTH0_MANAGEMENT_API_SCOPES=$(auth0 apis scopes list $AUTH0_MANAGEMENT_API_ID --json | jq -r '.[].value' | jq -ncR '[inputs]')Finally, grant all the scopes from the Auth0 Management API to the newly created clientId for Terraform:
auth0 api post "client-grants" --data='{"client_id": "'$AUTH0_CLIENT_ID'", "audience": "'$AUTH0_MANAGEMENT_API_IDENTIFIER'", "scope":'$AUTH0_MANAGEMENT_API_SCOPES'}'The previous grant is required for Terraform to create different types of resources in Auth0, like users and roles.
Edit terraform/providers.tf and add the Auth0 provider:
terraform {
  required_version = ">=1.8"
  required_providers {
    auth0 = {
      source  = "auth0/auth0"
      version = "~> 0.49.0"
    }
  }
}
Create a configuration file for the Auth0 resources:
cd terraform
touch auth0.tf
Edit auth0.tf and add the following content:
# terraform/auth0.tf
provider "auth0" {
  domain        = "https://<your-auth0-domain>"
  debug         = false
}
# Create a new Auth0 application for the JHipster app
resource "auth0_client" "java_ms_client" {
  name                = "JavaMicroservices"
  description         = "Java Microservices Client Created Through Terraform"
  app_type            = "regular_web"
  callbacks           = ["http://store.example.com/login/oauth2/code/oidc"]
  allowed_logout_urls = ["http://store.example.com"]
  oidc_conformant     = true
  jwt_configuration {
    alg = "RS256"
  }
}
# Configuring client_secret_post as an authentication method.
resource "auth0_client_credentials" "java_ms_client_creds" {
  client_id = auth0_client.java_ms_client.id
  authentication_method = "client_secret_post"
}
# Create roles for the JHipster app
resource "auth0_role" "admin" {
  name        = "ROLE_ADMIN"
  description = "Administrator"
}
resource "auth0_role" "user" {
  name        = "ROLE_USER"
  description = "User"
}
# Create an action to customize the authentication flow to add the roles and the username to the access token claims expected by JHipster applications.
resource "auth0_action" "jhipster_action" {
  name    = "jhipster_roles_claim"
  runtime = "node18"
  deploy  = true
  code    = <<-EOT
  /**
   * Handler that will be called during the execution of a PostLogin flow.
   *
   * @param {Event} event - Details about the user and the context in which they are logging in.
   * @param {PostLoginAPI} api - Interface whose methods can be used to change the behavior of the login.
   */
   exports.onExecutePostLogin = async (event, api) => {
     const namespace = 'https://www.jhipster.tech';
     if (event.authorization) {
       api.idToken.setCustomClaim('preferred_username', event.user.email);
       api.idToken.setCustomClaim(namespace + '/roles', event.authorization.roles);
       api.accessToken.setCustomClaim(namespace + '/roles', event.authorization.roles);
     }
   };
  EOT
  supported_triggers {
    id      = "post-login"
    version = "v3"
  }
}
# Attach the action to the login flow
resource "auth0_trigger_actions" "login_flow" {
  trigger = "post-login"
  actions {
    id           = auth0_action.jhipster_action.id
    display_name = auth0_action.jhipster_action.name
  }
}
# Create a test user. You can create more users here if needed
resource "auth0_user" "test_user" {
  connection_name = "Username-Password-Authentication"
  name            = "Jane Doe"
  email           = "jhipster@test.com"
  email_verified  = true
  # Don't set passwords like this in production! Use env variables instead.
  password        = "passpass$12$12"
}
resource "auth0_user_roles" "test_user_roles" {
  user_id = auth0_user.test_user.id
  roles   = [auth0_role.admin.id, auth0_role.user.id]
}
output "auth0_webapp_client_id" {
  description = "Auth0 JavaMicroservices Client ID"
  value       = auth0_client.java_ms_client.client_id
}
output "auth0_webapp_client_secret" {
  description = "Auth0 JavaMicroservices Client Secret"
  value       = auth0_client_credentials.java_ms_client_creds.client_secret
  sensitive   = true
}
Replace <your-auth0-domain> in the provider configuration. Now, you can run the Terraform script to create the Auth0 application. Run the following commands to initialize the script and apply it.
terraform init
terraform apply
Once it is done, you will see the Terraform output:
Apply complete! Resources: 8 added, 0 changed, 0 destroyed.
Outputs:
auth0_webapp_client_id = "1nQGDrJZfVG5tZsjVxAMThjFbuHTKXD7"
auth0_webapp_client_secret = <sensitive>
cluster_name = "example-autopilot-cluster"
Note the auth0_webapp_client_id from the output and get the auth0_webapp_client_secret with:
terraform output auth0_webapp_client_secretUpdate kubernetes/registry-k8s/application-configmap.yml to replace <your-auth0-domain>, <client-id>, and <client-secret> with these values. This configuration is loaded into Consul, and it shares the values with the gateway and microservices.
apiVersion: v1
kind: ConfigMap
metadata:
  name: application-config
  namespace: jhipster
#common configuration shared between all applications
data:
  application.yml: |-
    configserver:
      name: Consul
      status: Connected to Consul running in Kubernetes
    logging:
      level:
        ROOT: INFO
    jhipster:
      security:
        authentication:
          jwt:
            base64-secret: NTY5NTUyYzUzZDFlNjBkNjMzNDNkZWQzNDk0ZjAwOTQzZTU2ZTMyOTgxYTI3ZTZjYWViNjEzMmM3MGQ5MDNlY2YwYjY2MDc0ZDNlZWM1ZTY3ZDllNDE4NDlhY2M2YmViY2E3Mg==
        oauth2:
          audience:
            - https://<your-auth0-domain>/api/v2/
    spring:
      security:
        oauth2:
          client:
            provider:
              oidc:
                issuer-uri: https://<your-auth0-domain>/
            registration:
              oidc:
                client-id: <client-id>
                client-secret: <client-secret>
Deploy the microservices stack
Let us deploy the applications to the GKE cluster. The JHipster applications are designed to work with Consul for service discovery and configuration management. The Consul instances are deployed to the Kubernetes cluster, and the applications are configured to use Consul for service discovery.
Build the Docker images
You need to build Docker images for each app. This is specific to the JHipster application used in this tutorial, which uses Jib to build the images. Make sure you are logged into Docker using docker login. Navigate to each app folder (store, invoice, product) and run the following command:
./gradlew bootJar -Pprod jib -Djib.to.image=<docker-repo-uri-or-name>/<image-name>NOTE:
<image-name>would bestore,invoice, andproduct.
Update the Kubernetes descriptors
In the kubernetes/store-k8s folder, edit the file store-service.yml and set the following content:
# kubernetes/store-k8s/store-service.yml
apiVersion: v1
kind: Service
metadata:
  name: store
  namespace: jhipster
  labels:
    app: store
spec:
  selector:
    app: store
  ports:
    - name: http
      targetPort: 8080
      port: 80
Also, create a file kubernetes/store-k8s/store-ingress.yml and set the following content:
apiVersion: networking.k8s.io/v1
kind: Ingress
metadata:
  name: store-ingress
  namespace: jhipster
  annotations:
    kubernetes.io/ingress.class: 'gce'
spec:
  rules:
    - host: store.example.com
      http:
        paths:
          - path: '/'
            pathType: Prefix
            backend:
              service:
                name: store
                port:
number: 80NOTE: Although the kubernetes.io/ingress.class annotation is deprecated in Kubernetes, GKE continues to use this annotation.
For Consul instances to be spread across different zones, edit the file kubernetes/registry-k8s/consul.yml, and update the StatefulSet affinity:
spec:
  affinity:
    podAntiAffinity:
      preferredDuringSchedulingIgnoredDuringExecution:
        - podAffinityTerm:
            labelSelector:
              matchLabels:
                app.kubernetes.io/name: consul
                app: consul
            namespaces:
              - jhipster
            topologyKey: topology.kubernetes.io/zone
weight: 1NOTE:
preferredDuringSchedulingIgnoredDuringExecutionis a soft rule that allows the scheduler to schedule multiple consul pods in the same zone.
Update resource limits for autopilot. Edit kubernetes/store-k8s/store-deployment.yml and remove the resource.requests. Then repeat for the product-deployment.yml and invoice-deployment.yml.
resources:
  limits:
    memory: '1Gi'
cpu: '1'NOTE: When using autopilot clusters, if
requestsis less thanlimits, and the cluster does not support bursting, GKE sets the limits equal to the requests.
Deploy the microservices to GKE
You can deploy the microservices with the script generated by JHipster:
cd kubernetes
./kubectl-apply.sh -fNOTE: GKE Autopilot will return warnings if the container spec does not specify 'cpu' resource.
Run watch -n 1 kubectl get nodes and get the list of autopilot nodes:
NAME                                                  STATUS     ROLES    AGE     VERSION
gk3-example-autopilot-cl-nap-kng3oc2k-45c77a8e-92vf   Ready      <none>   85s     v1.30.3-gke.1639000
gk3-example-autopilot-cl-nap-kng3oc2k-45c77a8e-c82c   Ready      <none>   36s     v1.30.3-gke.1639000
gk3-example-autopilot-cl-nap-kng3oc2k-45c77a8e-zrxj   NotReady   <none>   35s     v1.30.3-gke.1639000
gk3-example-autopilot-cl-nap-kng3oc2k-f36cf7ca-g6s8   Ready      <none>   94s     v1.30.3-gke.1639000
gk3-example-autopilot-cl-nap-kng3oc2k-f36cf7ca-sl4b   Ready      <none>   92s     v1.30.3-gke.1639000
gk3-example-autopilot-cluster-pool-2-98d0acdc-vwzb    Ready      <none>   2m10s   v1.30.3-gke.1639000
gk3-example-autopilot-cluster-pool-3-bb546278-cq6w    Ready      <none>   39s     v1.30.3-gke.1639000
This might take some time as autopilot will start assigning nodes first and then schedule the pods.
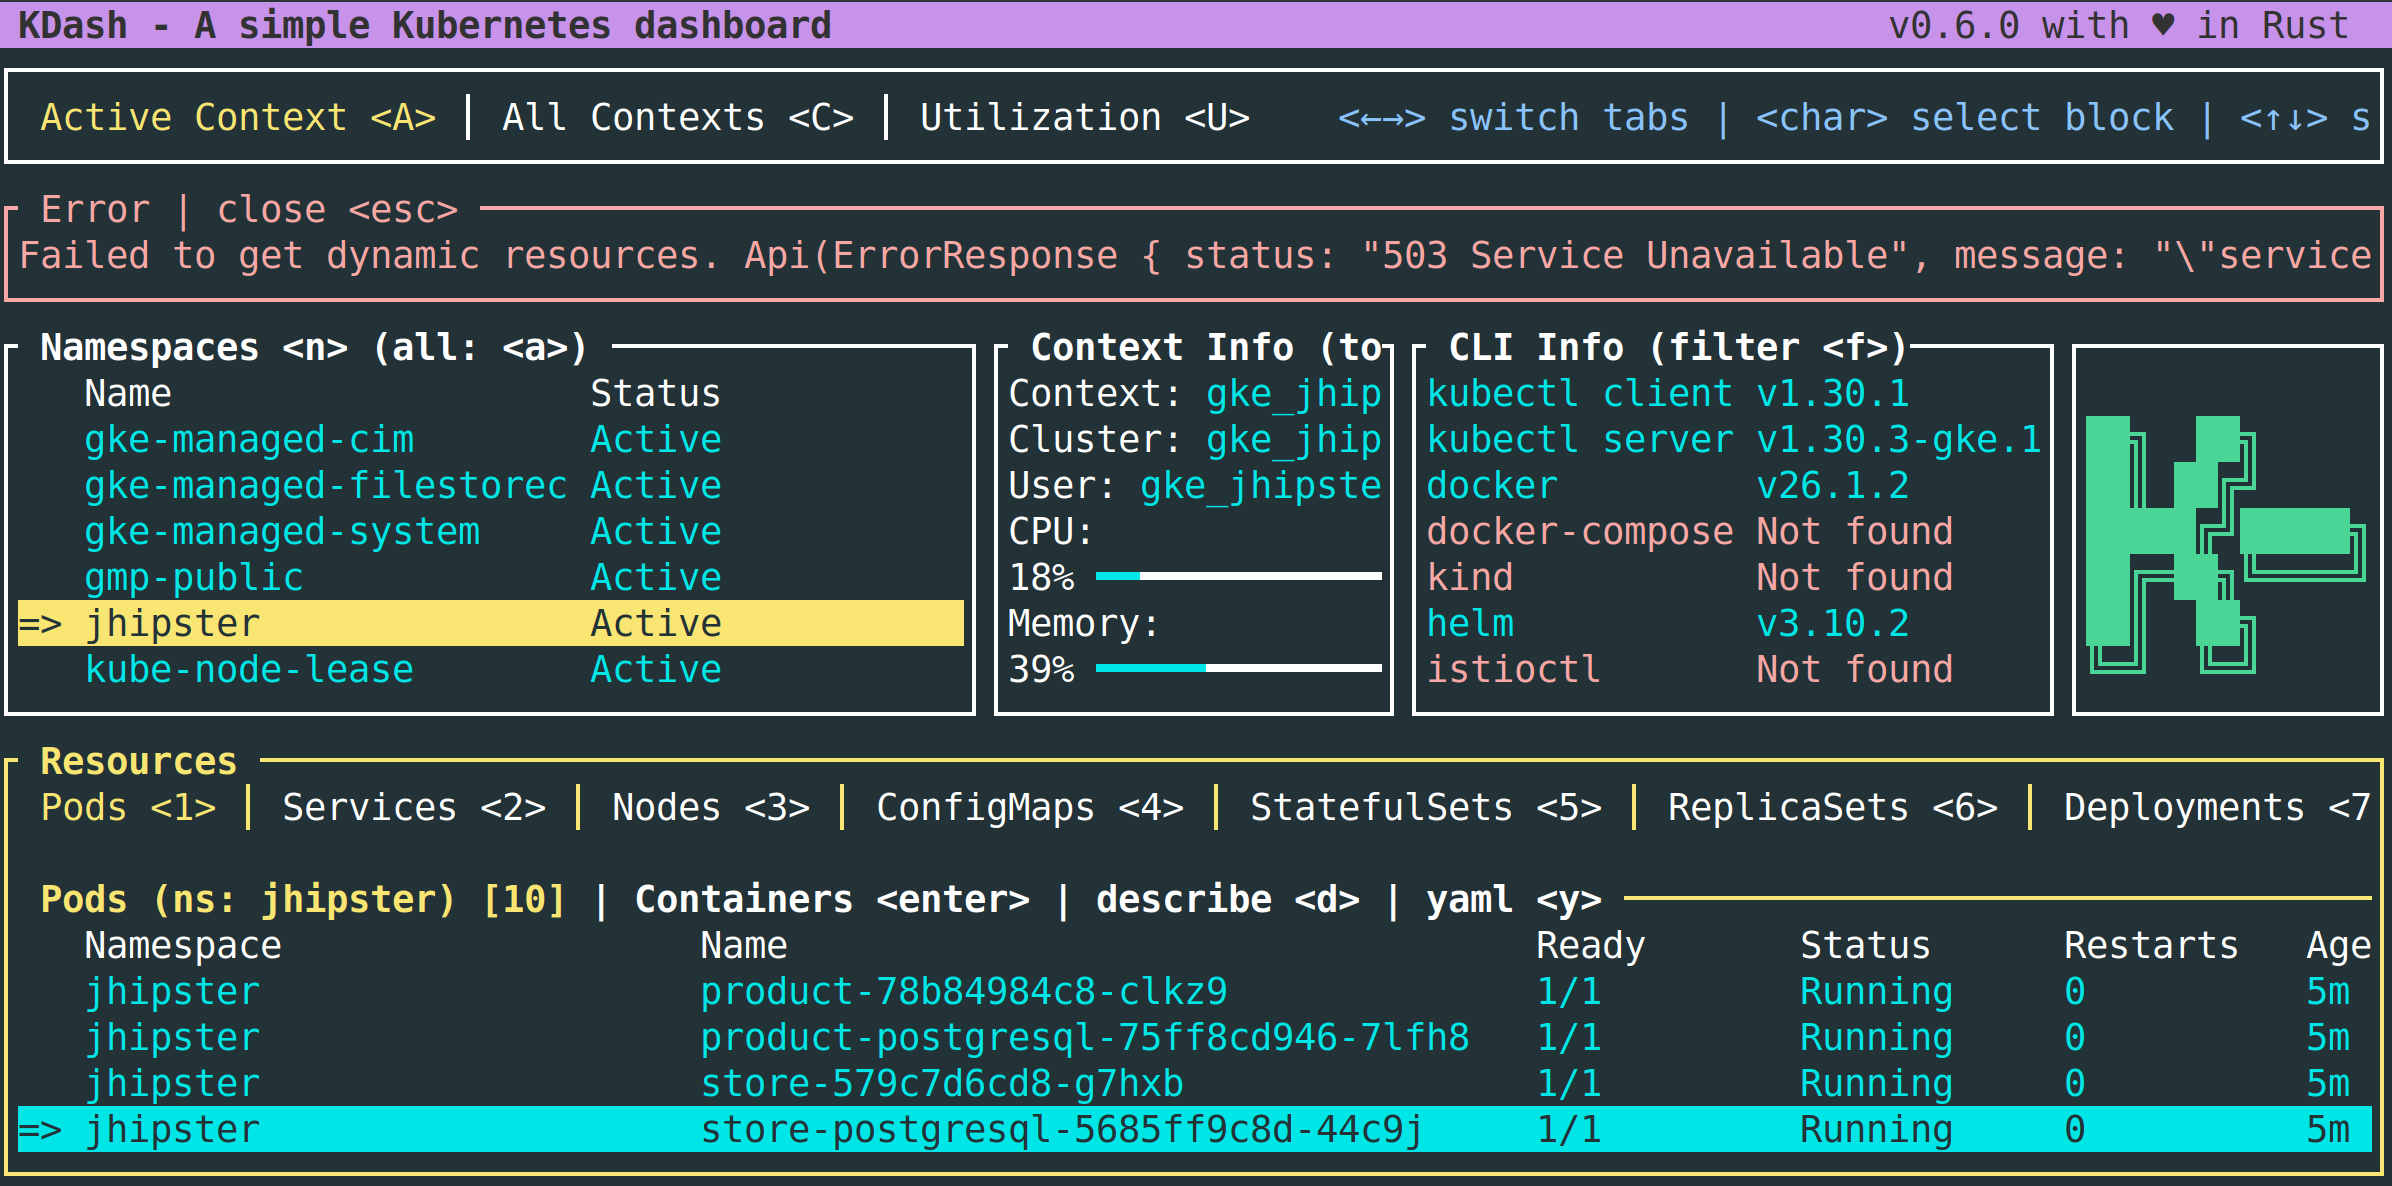
With kdash, check the pods status in the jhipster namespace:
NOTE: If it feels like pod creations are stuck, try deleting the namespace with
kubectl delete namespace jhipsterand deploying the pods again with./kubectl-apply.sh -f. Also, make sure you are not running out of Quotas in GCP.
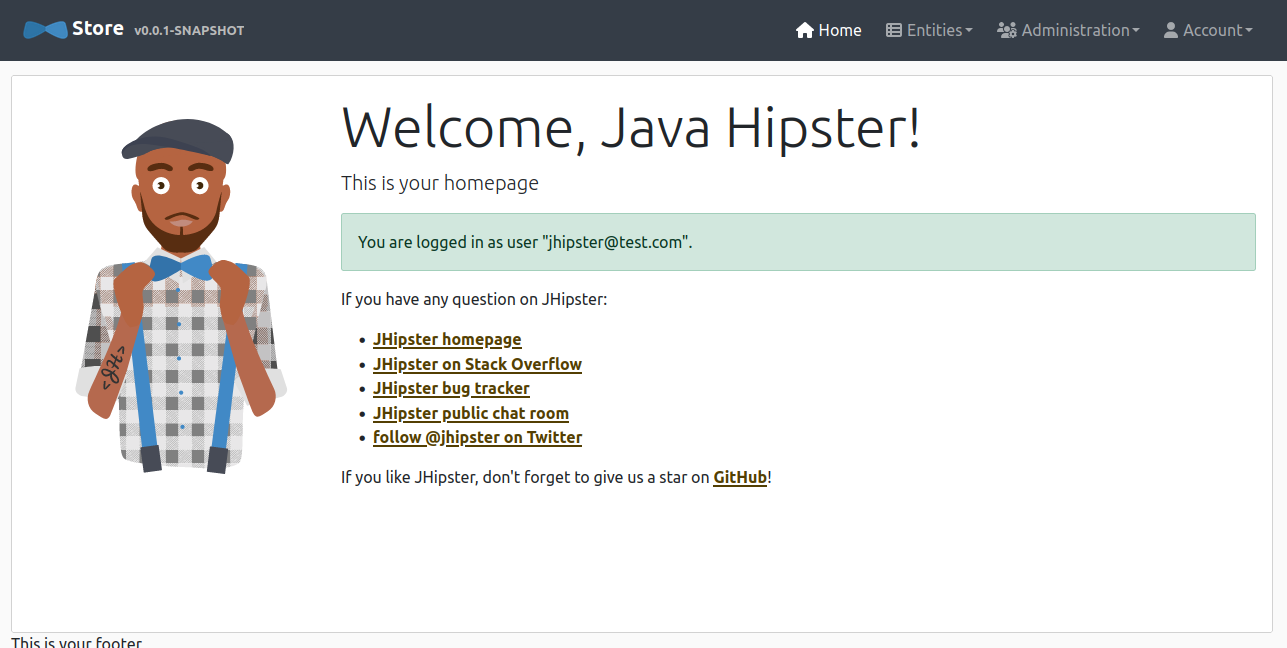
The Ingress configuration requires inbound traffic to be for the host store.example.com, you can test the store service by adding an entry in your /etc/hosts file that maps to the store-ingress public IP:
kubectl get ingress -n jhipsterThen navigate to http://store.example.com and sign in at Auth0 with the test user/password jhipster@test.com/passpass$12$12. The authentication flow will redirect back to the application home:
Tear down the cluster with Terraform
Once you finish verifying the deployment, don't forget to remove all resources to avoid unwanted costs.
terraform destroy -auto-approveLearn more about Java Microservices, Kubernetes and Jhipster
In this post, you learned about JHipster microservices deployment to Google Kubernetes Service using Terraform to provision a GKE cluster in a Standalone VPC. You can find the code shown in this tutorial on GitHub. If you'd rather skip the step-by-step Terraform configuration and prefer jumping straight into the deployment, follow the README instructions in the same repository.
Also, if you liked this post, you might enjoy these related posts:
- Deploy Secure Spring Boot Microservices on Azure AKS Using Terraform and Kubernetes
- Deploy Secure Spring Boot Microservices on Amazon EKS Using Terraform and Kubernetes
- Identity in Spring Boot with Kubernetes, Keycloak, and Auth0
- Micro Frontends for Java Microservices
- Get Started with the Auth0 Terraform Provider
- A Passwordless Future: Passkeys for Java Developers
For more tutorials like this one, follow @auth0 on Twitter. We also have a YouTube channel you might like. If you have any questions, please leave a comment below!
Our Zero Index Developer Newsletter will keep you informed about the latest happenings in the Java security space. Subscribe today!