Securing your application goes beyond simply granting or denying access at the surface level. As a developer, you need to implement fine-grained authorization (FGA) to manage permissions at a more detailed, granular level.
FGA allows you to set up detailed access controls that specify who can do what and under which conditions.
In this tutorial, you will learn how to implement fine-grained authorization in Java and Spring Boot using Permit.io.
Here is the source code (remember to give it a star ⭐).
I hope you enjoyed my previous blog about building a custom video conferencing app with Stream and Next.js. These blogs reflect my journey in creating DevTools Academy, a platform designed to help developers discover amazing developer tools.
This tutorial is another effort to introduce you to a super helpful developer tool that I recently explored.
Table of Contents:
What is Permit?
Prerequisites
What is Fine-Grained Authorization?
Role-Based Access Control (RBAC)
Attribute-Based Access Control (ABAC)
Relationship-Based Access Control (ReBAC)
How to Implement Fine-Grained Authorization
Implementing Role-Based Access Control
Implementing Attribute-Based Access Control
Implementing Relationship-Based Access Control
How to Implement FGA in Java and SpringBoot
Step 1: Setting Up the E-commerce Application
Step 2: Get your Environment API Key
Step 3: Deploy Policy Decision Point (PDP)
Step 4: Running the App
Next Steps
- Before We End...
What is Permit?
Permit.io is a full stack, plug-and-play application-level authorization solution that allows you to implement a
secure,flexible,authorizationlayer within minutes, so you can focus on what matters most.
Prerequisites
To fully understand the tutorial, you need to have a basic understanding of Java and Spring Boot. You’ll also need the following:
Permit.io: A developer tool that simplifies the implementation of FGA.
Spring Boot Starter Web: Provides essential components for building web applications, including RESTful APIs.
Gradle: A build tool for managing dependencies.
JDK 11 or later: The Java Development Kit version required to compile and run your Spring Boot app.
Postman or cURL: Tools for testing your
APIendpoints.
Fine-grained authorization offers access control to resources by determining who can access them, to what extent, and under specified conditions.
Contrary to coarse-grained authorization (that handles access based on categories like user roles such as "admin" or "user"), fine-grained authorization gives you the flexibility to define access at a granular level, for specific resources or actions and even attributes.
In Fine Grained Authorization there exist 3 types of policy models for managing authorization; Role Based Access Control (RBAC), Attribute Based Access Control (ABAC), and Relationship-Based Access Control (ReBAC).
Let's take a look, at each of these approaches and see how you can implement them in your application.
Role-Based Access Control (RBAC)
RBAC is a security approach that controls resource access based on the roles of users within an organization. This model streamlines permissions by organizing users into roles and managing access control according to these defined roles.
Key Concepts in RBAC:
Users: People who use the system such as employees or customers.
Roles: A set of permissions or access privileges assigned to a group of users based on their responsibilities or tasks such as admin, manager, or customer.
Permissions: The rights granted to users for interacting with resources, such as read, write, or delete.
Attribute-Based Access Control (ABAC)
ABAC is a versatile and adaptive access control model that decides who can or cannot access resources based on attributes, like user details. The ABAC model allows you to define fine-grained authorization based on user attributes.
Key Concepts in ABAC:
Attributes: Characteristics or properties used to make access control decisions. Attributes are typically categorized into:
User Attributes: Information about the user (for example, role, department, job title, age, and so on).
Resource Attributes: Characteristics of the resource (for example, file type, data classification level, creation date, owner).
Action Attributes: The action the user is trying to perform (for example, read, write, delete, approve).
Environmental Attributes: Contextual information about the access request (for example, time of day, location, device type, IP address).
Relationship-Based Access Control (ReBAC)
ReBAC is an access control system that grants permissions to access resources based on the relationship between entities within a system. The approach emphasizes defining and managing access control by mapping out how users relate to resources and other entities such as organizations or groups.
Key Concepts of ReBAC:
Entities: Users, resources (such as files and documents), and other entities, such as groups or organizational units.
Relationships: The connections that specify the relationship between two entities. A user might be the "owner" of a document or a "member" of a team, for instance.
Policies: Rules that use relationships to determine access rights. A user can access a resource or execute an action on it if they have a particular relationship with it.
How to Implement Fine-Grained Authorization
Now that you have a basic understanding of RBAC, ABAC, and ReBAC, let’s see how we can implement these models in an e-commerce app.
Implementing Role-Based Access Control
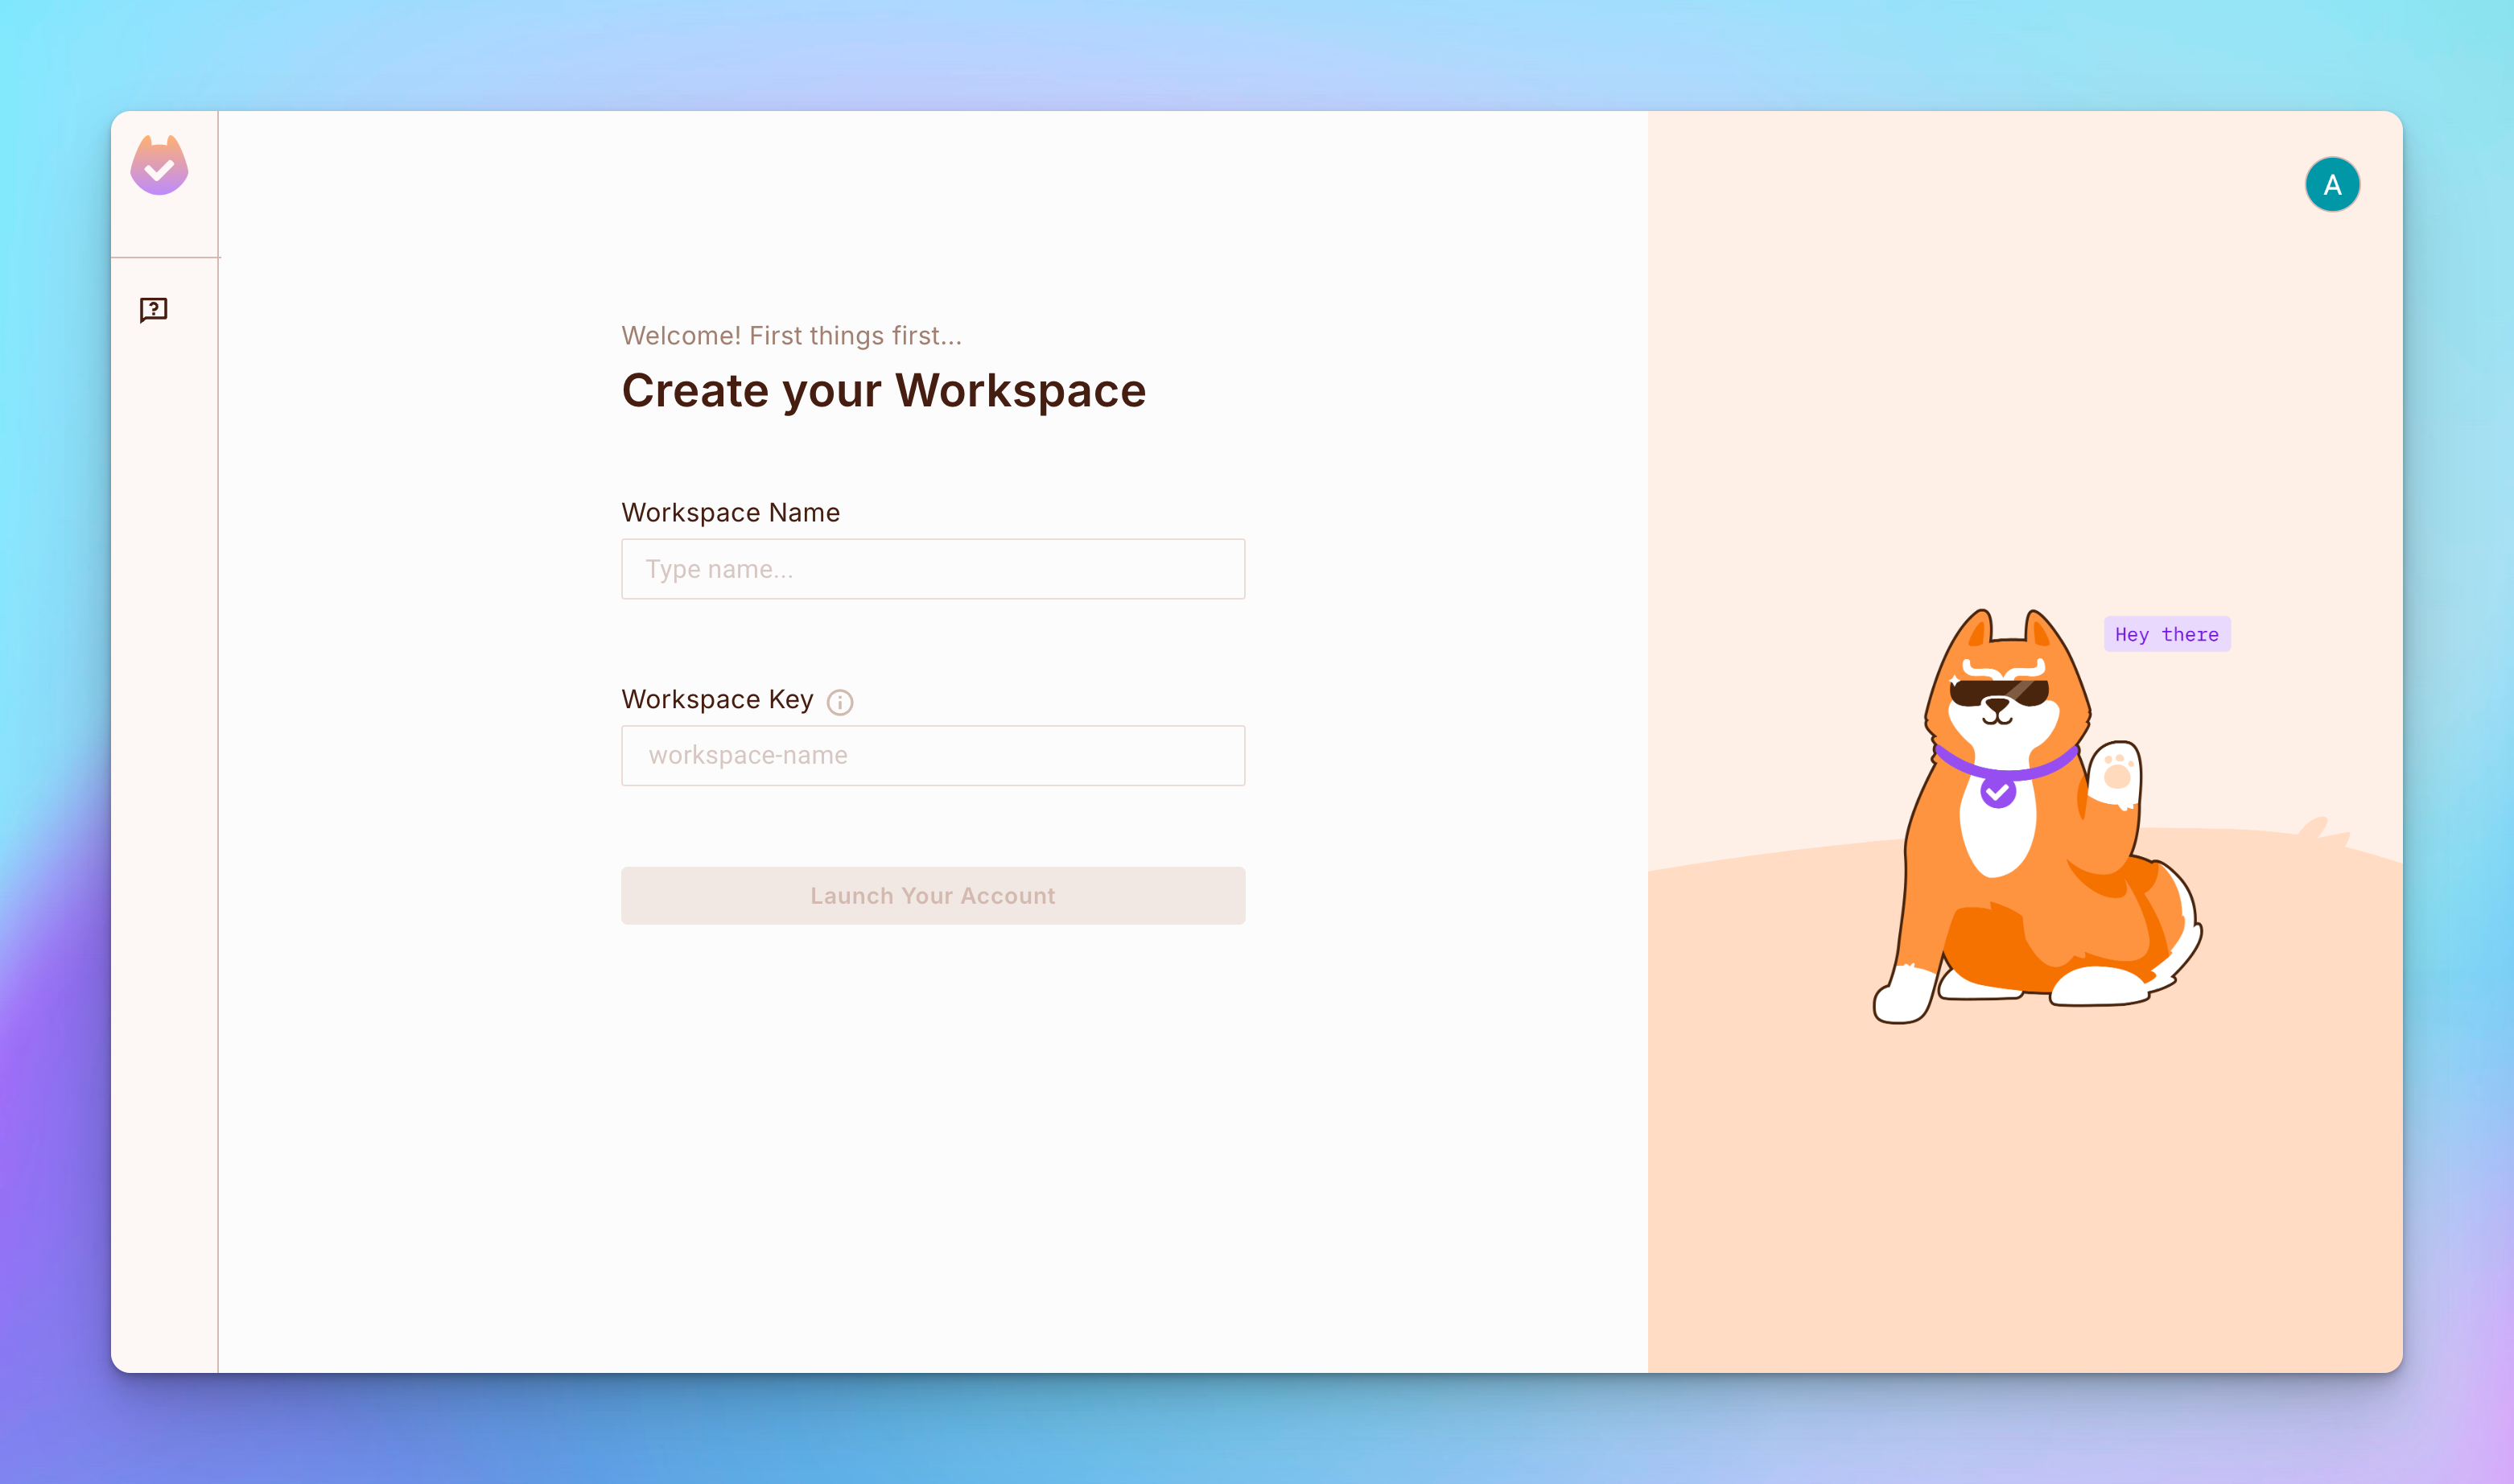
Step 1: Navigate to Permit.io, and then create an account and your workspace.
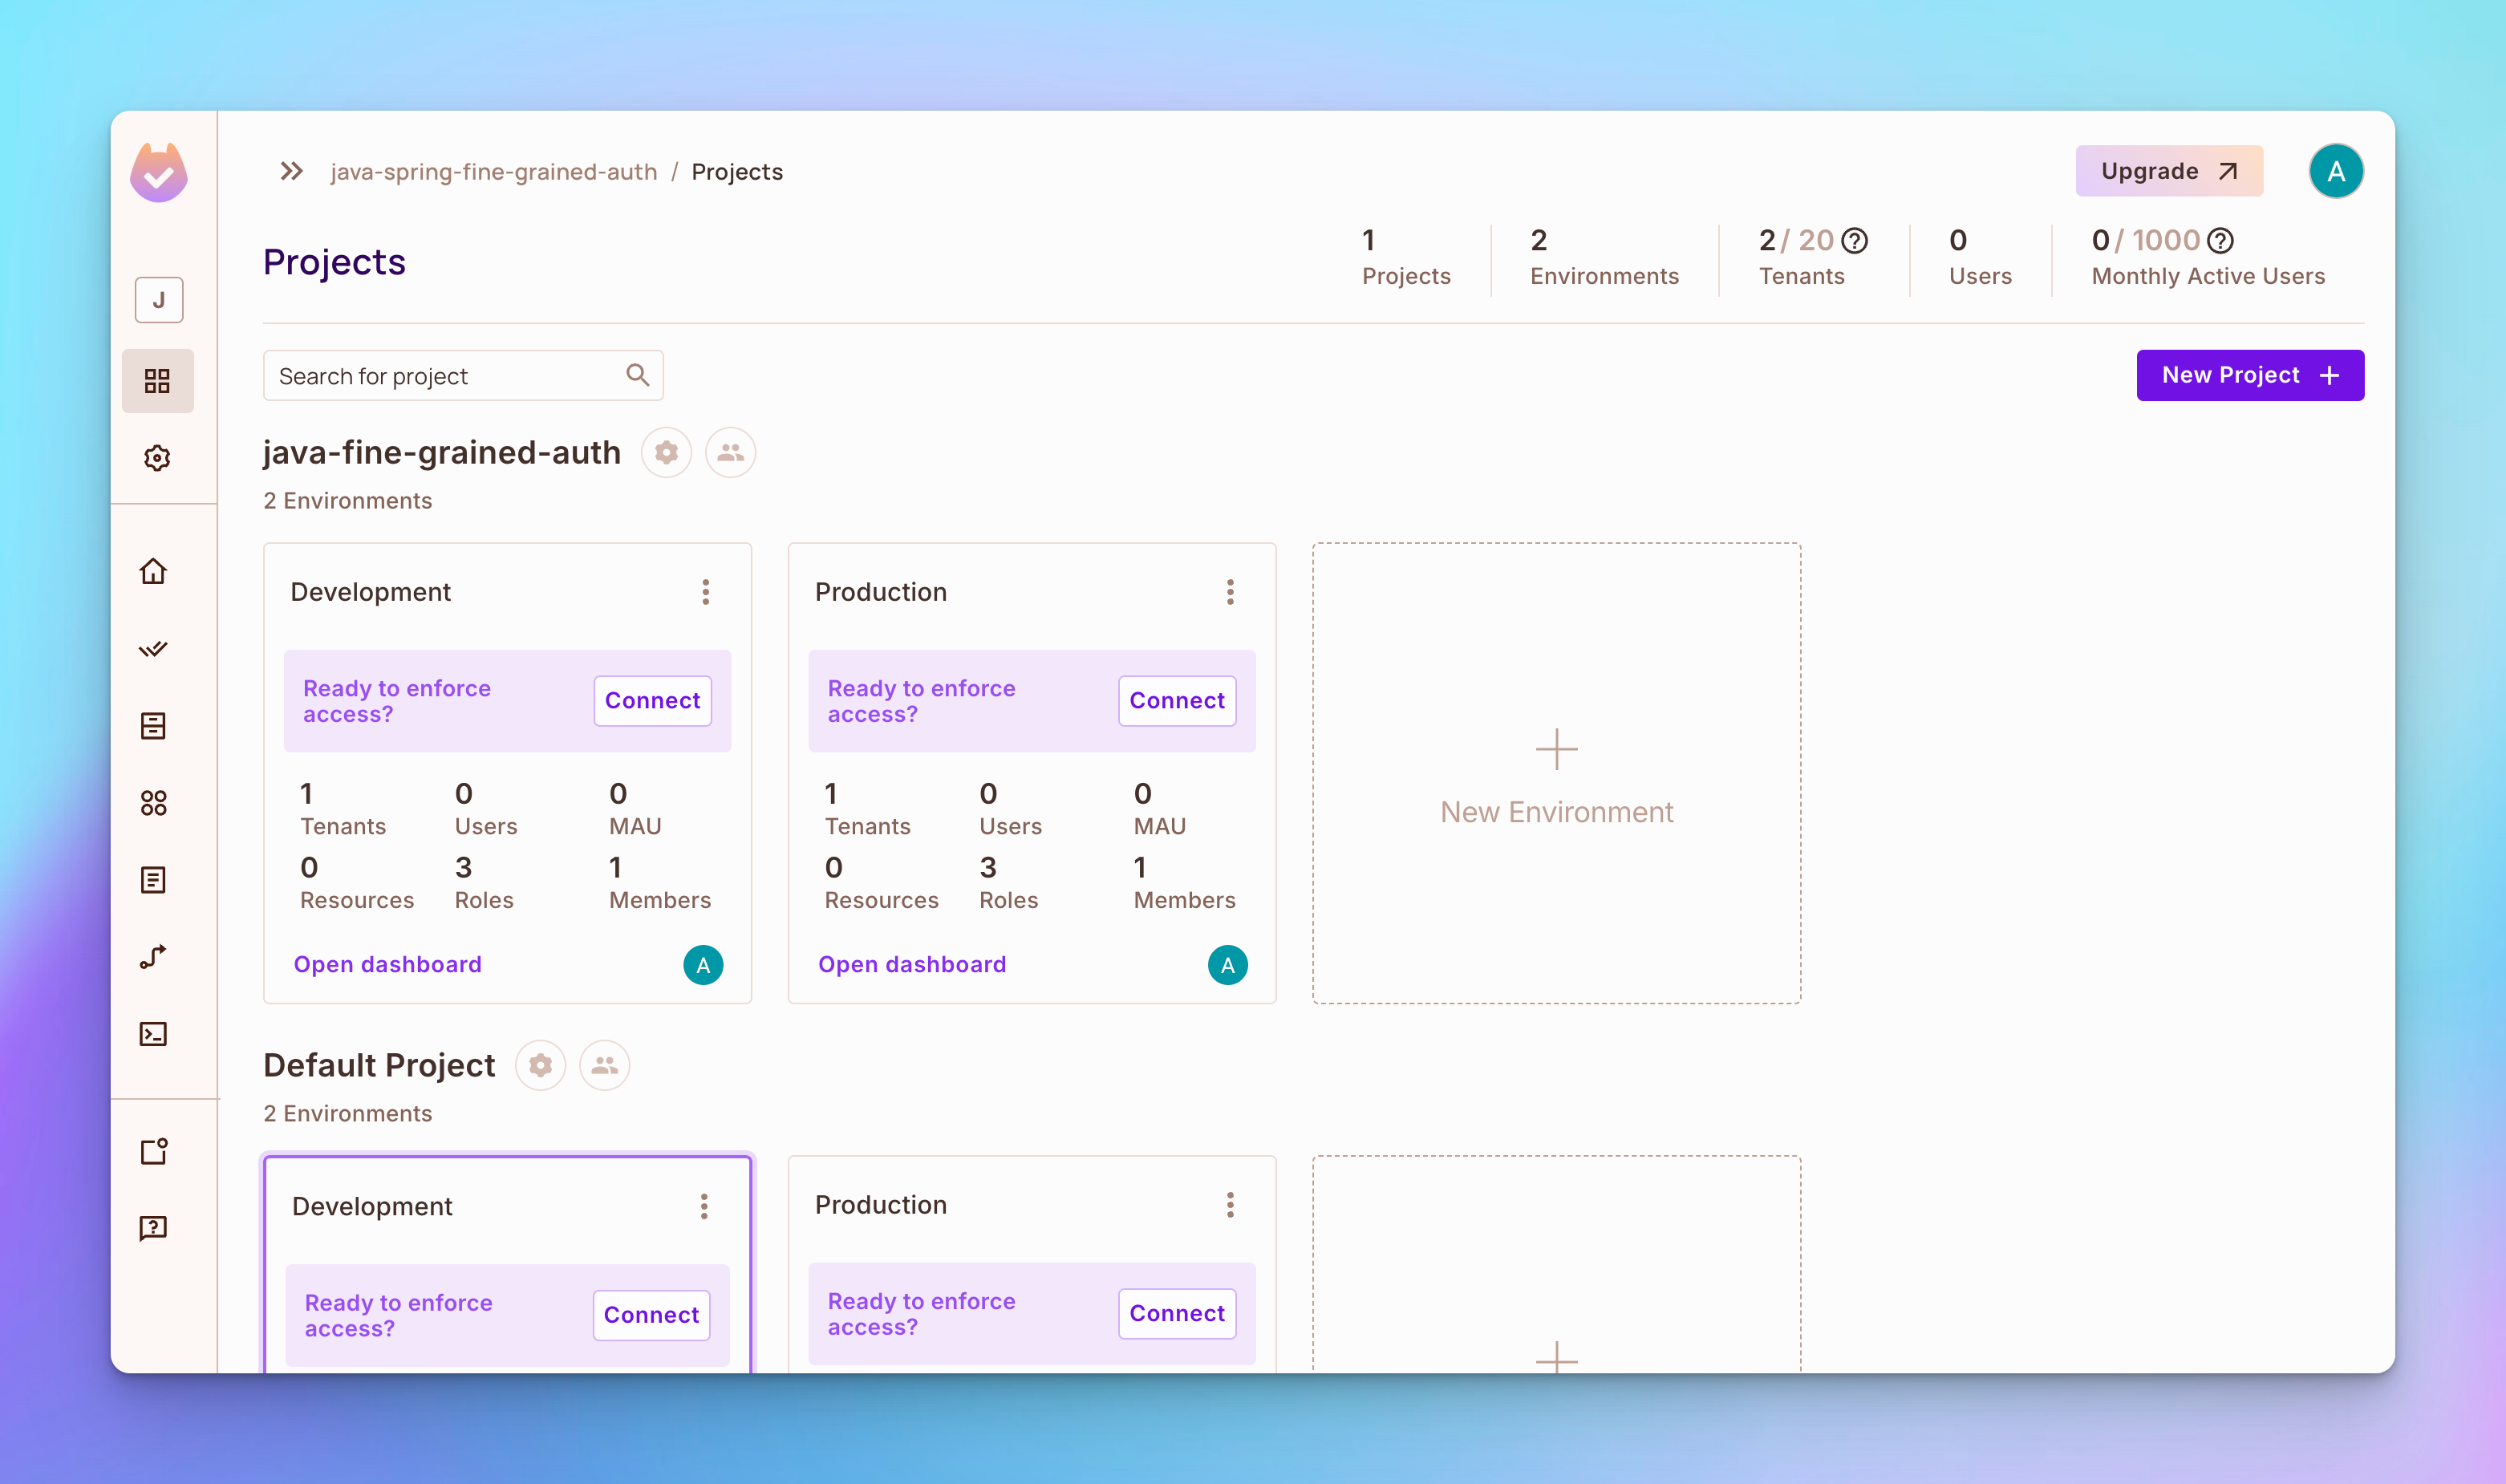
By default, you should see a project that includes two environments: Development and Production.
💡
Note: You need to define and test your policies in the development environment before deploying them to production.
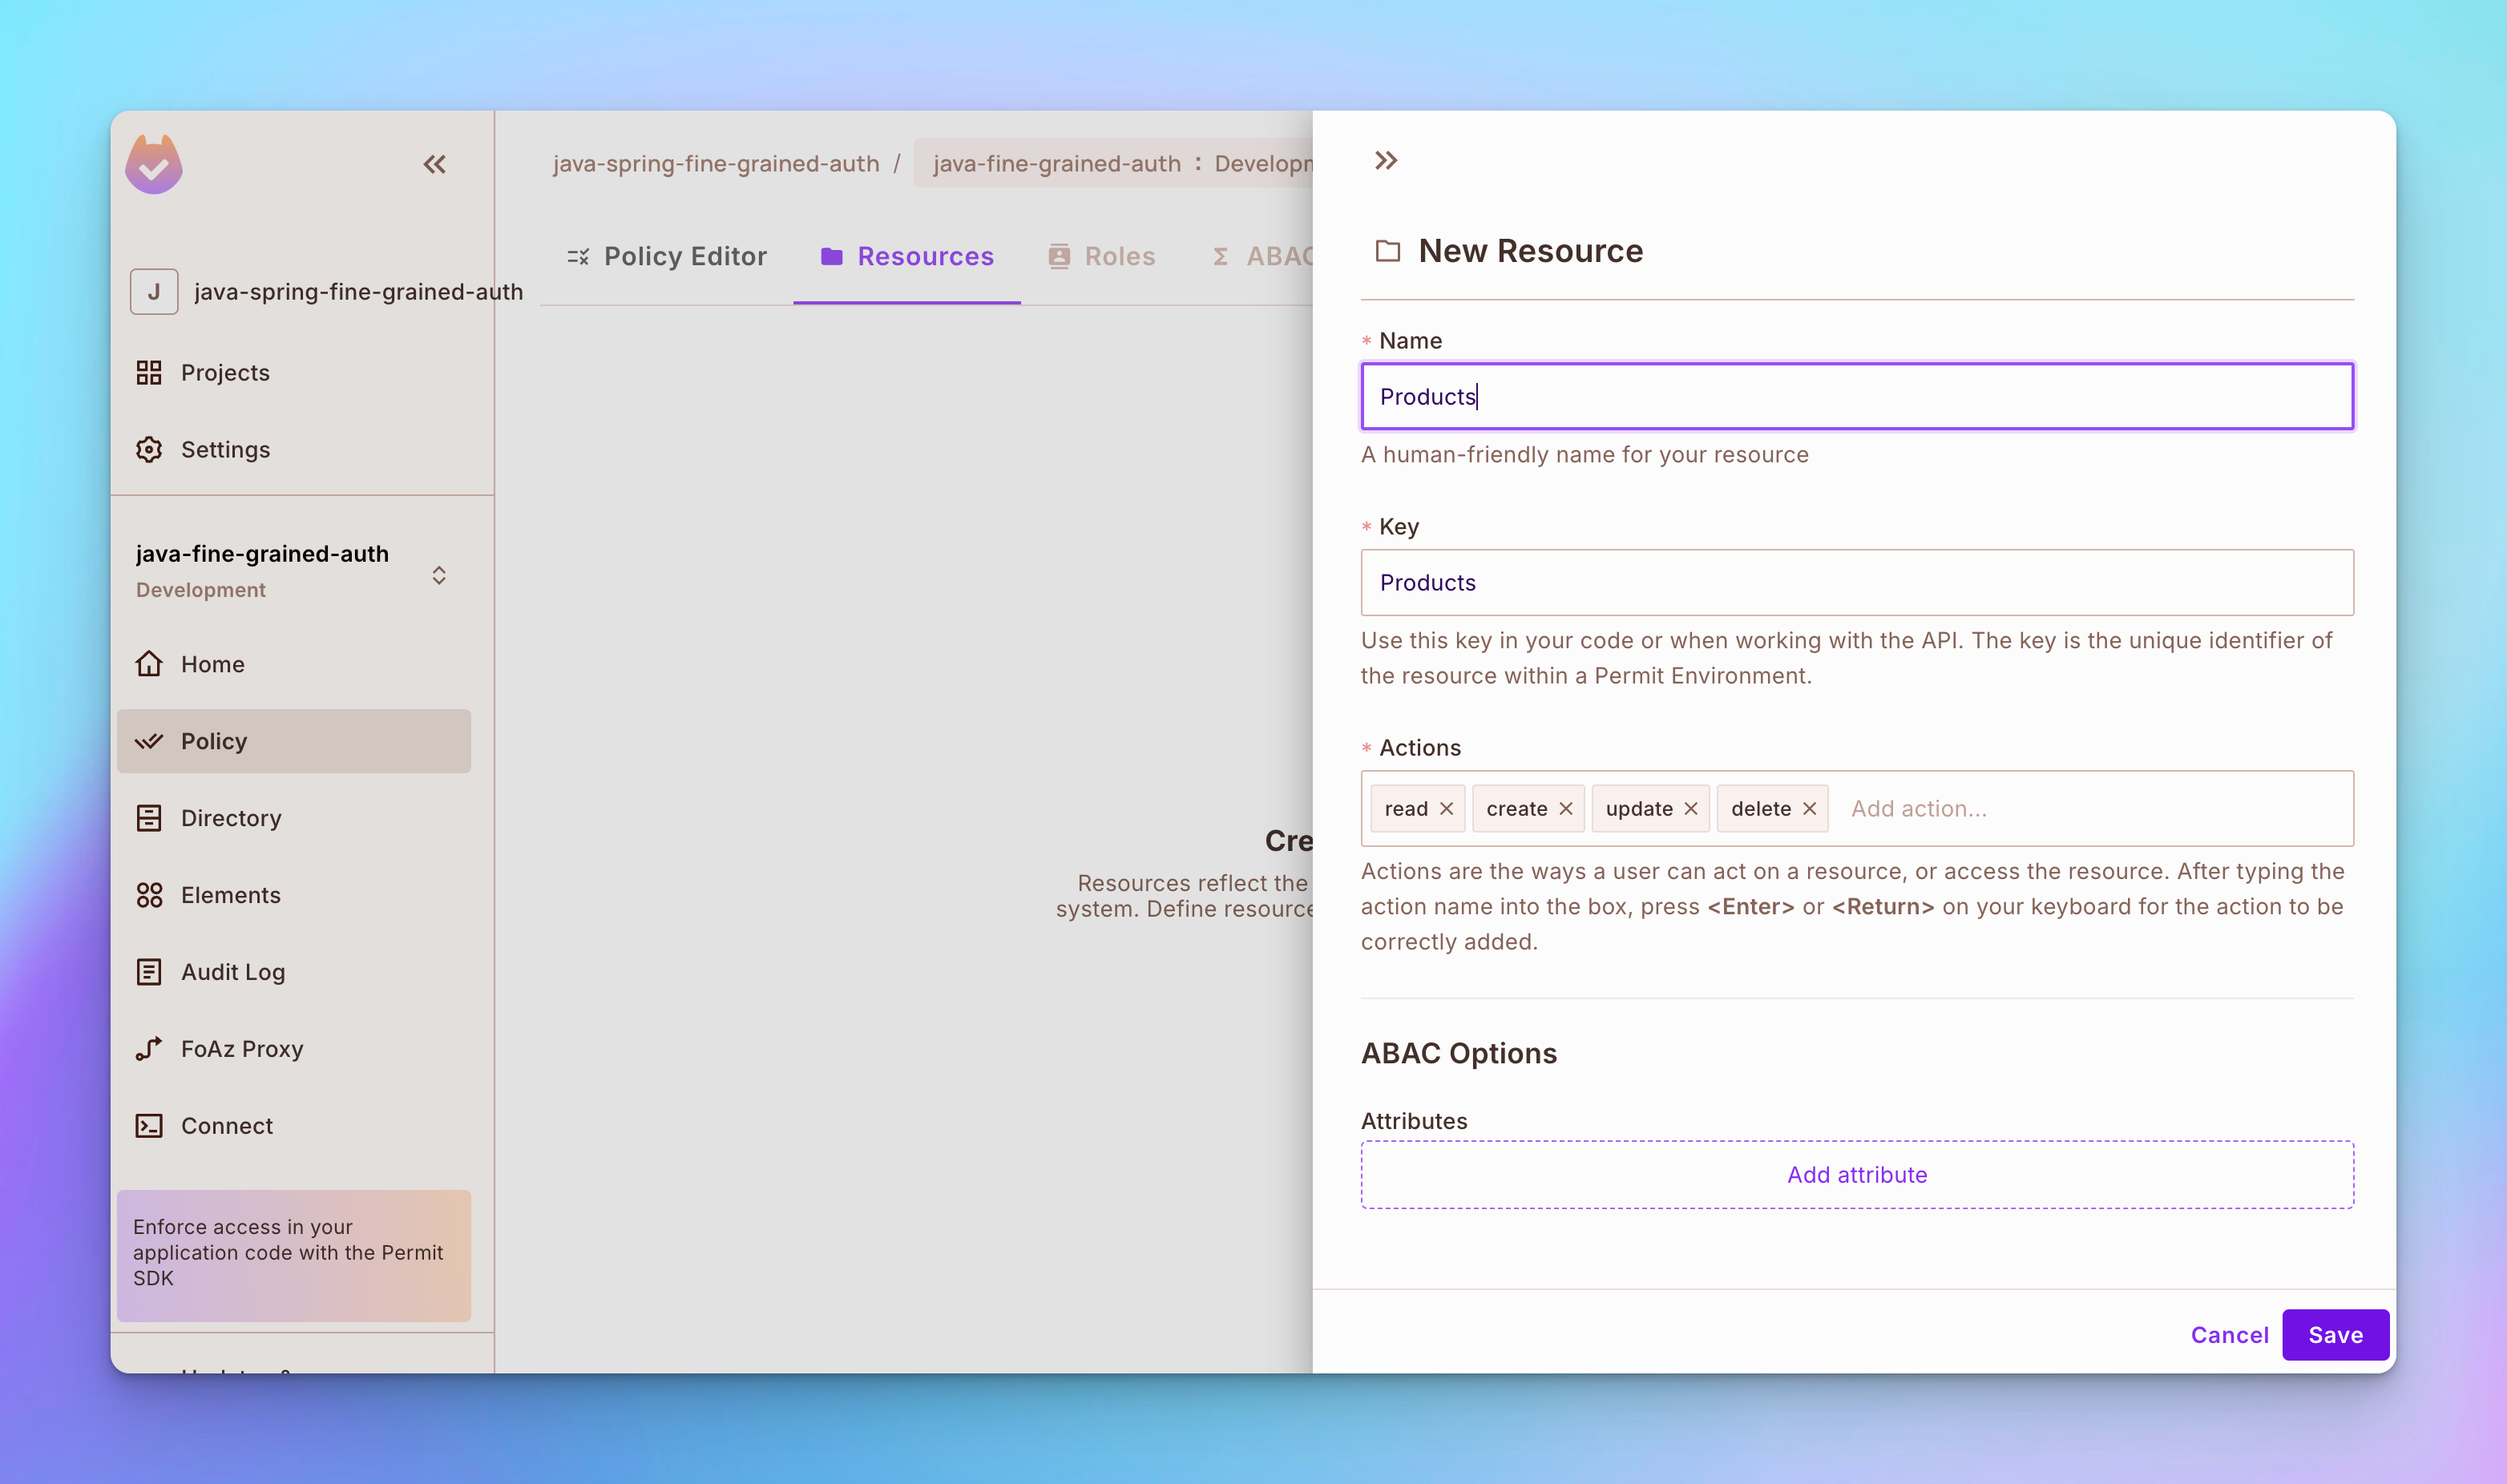
Step 2: Create a resource named Products. To create the resource, open the Policy tab on the left sidebar and then open the Resources tab at the top. After that, click the Create a Resource button and then create a resource called Products with actions read, create, update, and delete.
Step 3: Create another resource called Reviews with actions read, create, update, and delete.
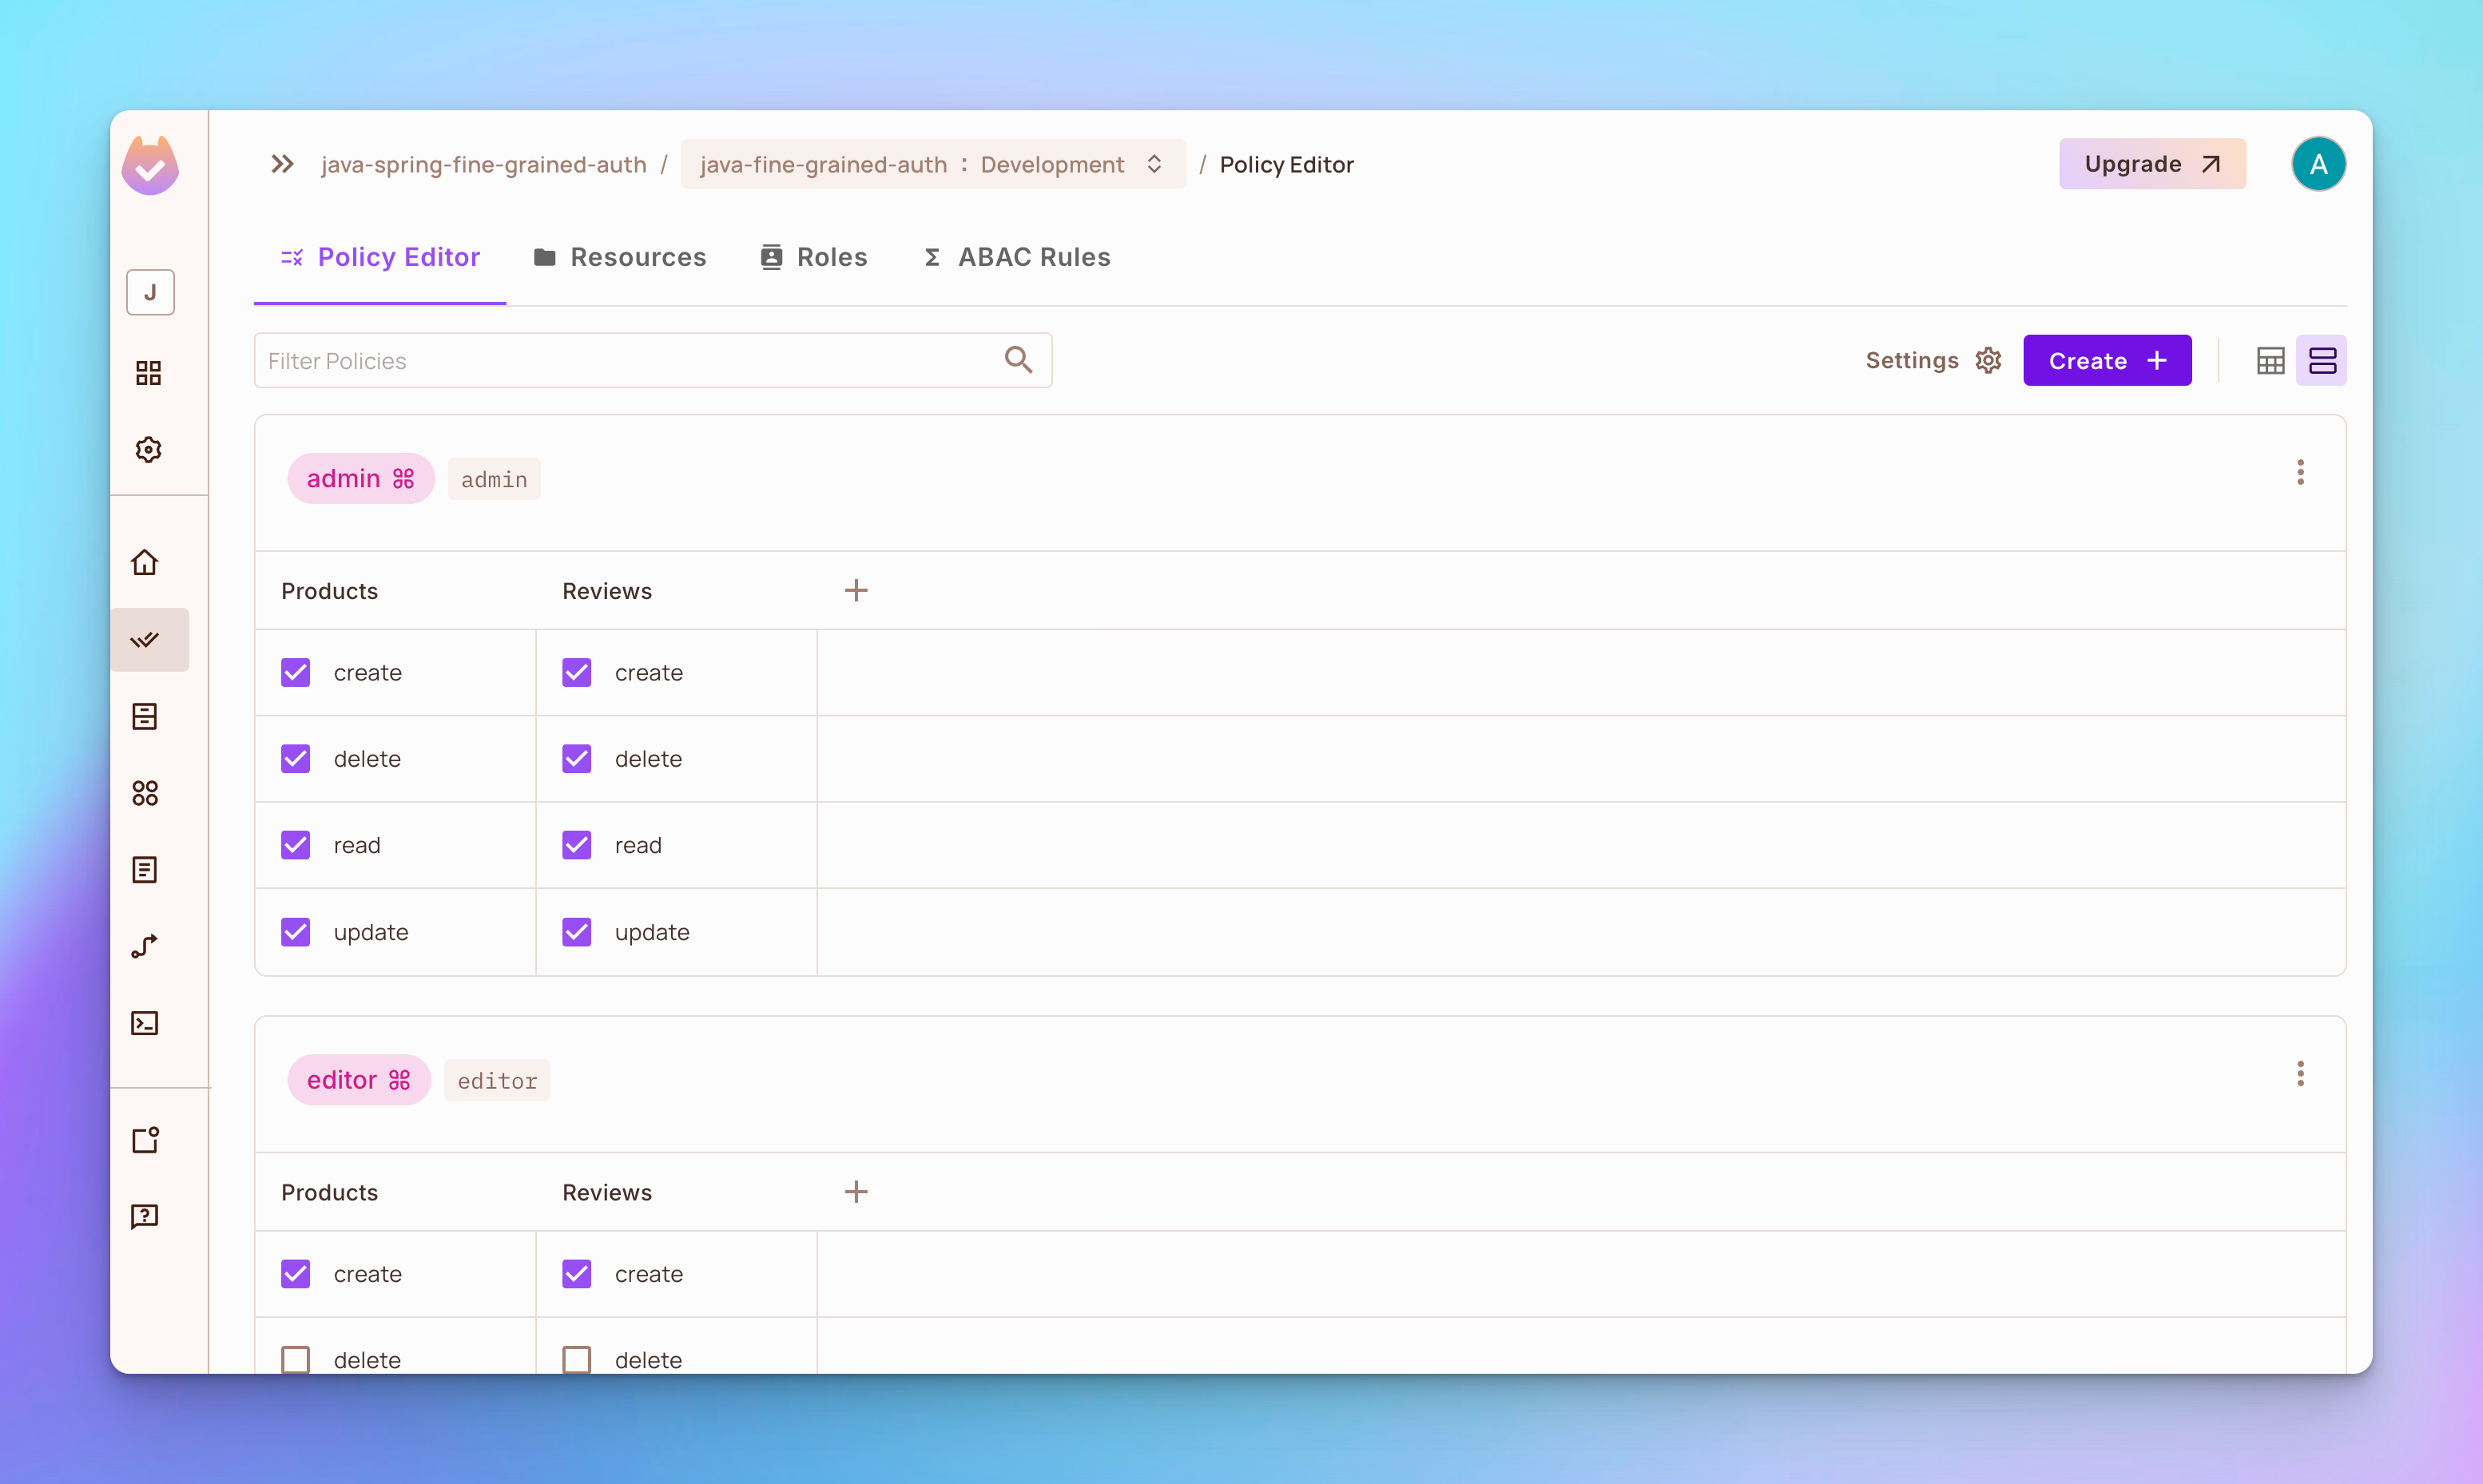
Step 4: Open the Policy Editor tab. You’ll see that 3 roles named admin, editor, and viewer were created.
Role admin has permission to
create,delete,read, orupdatea product or a review.Role
editorhas permission tocreate,read, orupdateaproductor areviewbut notdeleteany.Role
viewerhas permission tocreateandreada product or areviewbut notdeleteorupdateany.
Implementing Attribute-Based Access Control
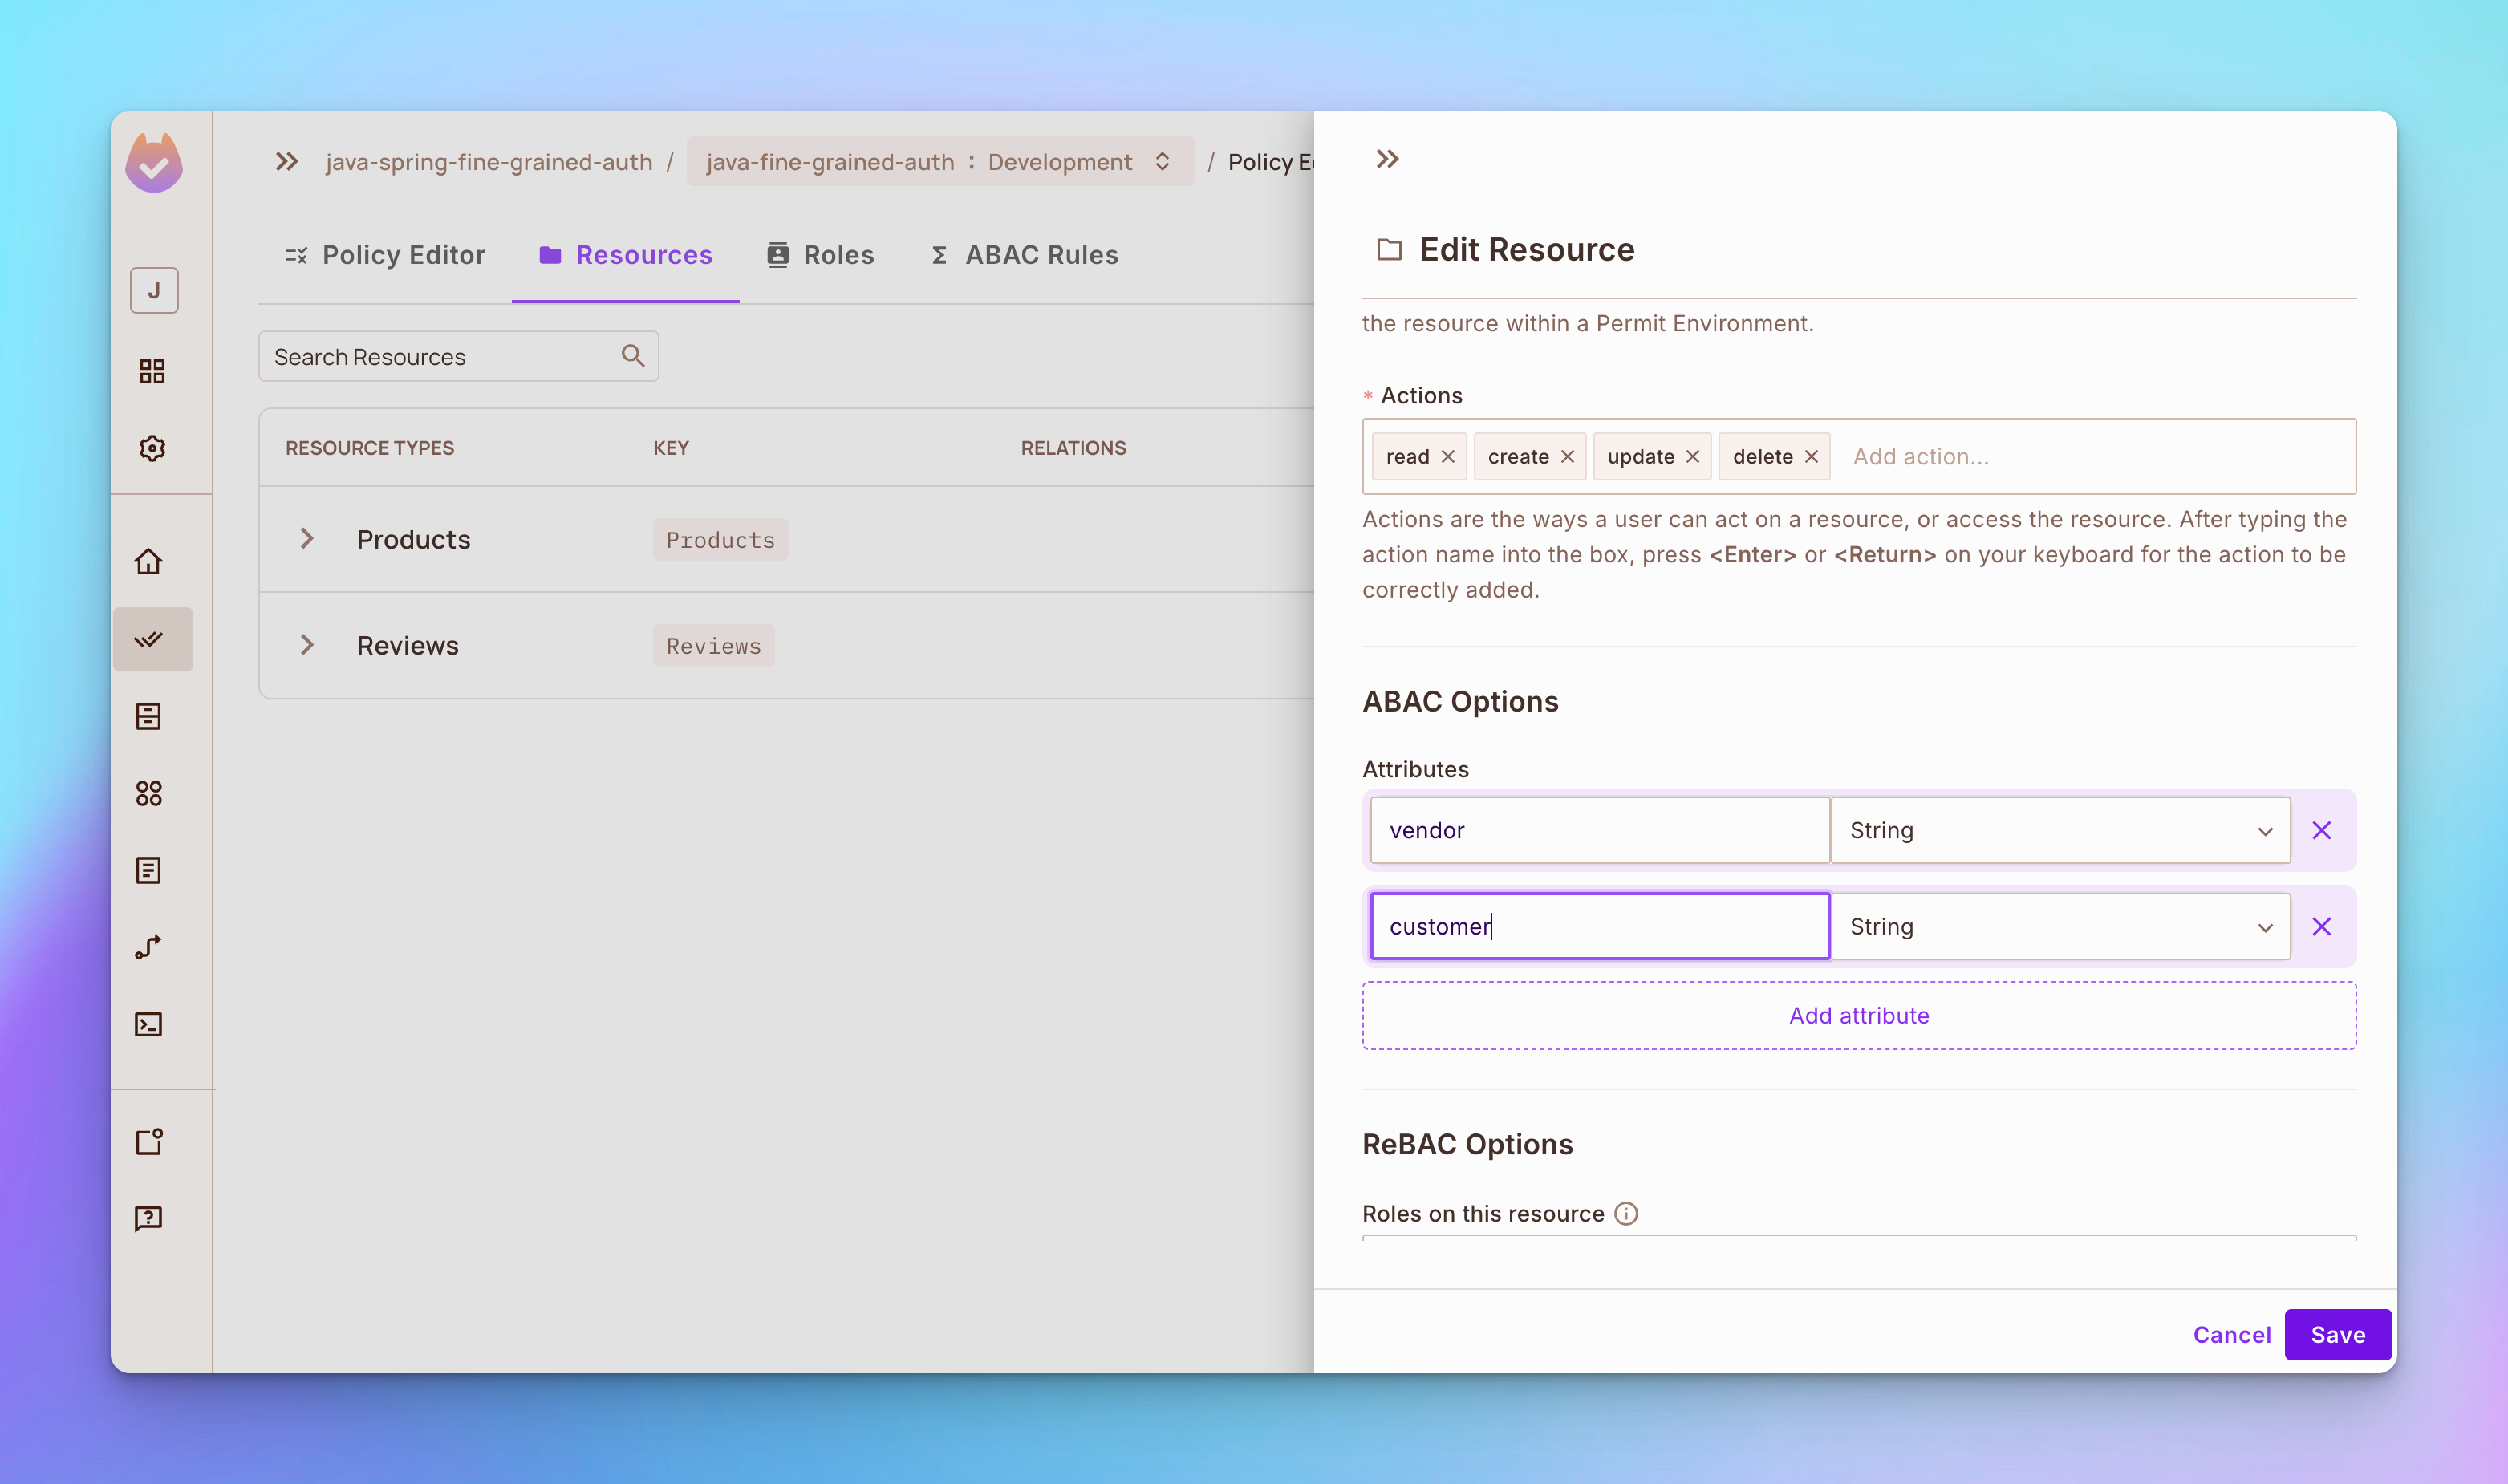
Step 1: Open the Resources tab, then click the Add Attributes button.
Add an attribute called vendor
Add an attribute called the customer
Step 2: Open the ABAC Rules tab, then create a new ABAC Resource Set called Own Products that depends on the Products resource. After that, add a condition that gives permissions only to the user who created a product based on the vendor attribute.
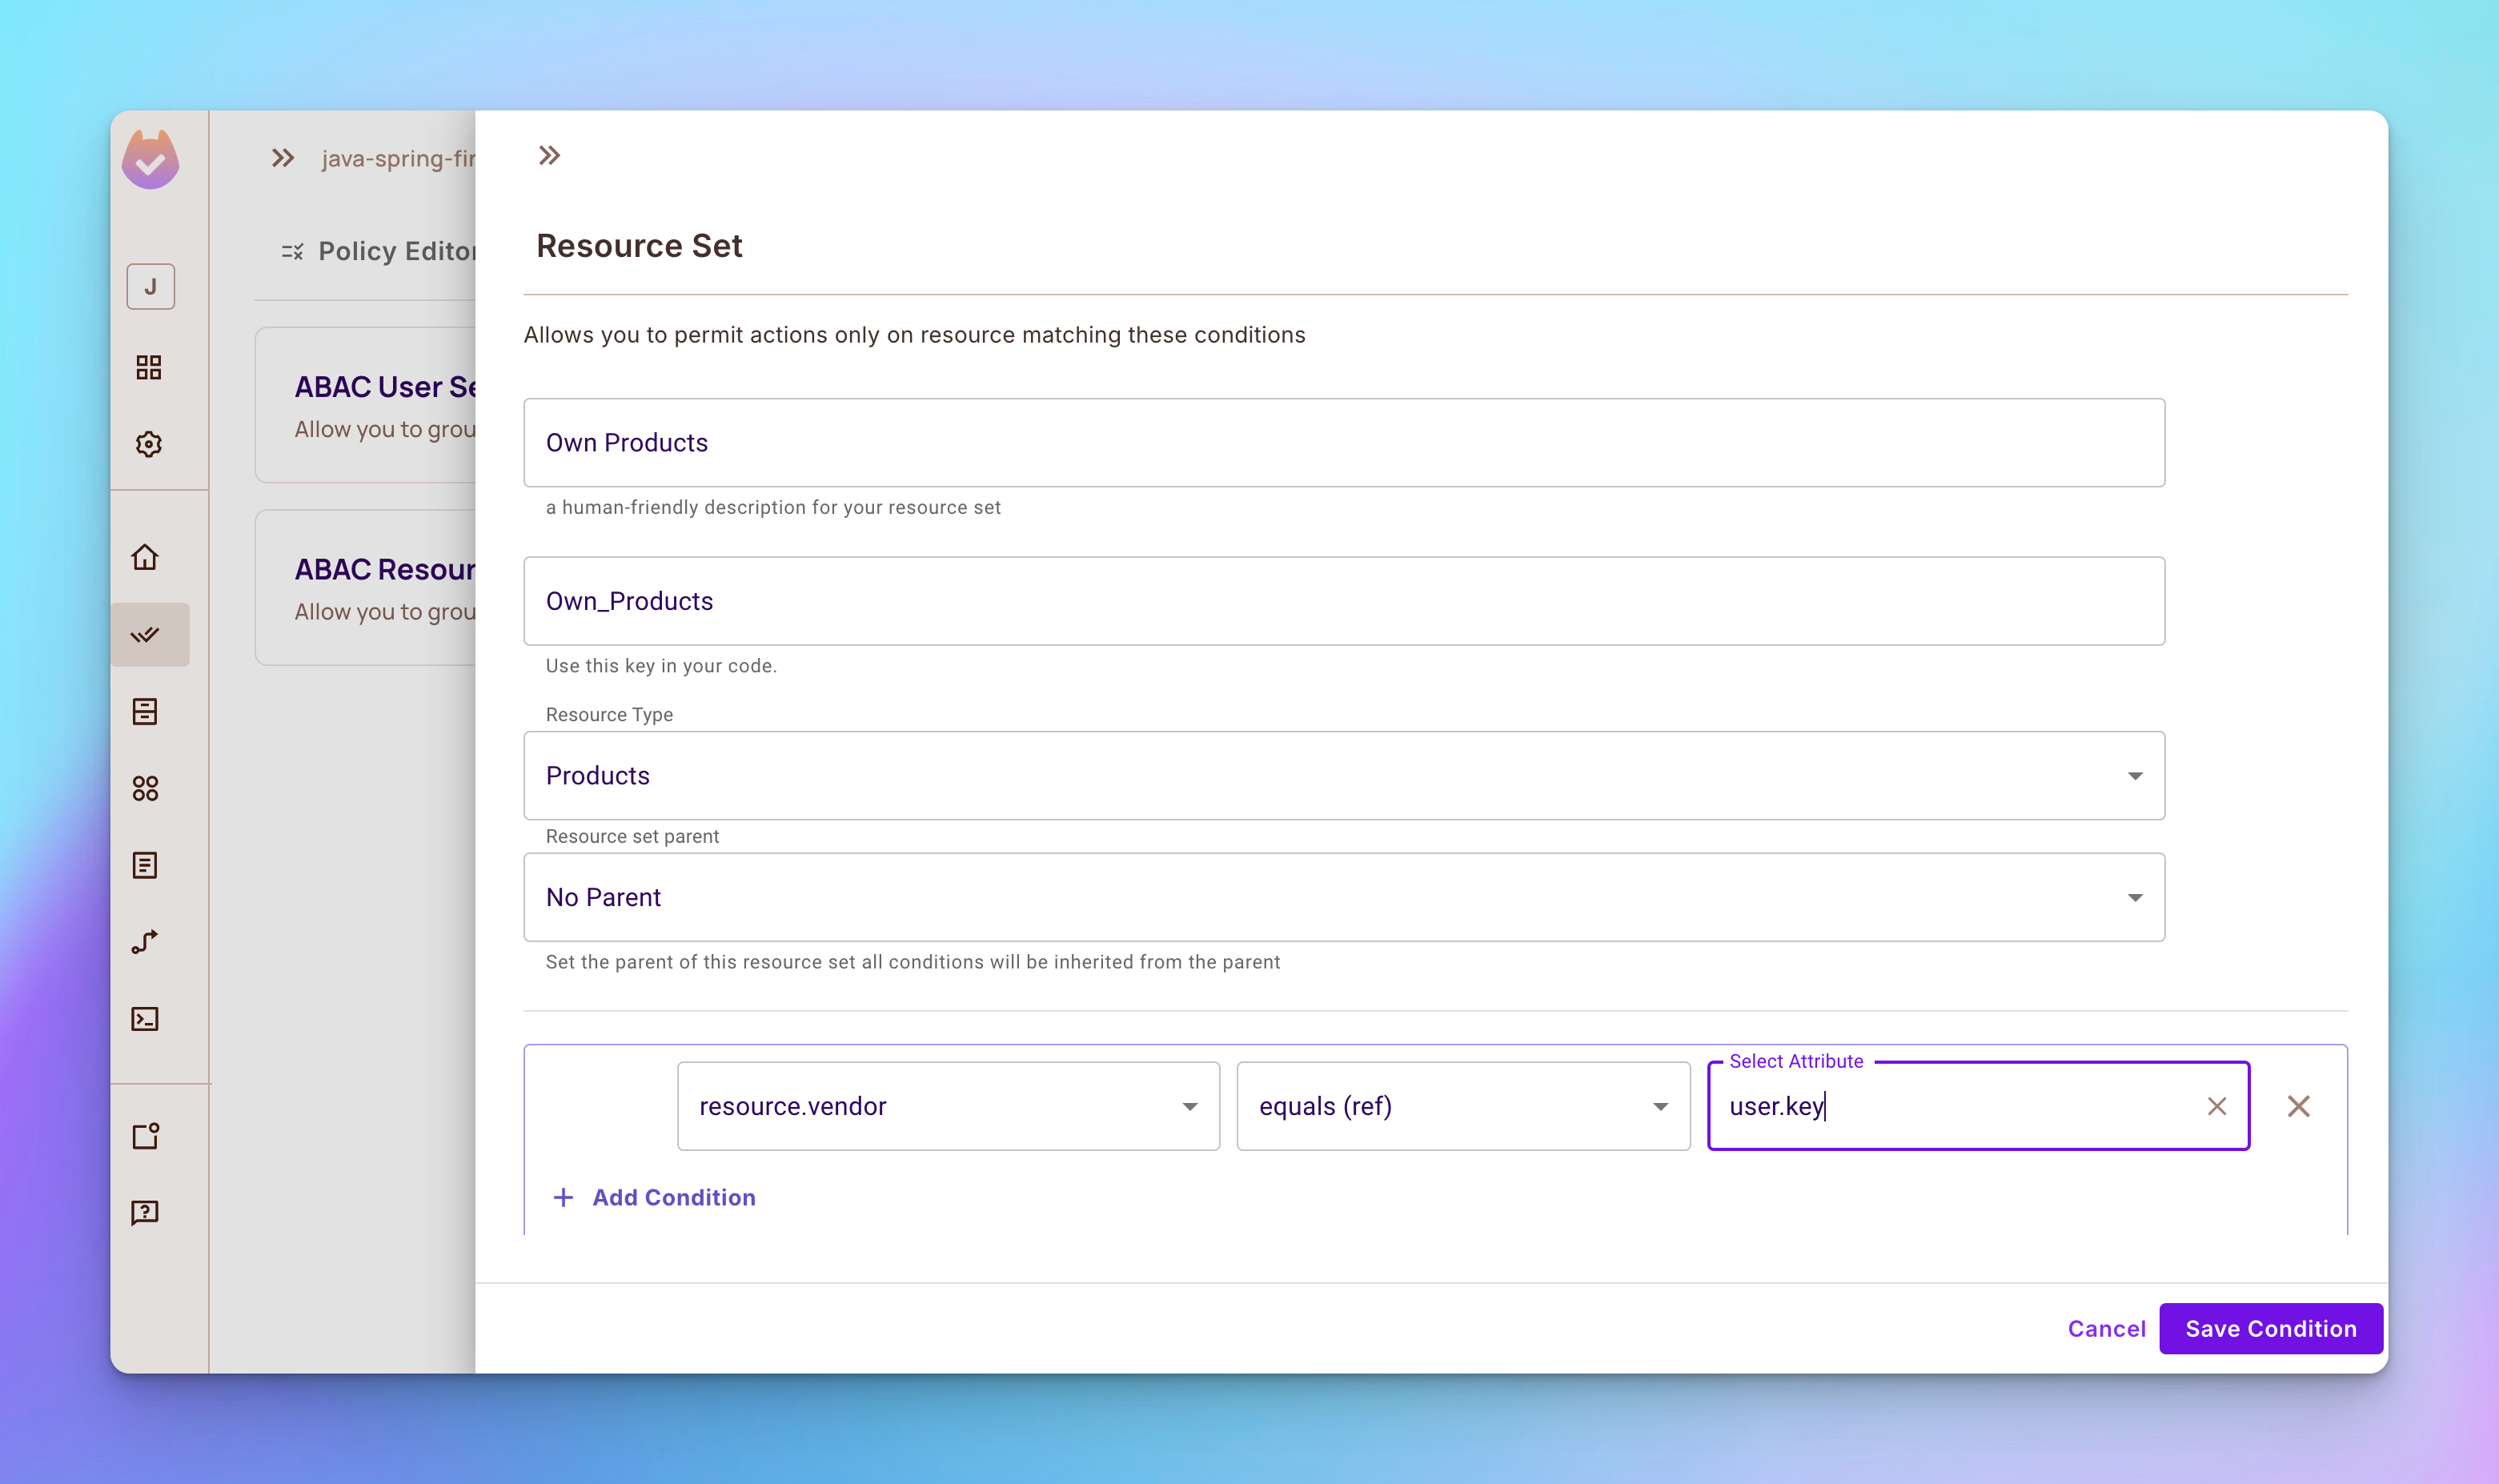
Step 3: Create another ABAC Resource Set called Own Reviews that depends on the Reviews resource.
Implementing Relationship-Based Access Control
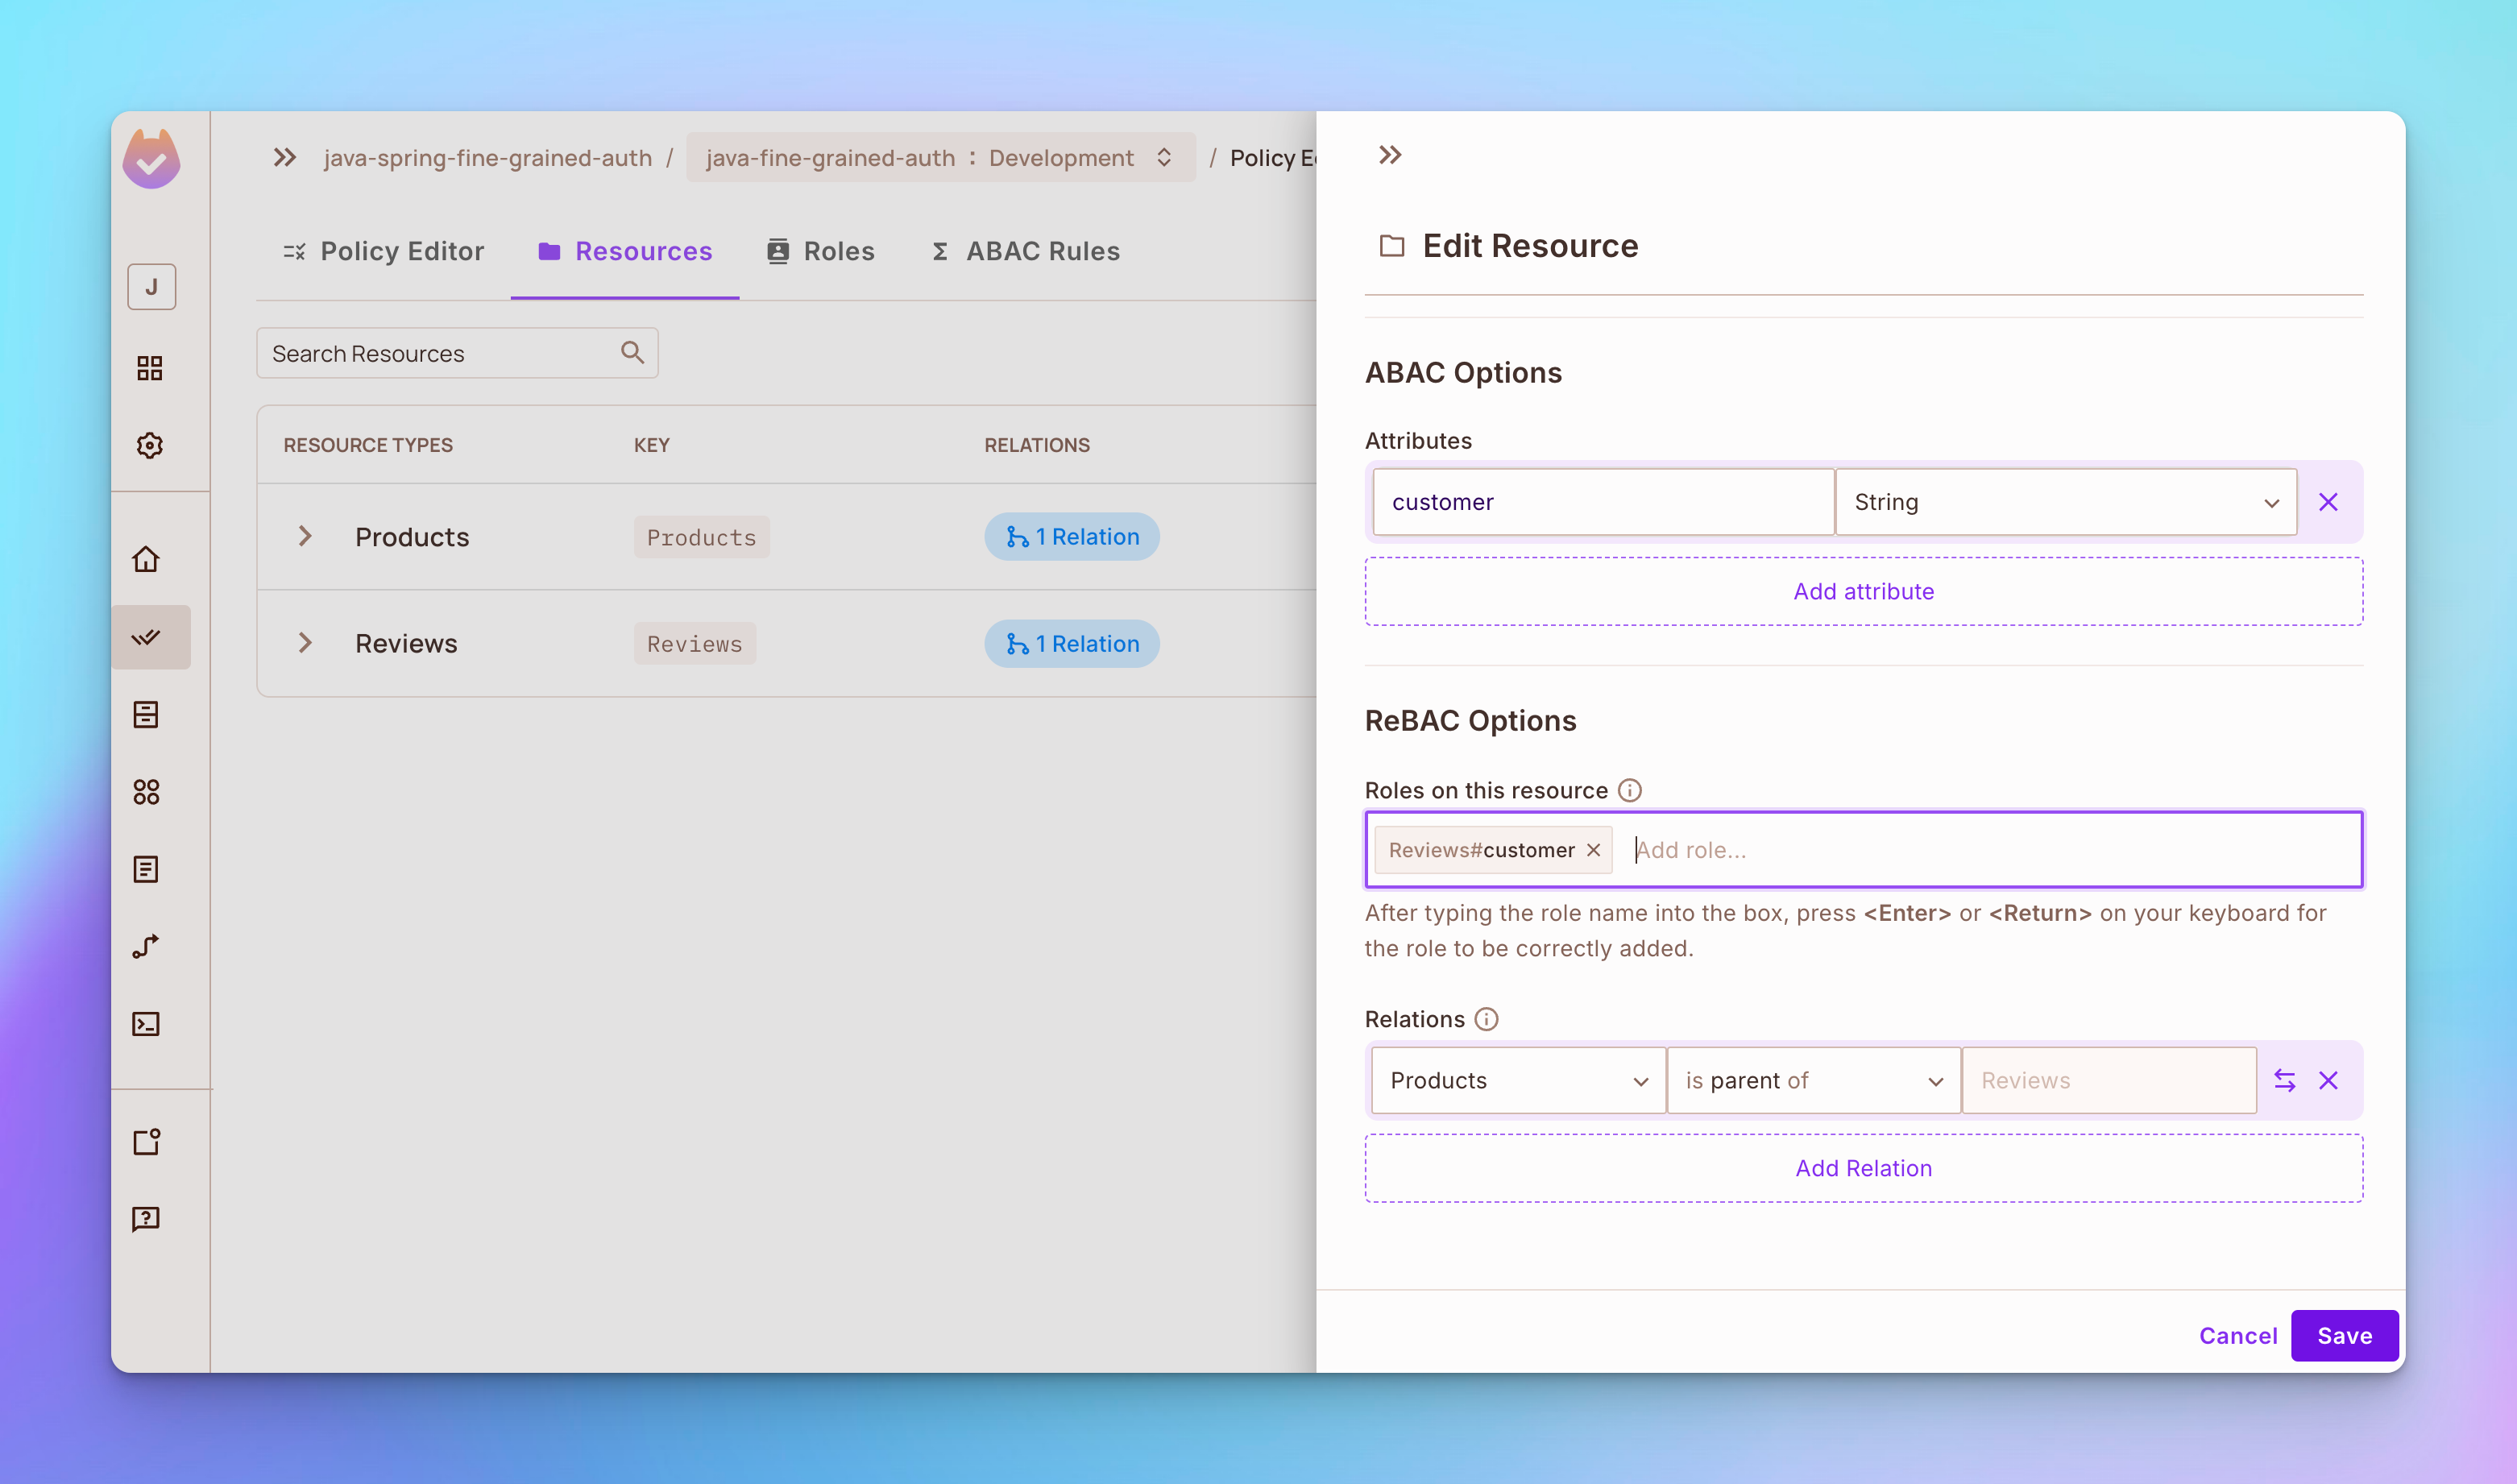
Step 1: Open the Resources tab and edit the Products resource. Add role vendor in the ReBAC options section. Then set products as parent of reviews in the relations section.
Step 2: Edit the Reviews resource by adding role customer in the ReBAC options section, as shown below:
Step 3: Go to Policy Editor tab and add:
role
vendorpermission to update and delete own products.role
customerpermission to update and delete their own reviews on products.

How to Implement FGA in Java and SpringBoot
Now that we have defined RBAC, ABAC, and ReBAC policies in the Permit.io web interface, let’s learn how to enforce them in an E-Commerce Management System application using the Permit.io API.
There’s a lot of code coming up, so make sure you read through the extensive comments I’ve left throughout each code block. These will help you understand more fully what’s going on in this code.
Step 1: Setting Up the E-commerce Application
To set up the e-commerce application and git clone the source code.
git clone https://github.com/tyaga001/java-spring-fine-grained-auth.git
💡
Then open the code in your Java IDE. I used JetBrains for all my work.
Installing Permit package SDK
To install the Permit package SDK, you add the SDK under the dependencies block in the build.graddle file.
## Dependencies
To set up the necessary dependencies for your Spring Boot project, include the following in your `build.gradle` file:
```groovy
dependencies {
    implementation 'org.springframework.boot:spring-boot-starter-web'
    implementation 'org.springdoc:springdoc-openapi-starter-webmvc-ui:2.3.0'
    developmentOnly 'org.springframework.boot:spring-boot-devtools'
    testImplementation 'org.springframework.boot:spring-boot-starter-test'
    testRuntimeOnly 'org.junit.platform:junit-platform-launcher'
    // Add this line to install the Permit.io Java SDK in your project
    implementation 'io.permit:permit-sdk-java:2.0.0'
}
Initializing the Permit SDK
You can initialize the Permit SDK Client using the code below:
package com.boostmytool.store.config;
import io.permit.sdk.Permit;
import io.permit.sdk.PermitConfig;
import org.springframework.beans.factory.annotation.Value;
import org.springframework.context.annotation.Bean;
import org.springframework.context.annotation.Configuration;
@Configuration  // Marks this class as a configuration class for Spring IoC
public class PermitClientConfig {
    @Value("${permit.api-key}")  // Inject Permit API key from application properties
    private String apiKey;
    @Value("${permit.pdp-url}")  // Inject Permit PDP (Policy Decision Point) URL from application properties
    private String pdpUrl;
    /**
     * Creates a Permit client bean with custom configuration
     * @return Permit client instance
     */
    @Bean
    public Permit permit() {
        return new Permit(
                new PermitConfig.Builder(apiKey)  // Initialize PermitConfig with API key
                        .withPdpAddress(pdpUrl)   // Set the PDP address
                        .withDebugMode(true)      // Enable debug mode for detailed logging
                        .build()                  // Build the PermitConfig object
        );
    }
}
Syncing Users with SDK
To start enforcing permissions, you should first sync a user to Permit, and then assign them a role.
In the code below, the UserService class provides methods for user login, signup, role assignment, and authorization, with exception handling for possible errors when interacting with the Permit API.
package com.boostmytool.store.service;
import com.boostmytool.store.exception.ForbiddenAccessException;
import com.boostmytool.store.exception.UnauthorizedException;
import io.permit.sdk.Permit;
import io.permit.sdk.api.PermitApiError;
import io.permit.sdk.api.PermitContextError;
import io.permit.sdk.enforcement.Resource;
import io.permit.sdk.enforcement.User;
import org.springframework.stereotype.Service;
import java.io.IOException;
@Service  // Marks this class as a Spring service, making it a candidate for component scanning
public class UserService {
    private final Permit permit;
    // Constructor injection for the Permit SDK
    public UserService(Permit permit) {
        this.permit = permit;
    }
    /**
     * Simulates user login by creating and returning a Permit User object.
     *
     * @param key User's unique key
     * @return User object
     */
    public Object login(String key) {
        return new User.Builder(key).build();
    }
    /**
     * Handles user signup by creating and syncing a new Permit User.
     *
     * @param key User's unique key
     * @return Created and synced User object
     */
    public User signup(String key) {
        var user = new User.Builder(key).build();
        try {
            permit.api.users.sync(user);  // Syncs the new user with the Permit service
        } catch (PermitContextError | PermitApiError | IOException e) {
            throw new RuntimeException("Failed to create user", e);  // Handles exceptions during user creation
        }
        return user;
    }
    /**
     * Assigns a role to the user within the "default" environment.
     *
     * @param user User object to assign the role to
     * @param role Role to be assigned
     */
    public void assignRole(User user, String role) {
        try {
            permit.api.users.assignRole(user.getKey(), role, "default");  // Assigns role in the "default" environment
        } catch (PermitApiError | PermitContextError | IOException e) {
            throw new RuntimeException("Failed to assign role to user", e);  // Handles exceptions during role assignment
        }
    }
    /**
     * Checks if the user is authorized to perform a specific action on a resource.
     *
     * @param user User object requesting authorization
     * @param action Action to be authorized
     * @param resource Resource on which the action will be performed
     * @throws UnauthorizedException if user is not logged in
     * @throws ForbiddenAccessException if user is denied access
     */
    public void authorize(User user, String action, Resource resource) {
        if (user == null) {
            throw new UnauthorizedException("Not logged in");  // Throws exception if user is not logged in
        }
        try {
            var permitted = permit.check(user, action, resource);  // Performs authorization check
            if (!permitted) {
                throw new ForbiddenAccessException("Access denied");  // Throws exception if access is denied
            }
        } catch (PermitApiError | IOException e) {
            throw new RuntimeException("Failed to authorize user", e);  // Handles exceptions during authorization
        }
    }
}
Then in the code below, the UserController class exposes REST API endpoints for user signup and role assignment. It interacts with the UserService class to handle user-related business logic and provides appropriate HTTP responses.
package com.boostmytool.store.controllers;
import com.boostmytool.store.exception.UnauthorizedException;
import com.boostmytool.store.service.UserService;
import io.permit.sdk.enforcement.User;
import jakarta.servlet.http.HttpServletRequest;
import org.springframework.web.bind.annotation.PostMapping;
import org.springframework.web.bind.annotation.RequestBody;
import org.springframework.web.bind.annotation.RequestMapping;
import org.springframework.web.bind.annotation.RestController;
@RestController  // Indicates that this class handles HTTP requests and returns JSON responses
@RequestMapping("/api/users")  // Base URL path for all user-related operations
public class UserController {
    private final UserService userService;
    // Constructor injection of UserService, containing business logic for user operations
    public UserController(UserService userService) {
        this.userService = userService;
    }
    /**
     * Handles user signup requests.
     * Endpoint: POST /api/users/signup
     *
     * @param key Unique key for the new user
     * @return Created User object
     */
    @PostMapping("/signup")
    public User signup(@RequestBody String key) {
        return userService.signup(key);  // Calls the signup method in UserService to create a new user
    }
    /**
     * Handles assigning a role to the logged-in user.
     * Endpoint: POST /api/users/assign-role
     *
     * @param request HTTP request, used to retrieve the current user
     * @param role Role to be assigned to the current user
     */
    @PostMapping("/assign-role")
    public void assignRole(HttpServletRequest request, @RequestBody String role) {
        // Retrieves the current user from the request attributes
        User currentUser = (User) request.getAttribute("user");
        // Throws an exception if the user is not logged in
        if (currentUser == null) {
            throw new UnauthorizedException("Not logged in");
        }
        // Assigns the specified role to the current user
        userService.assignRole(currentUser, role);
    }
}
Creating RBAC, ABAC, and ReBAC Policy Enforcement Point
In the code below, the ProductService class manages CRUD operations for products and reviews, handling permissions and roles via the Permit API.
Each operation includes user authorization checks, with appropriate exception handling for Permit API errors and resource not found scenarios.
package com.boostmytool.store.service;
import com.boostmytool.store.exception.ResourceNotFoundException;
import com.boostmytool.store.model.Product;
import com.boostmytool.store.model.Review;
import io.permit.sdk.Permit;
import io.permit.sdk.api.PermitApiError;
import io.permit.sdk.api.PermitContextError;
import io.permit.sdk.enforcement.Resource;
import io.permit.sdk.enforcement.User;
import io.permit.sdk.openapi.models.RelationshipTupleCreate;
import io.permit.sdk.openapi.models.ResourceInstanceCreate;
import io.permit.sdk.openapi.models.RoleAssignmentCreate;
import org.springframework.stereotype.Service;
import java.io.IOException;
import java.util.ArrayList;
import java.util.HashMap;
import java.util.List;
import java.util.concurrent.atomic.AtomicInteger;
@Service  // Marks this class as a Spring service
public class ProductService {
    private final List<Product> products = new ArrayList<>();  // In-memory list to store products
    private final AtomicInteger productIdCounter = new AtomicInteger();  // Counter to generate unique product IDs
    private final AtomicInteger reviewIdCounter = new AtomicInteger();   // Counter to generate unique review IDs
    // Builders for Permit resource instances (product and review)
    private final Resource.Builder productResourceBuilder = new Resource.Builder("product");
    private final Resource.Builder reviewResourceBuilder = new Resource.Builder("review");
    private final UserService userService;  // Service for handling user-related operations
    private final Permit permit;  // Permit SDK instance for handling authorization and resource management
    // Constructor for injecting dependencies
    public ProductService(UserService userService, Permit permit) {
        this.userService = userService;
        this.permit = permit;
    }
    // Method to authorize a user for a given action on a resource
    private void authorize(User user, String action, Resource resource) {
        userService.authorize(user, action, resource);
    }
    // Authorizes a user to perform an action on a specific product
    private void authorize(User user, String action, Product product) {
        var attributes = new HashMap<String, Object>();
        attributes.put("vendor", product.getVendor());  // Add vendor attribute to the product
        userService.authorize(user, action, productResourceBuilder.withKey(product.getId().toString()).withAttributes(attributes).build());
    }
    // Authorizes a user to perform an action on a specific review
    private void authorize(User user, String action, Review review) {
        var attributes = new HashMap<String, Object>();
        attributes.put("customer", review.getCustomer());  // Add customer attribute to the review
        userService.authorize(user, action, reviewResourceBuilder.withKey(review.getId().toString()).withAttributes(attributes).build());
    }
    // Retrieves a product by its ID, throws an exception if not found
    private Product getProductById(int id) {
        return products.stream().filter(product -> product.getId().equals(id))
                .findFirst().orElseThrow(() -> new ResourceNotFoundException("Product with id " + id + " not found"));
    }
    // Retrieves all products, checks if the user is authorized to "read" products
    public List<Product> getAllProducts(User user) {
        authorize(user, "read", productResourceBuilder.build());  // User must have "read" permission
        return new ArrayList<>(products);  // Return a copy of the products list
    }
    // Retrieves a product by its ID, checks if the user is authorized to "read" the product
    public Product getProduct(User user, int id) {
        authorize(user, "read", productResourceBuilder.build());
        return getProductById(id);
    }
    // Adds a new product, authorizes the user and creates resource instances and role assignments in Permit
    public Product addProduct(User user, String content) {
        authorize(user, "create", productResourceBuilder.build());  // Check if user can create a product
        Product product = new Product(productIdCounter.incrementAndGet(), user.getKey(), content);  // Create new product
        try {
            // Create resource instance in Permit and assign "vendor" role to the user for this product
            permit.api.resourceInstances.create(new ResourceInstanceCreate(product.getId().toString(), "product").withTenant("default"));
            permit.api.roleAssignments.assign(new RoleAssignmentCreate("vendor", user.getKey()).withResourceInstance("product:" + product.getId()).withTenant("default"));
        } catch (IOException | PermitApiError | PermitContextError e) {
            throw new RuntimeException("Failed to create resource instance or role assignment: " + e.getMessage());
        }
        products.add(product);  // Add product to in-memory list
        return product;
    }
    // Updates a product's content, checks if the user is authorized to "update" the product
    public Product updateProduct(User user, int id, String content) {
        Product product = getProductById(id);  // Get the product by its ID
        authorize(user, "update", product);  // Check if user can update the product
        product.setContent(content);  // Update product content
        return product;
    }
    // Deletes a product, checks if the user is authorized to "delete" the product
    public void deleteProduct(User user, int id) {
        boolean isDeleted = products.removeIf(product -> {
            if (product.getId().equals(id)) {
                authorize(user, "delete", product);  // Check if user can delete the product
                return true;
            } else {
                return false;
            }
        });
        if (!isDeleted) {
            throw new ResourceNotFoundException("Product with id " + id + " not found");
        }
        try {
            permit.api.resourceInstances.delete("product:" + id);  // Remove product resource instance from Permit
        } catch (IOException | PermitApiError | PermitContextError e) {
            throw new RuntimeException(e);
        }
    }
    // Adds a review to a product, creates a resource instance and relationship in Permit
    public Review addReview(User user, int productId, String content) {
        authorize(user, "create", reviewResourceBuilder.build());  // Check if user can create a review
        Product product = getProductById(productId);  // Get the product by its ID
        Review review = new Review(reviewIdCounter.incrementAndGet(), user.getKey(), content);  // Create new review
        try {
            // Create a resource instance for the review and set relationship with the product
            permit.api.resourceInstances.create(new ResourceInstanceCreate(review.getId().toString(), "review").withTenant("default"));
            permit.api.relationshipTuples.create(new RelationshipTupleCreate("product:" + productId, "parent", "review:" + review.getId()));
        } catch (IOException | PermitApiError | PermitContextError e) {
            throw new RuntimeException(e);
        }
        product.addReview(review);  // Add the review to the product
        return review;
    }
    // Updates a review's content, checks if the user is authorized to "update" the review
    public Review updateReview(User user, int productId, int reviewId, String content) {
        Product product = getProductById(productId);  // Get the product by its ID
        Review review = product.getReviews().stream().filter(c -> c.getId().equals(reviewId))
                .findFirst().orElseThrow(() -> new ResourceNotFoundException("Review with id " + reviewId + " not found"));
        authorize(user, "update", review);  // Check if user can update the review
        review.setContent(content);  // Update review content
        return review;
    }
    // Deletes a review, checks if the user is authorized to "delete" the review
    public void deleteReview(User user, int productId, int reviewId) {
        Product product = getProductById(productId);  // Get the product by its ID
        boolean isDeleted = product.getReviews().removeIf(review -> {
            if (review.getId().equals(reviewId)) {
                authorize(user, "delete", review);  // Check if user can delete the review
                return true;
            } else {
                return false;
            }
        });
        if (!isDeleted) {
            throw new ResourceNotFoundException("Review with id " + reviewId + " not found");
        }
        try {
            permit.api.resourceInstances.delete("review:" + reviewId);  // Remove review resource instance from Permit
        } catch (IOException | PermitApiError | PermitContextError e) {
            throw new RuntimeException(e);
        }
    }
}
Then in the code below, the ProductController class handles HTTP requests related to products and their reviews. It exposes endpoints for managing products (like creating, updating, deleting, and retrieving) and for managing product reviews.
package com.boostmytool.store.controllers;
import com.boostmytool.store.model.Product;
import com.boostmytool.store.model.Review;
import com.boostmytool.store.service.ProductService;
import io.permit.sdk.enforcement.User;
import jakarta.servlet.http.HttpServletRequest;
import org.springframework.beans.factory.annotation.Autowired;
import org.springframework.http.HttpStatus;
import org.springframework.web.bind.annotation.*;
import java.util.List;
@RestController  // Indicates that this class is a Spring REST controller
@RequestMapping("/api/products")  // Base URL for all endpoints in this controller
public class ProductController {
    private final ProductService productService;  // ProductService instance to handle product-related operations
    @Autowired  // Autowires ProductService bean automatically
    public ProductController(ProductService productService) {
        this.productService = productService;
    }
    // GET request to retrieve all products
    @GetMapping
    public List<Product> getAllProducts(HttpServletRequest request) {
        User currentUser = (User) request.getAttribute("user");  // Gets the authenticated user from the request
        return productService.getAllProducts(currentUser);  // Calls ProductService to get all products for the user
    }
    // GET request to retrieve a product by its ID
    @GetMapping("/{id}")
    public Product getProductById(HttpServletRequest request, @PathVariable("id") int id) {
        User currentUser = (User) request.getAttribute("user");  // Gets the authenticated user from the request
        return productService.getProduct(currentUser, id);  // Calls ProductService to get the product by ID for the user
    }
    // POST request to add a new product
    @PostMapping
    @ResponseStatus(HttpStatus.CREATED)  // Sets the response status to 201 (Created)
    public Product addProduct(HttpServletRequest request, @RequestBody String content) {
        User currentUser = (User) request.getAttribute("user");  // Gets the authenticated user from the request
        return productService.addProduct(currentUser, content);  // Calls ProductService to add a new product
    }
    // PUT request to update an existing product by its ID
    @PutMapping("/{id}")
    public Product updateProduct(HttpServletRequest request, @PathVariable("id") int id, @RequestBody String content) {
        User currentUser = (User) request.getAttribute("user");  // Gets the authenticated user from the request
        return productService.updateProduct(currentUser, id, content);  // Calls ProductService to update the product by ID
    }
    // DELETE request to delete a product by its ID
    @DeleteMapping("/{id}")
    public String deleteProduct(HttpServletRequest request, @PathVariable("id") int id) {
        User currentUser = (User) request.getAttribute("user");  // Gets the authenticated user from the request
        productService.deleteProduct(currentUser, id);  // Calls ProductService to delete the product by ID
        return "Deleted product with id " + id;  // Returns a success message after deletion
    }
    // POST request to add a new review to a product by product ID
    @PostMapping("/{id}/review")
    public Review addReview(HttpServletRequest request, @PathVariable("id") int id, @RequestBody String content) {
        User currentUser = (User) request.getAttribute("user");  // Gets the authenticated user from the request
        return productService.addReview(currentUser, id, content);  // Calls ProductService to add a review to the product
    }
    // PUT request to update an existing review by product and review ID
    @PutMapping("/{id}/review/{reviewId}")
    public Review updateReview(HttpServletRequest request, @PathVariable("id") int id, @PathVariable("reviewId") int reviewId, @RequestBody String content) {
        User currentUser = (User) request.getAttribute("user");  // Gets the authenticated user from the request
        return productService.updateReview(currentUser, id, reviewId, content);  // Calls ProductService to update the review
    }
    // DELETE request to delete a review by product and review ID
    @DeleteMapping("/{id}/review/{reviewId}")
    public String deleteReview(HttpServletRequest request, @PathVariable("id") int id, @PathVariable("reviewId") int reviewId) {
        User currentUser = (User) request.getAttribute("user");  // Gets the authenticated user from the request
        productService.deleteReview(currentUser, id, reviewId);  // Calls ProductService to delete the review
        return "Deleted review with id " + reviewId + " from product " + id;  // Returns a success message after deletion
    }
}
Step 2: Get your Environment API Key
In the UI Dashboard, copy the Environment API Key of the active environment.

Then add the env API key and PDP URL in the application.yaml file.
permit:
  pdpUrl: 'http://localhost:7766'
  apiKey: "Your Permit environment API Key"
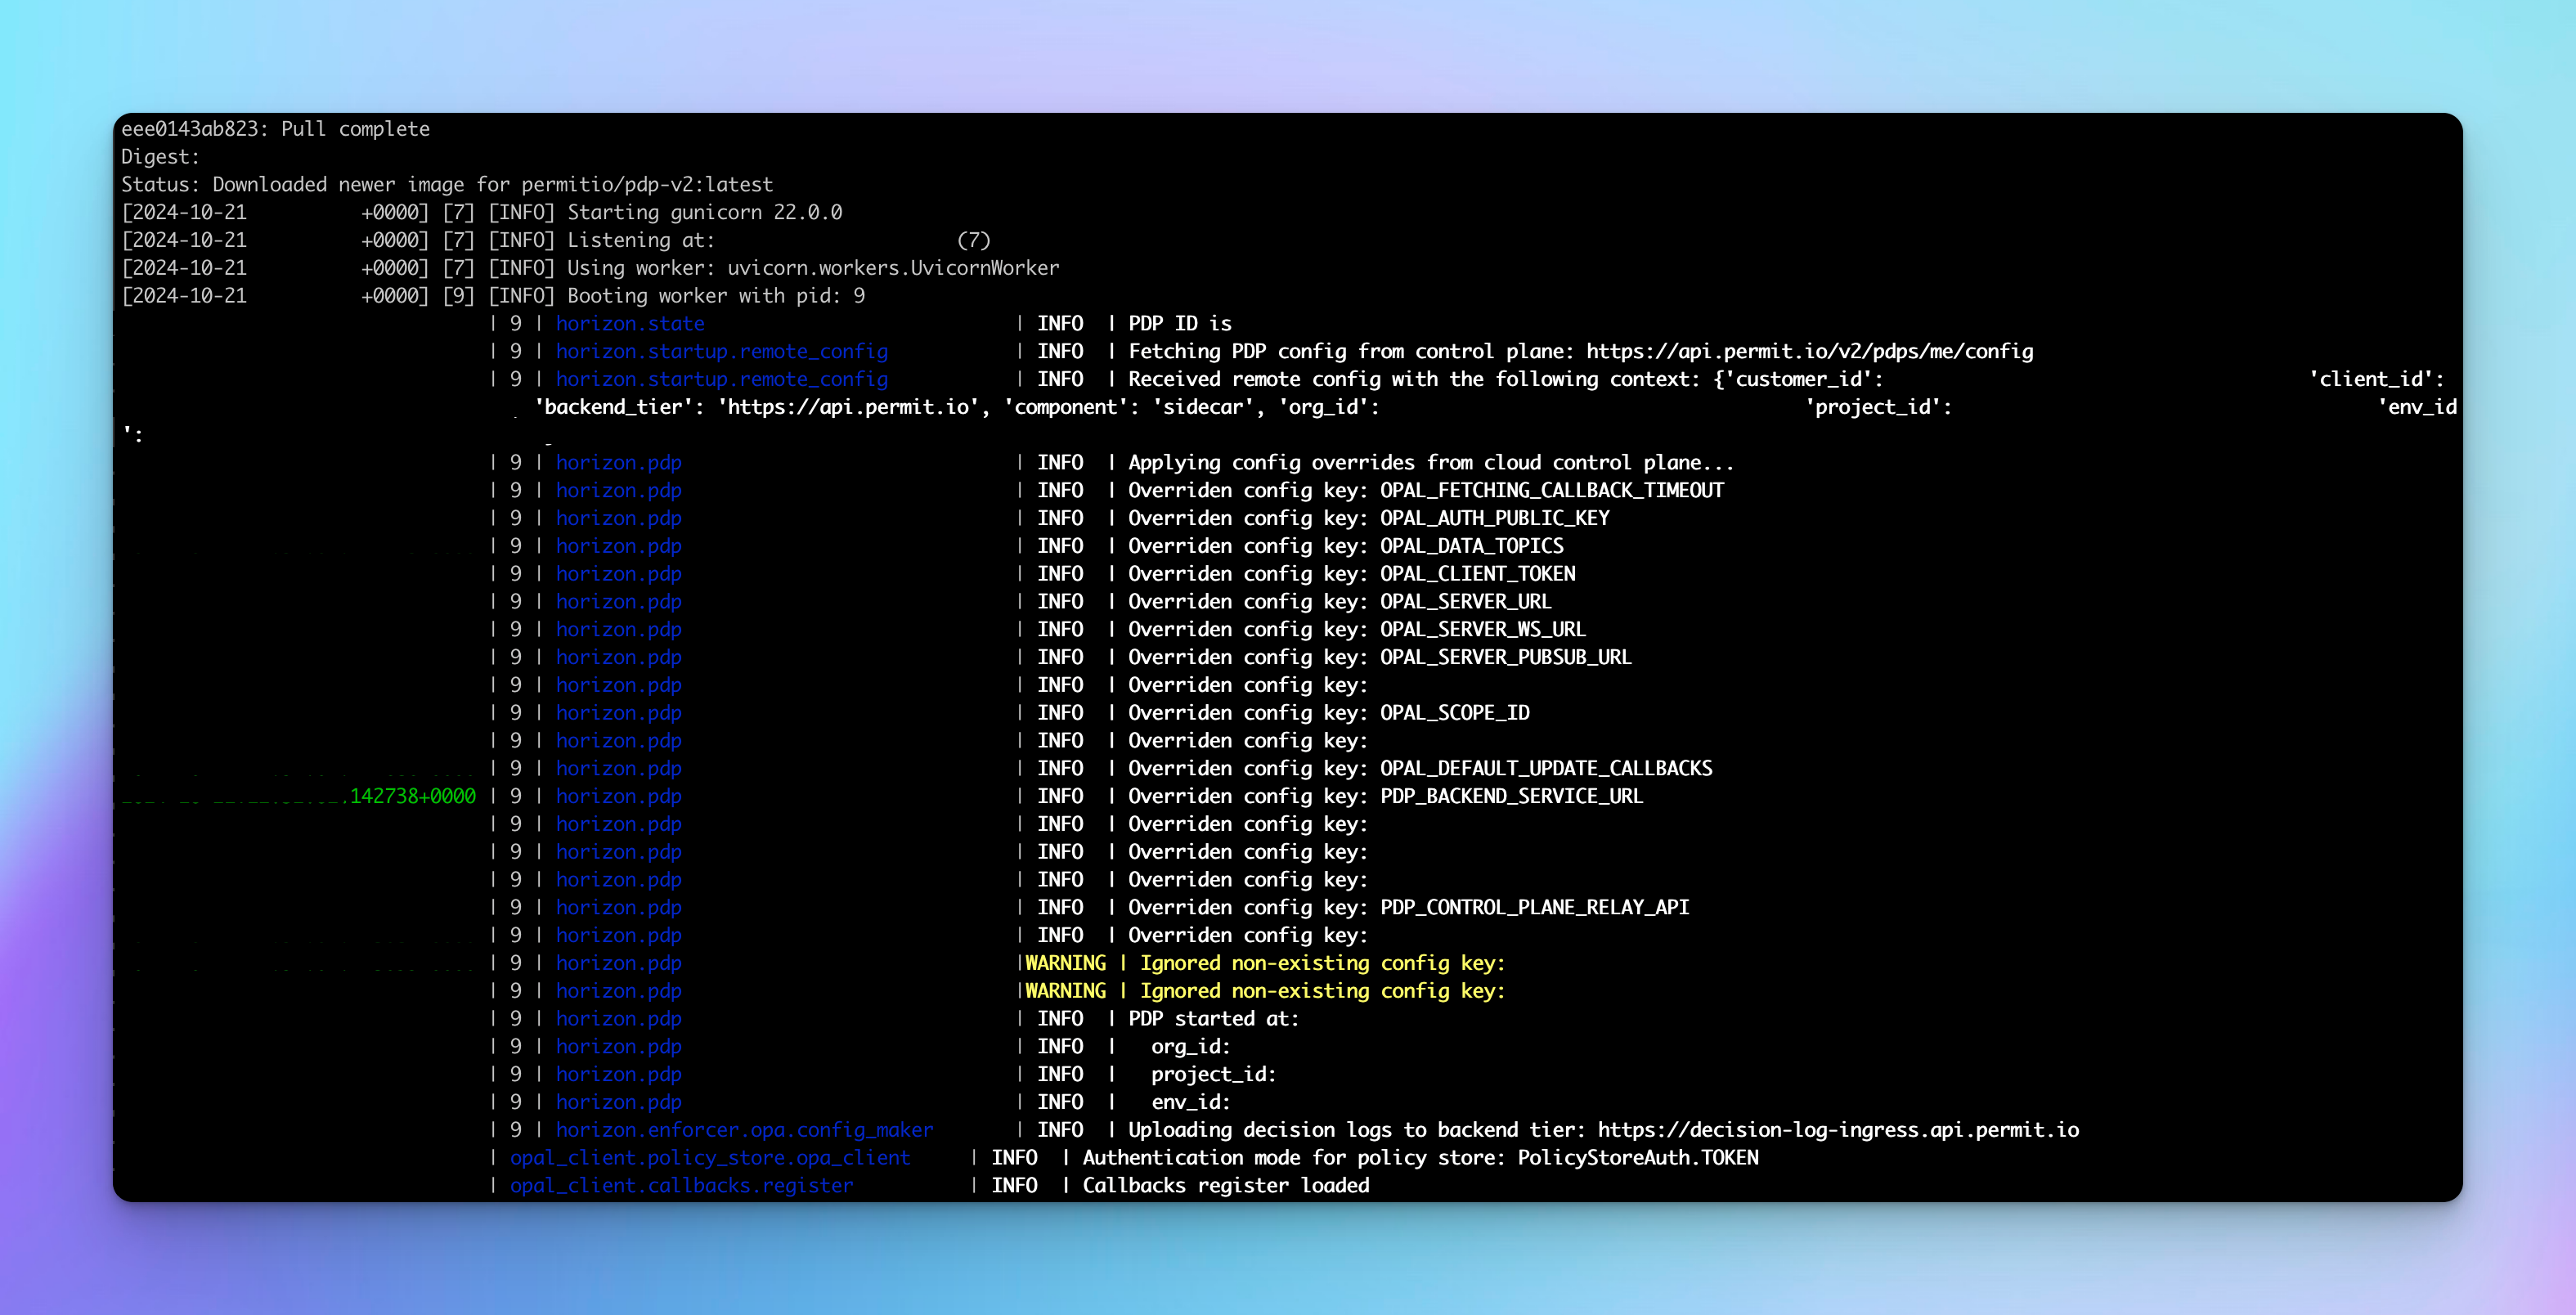
Step 3: Deploy Policy Decision Point (PDP)
The Policy Decision Point (PDP) is deployed in your VPC and is in charge of evaluating your authorization requests. The PDP will ensure zero latency, great performance, high availability, and improved security.
Use the command below to pull the Permit.io PDP container from Docker Hub.
docker pull permitio/pdp-v2:latest
Then run the container.
docker run -it -p 7766:7000 --env PDP_DEBUG=True --env PDP_API_KEY=<YOUR_API_KEY> permitio/pdp-v2:latest
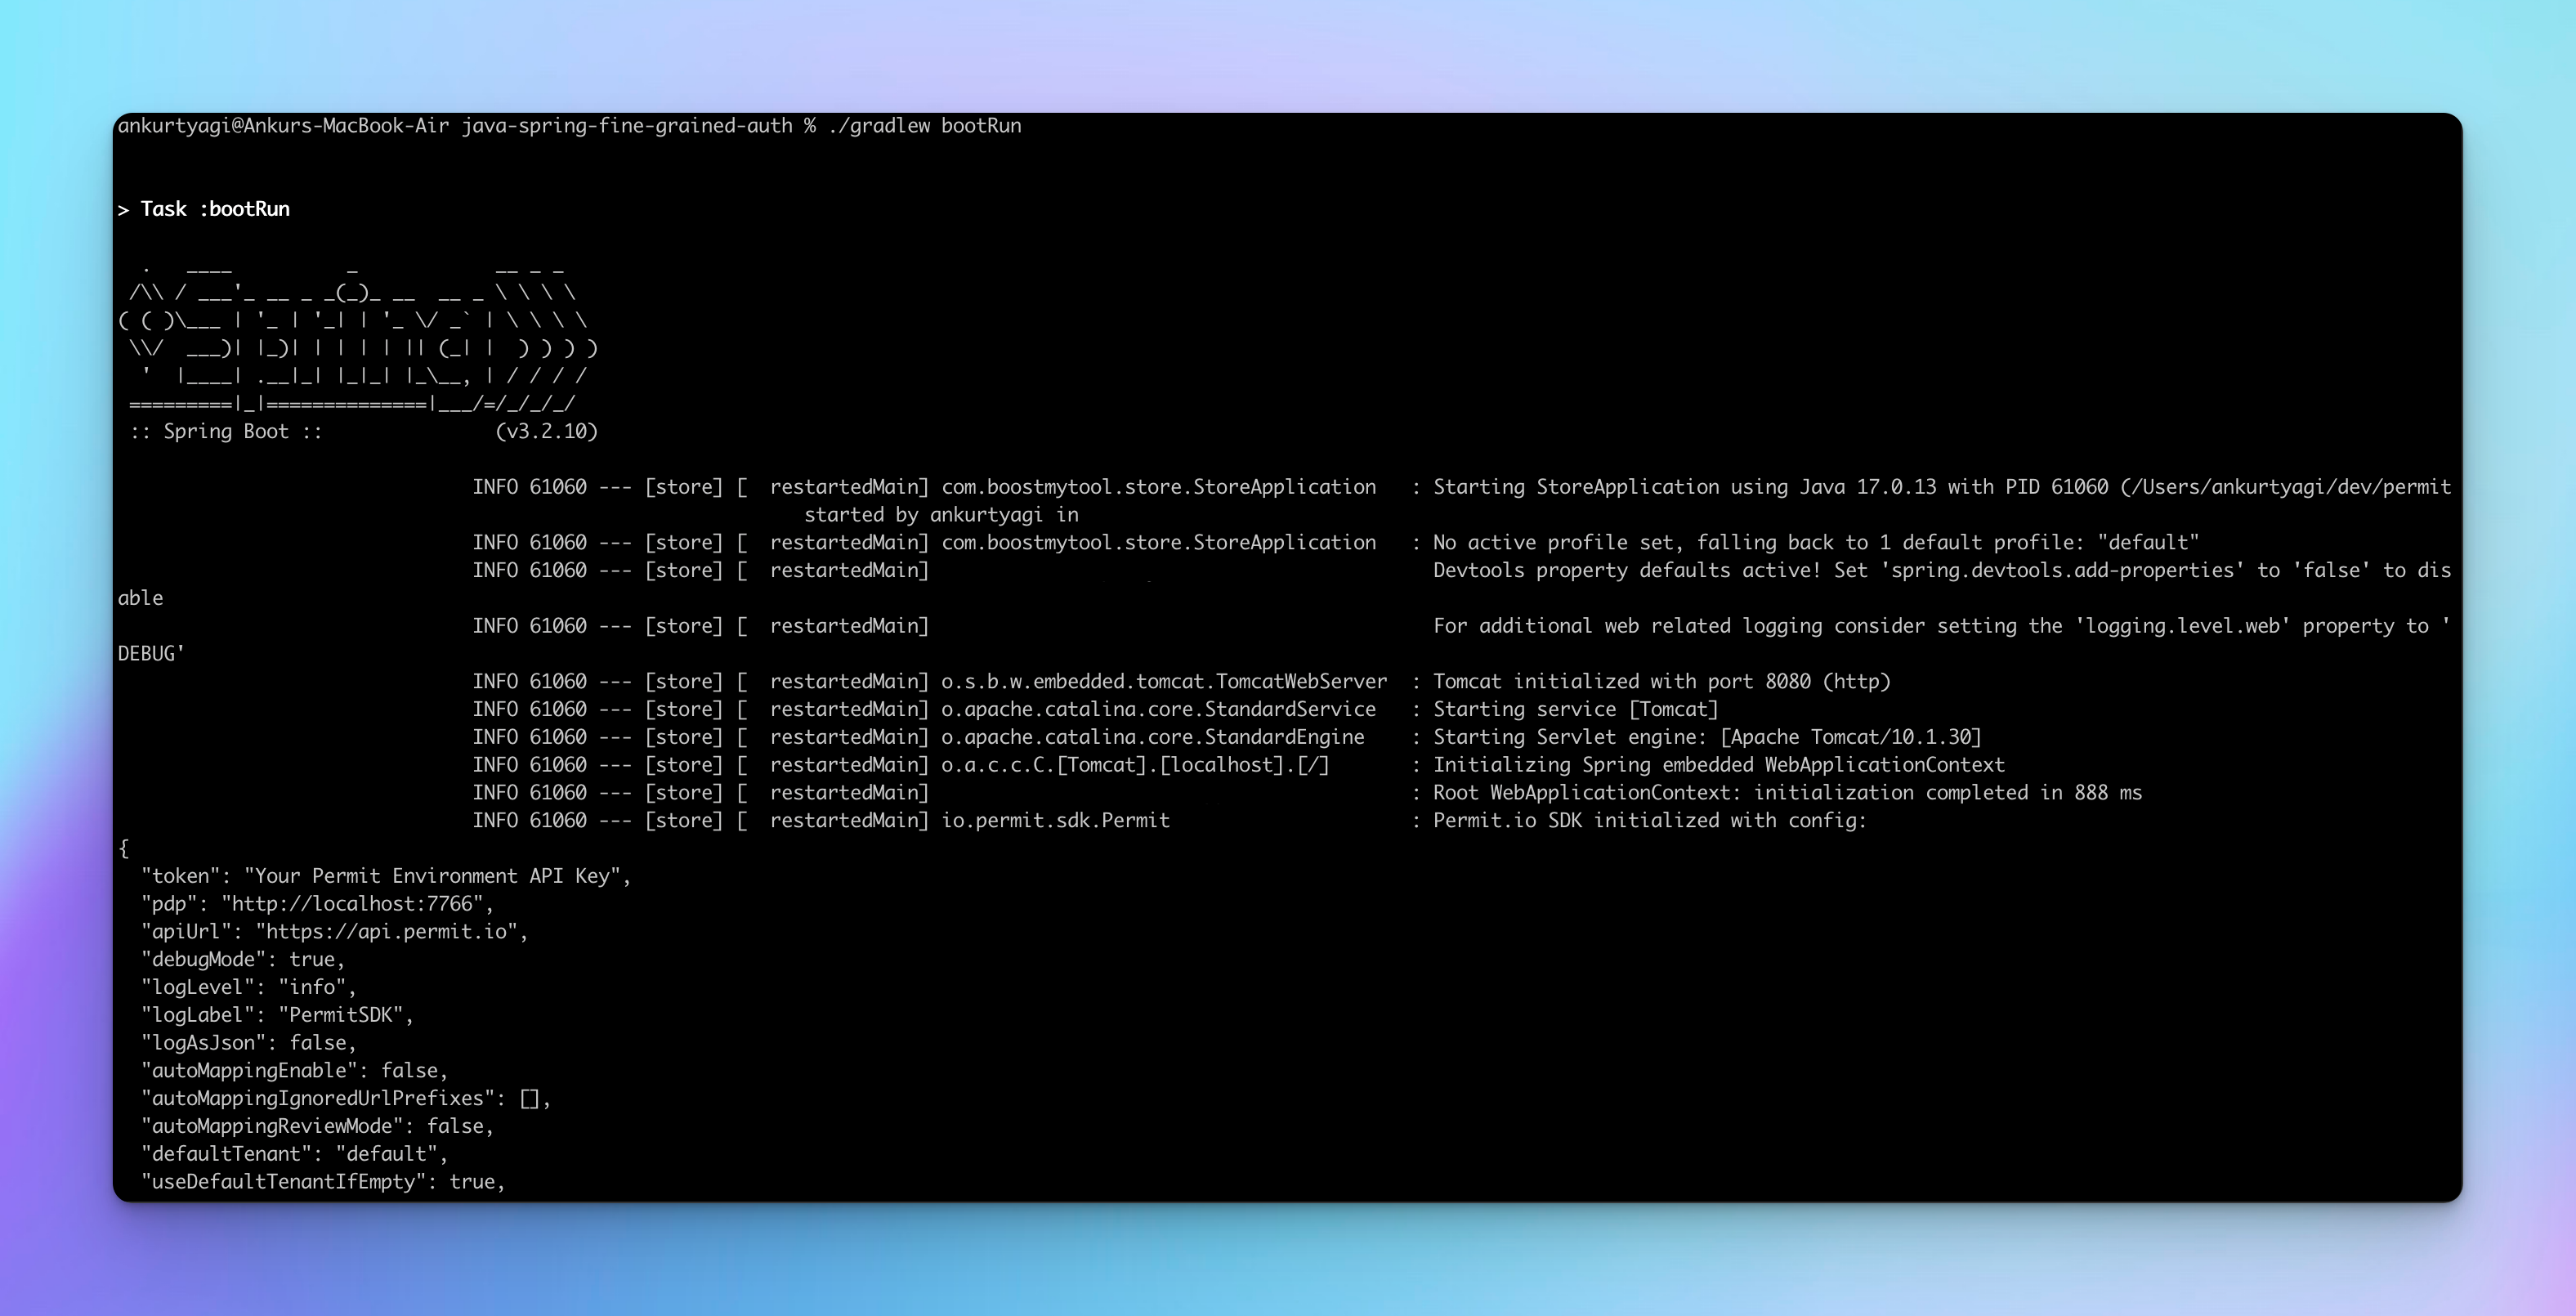
Step 4: Running the App
You can run the application using the following Gradle command:
./gradlew bootRun
Viewing and Creating Products
Let’s now interact with the application endpoints using REQBIN.
First, create a new user using the /api/users/signup endpoint.
curl -X POST "http://localhost:8080/api/users/signup" -H "Content-Type: application/json" -d 'johndoe'
You should be able to view the user in your Permit project, under Directory > All Tenants.
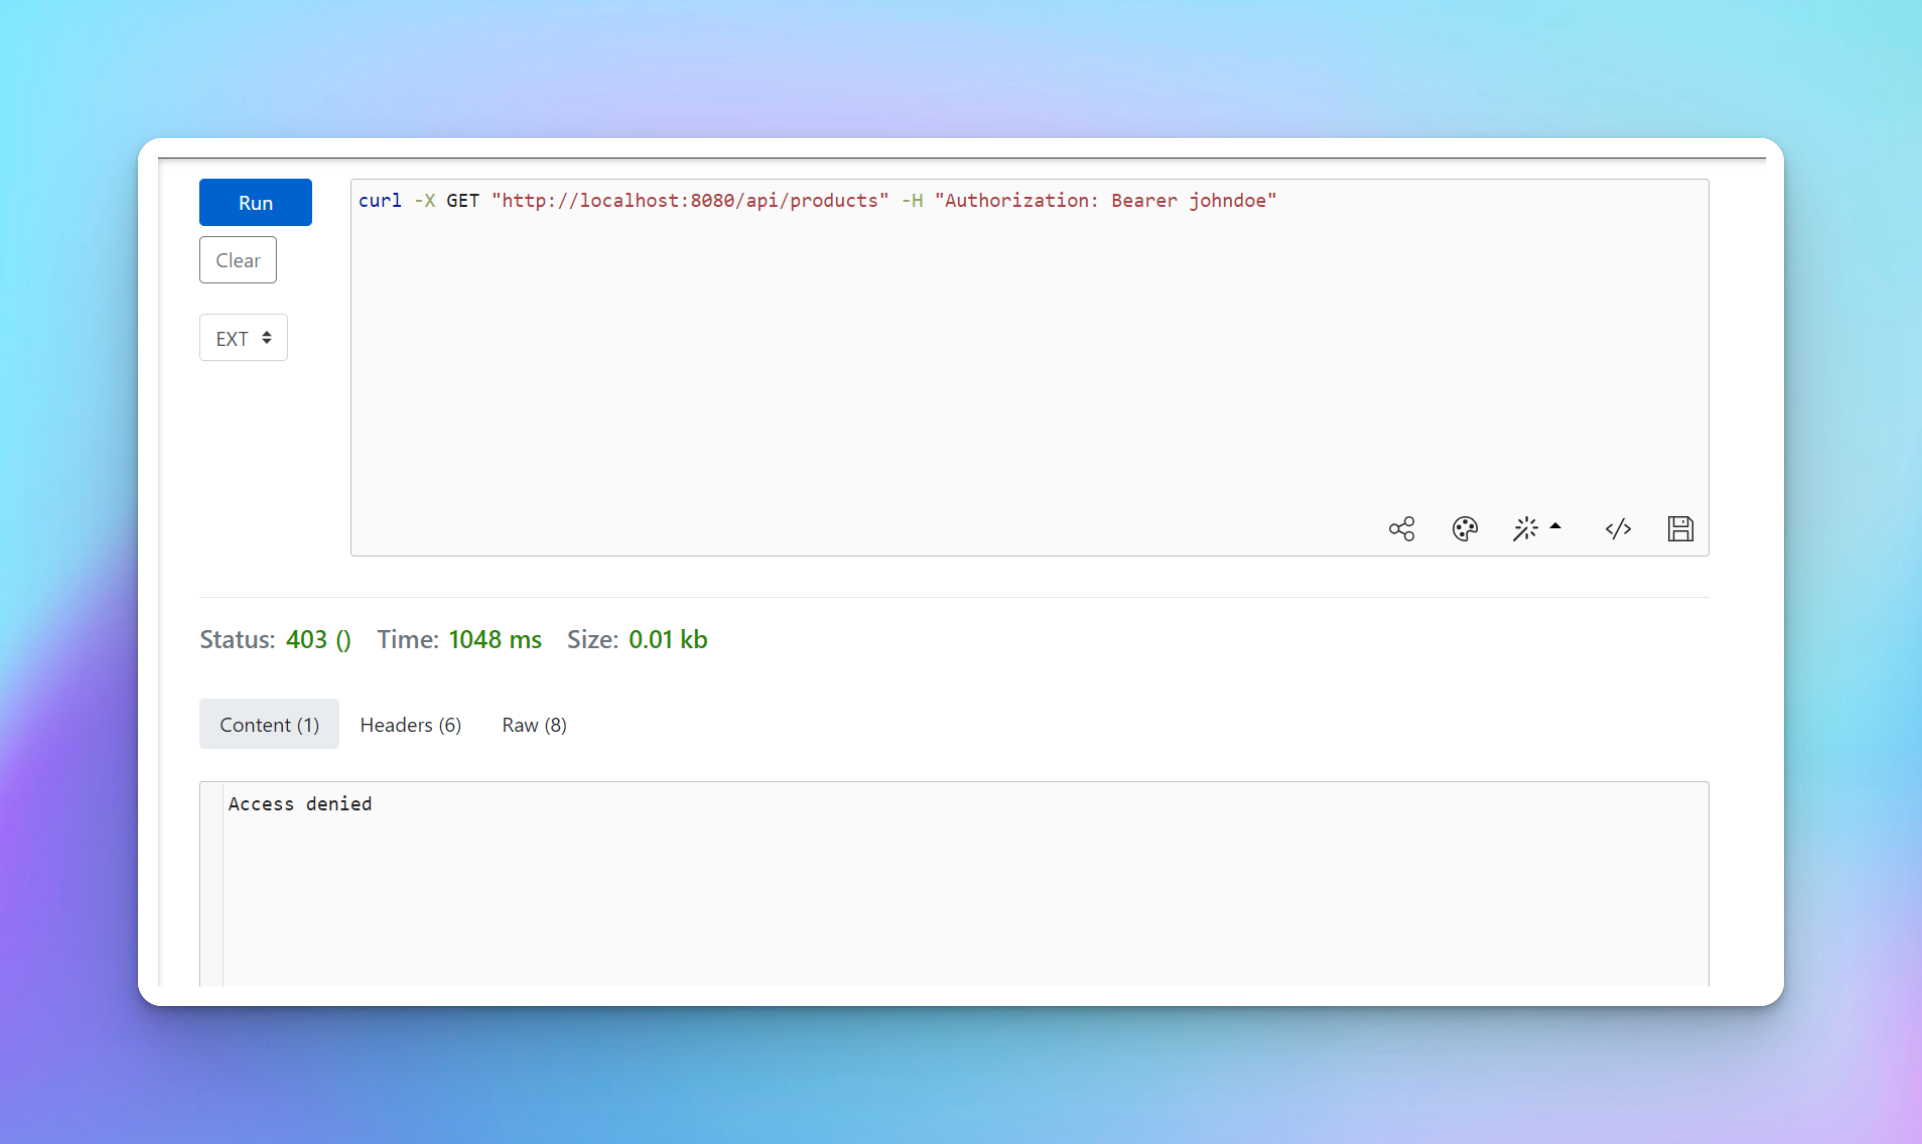
Initially, the user has no roles, so it cannot do much. For example, trying to list the products will result in a 403 Forbidden response, as shown below. The 403 error code means the user doesn’t have permissions to access the requested resource, which is products in this case. You can learn more about the difference between 401 and 403 error codes here.
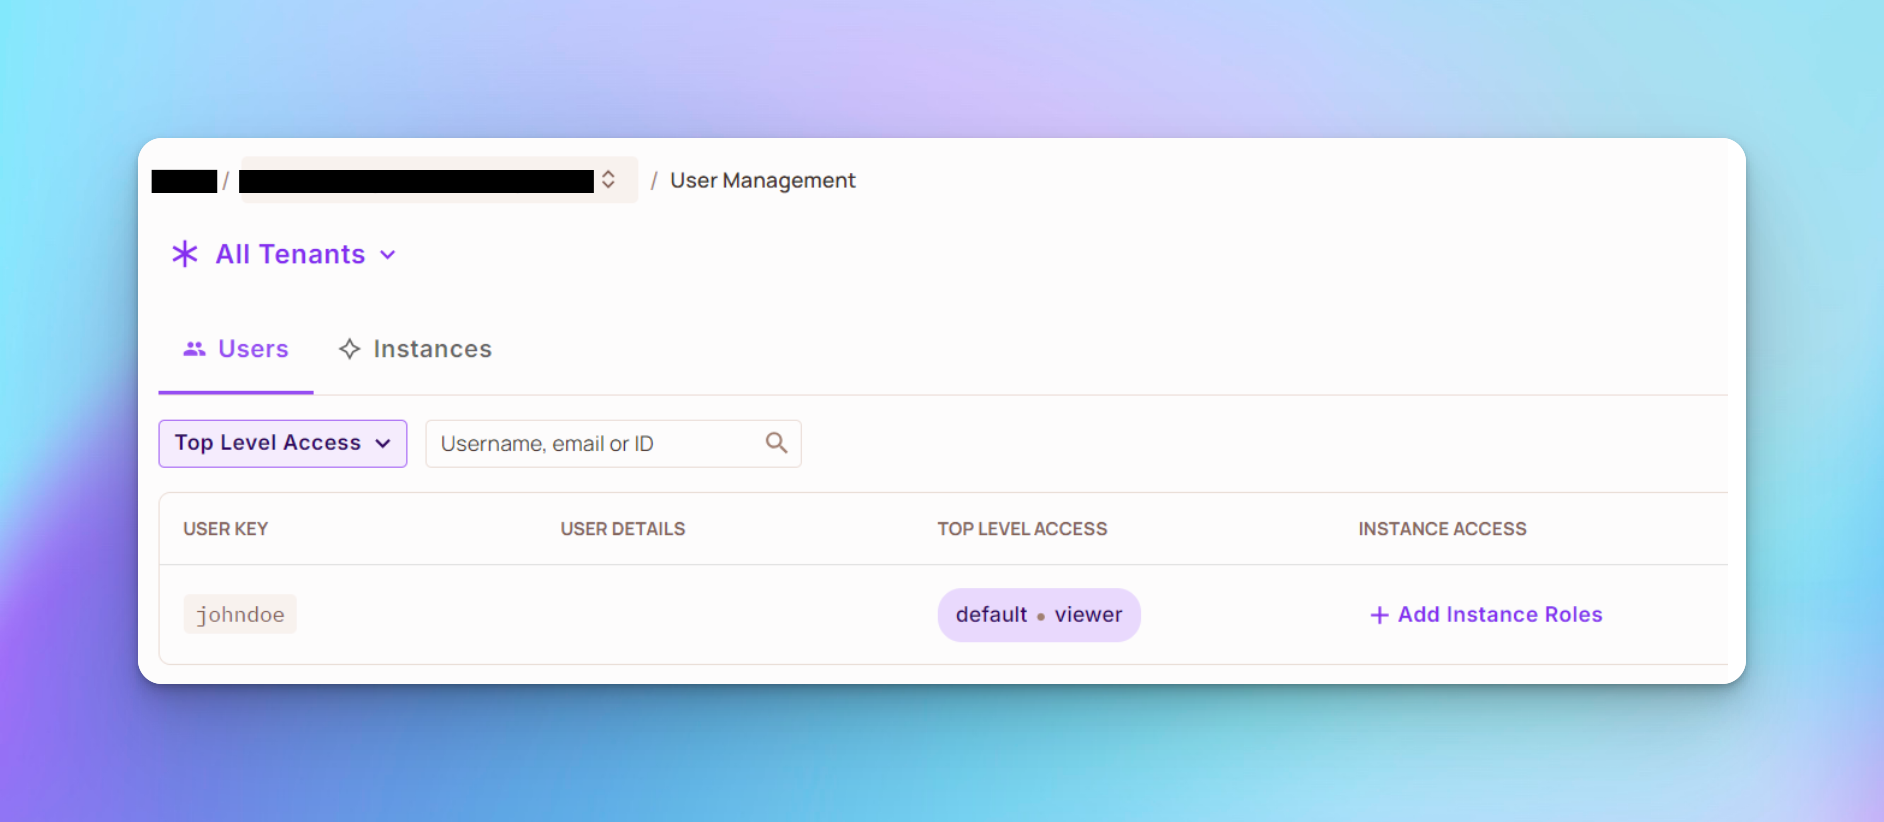
For the user to view a list of products, assign them a viewer role using the command below:
curl -X POST "http://localhost:8080/api/users/assign-role" \
-H "Authorization: Bearer johndoe" \
-H "Content-Type: application/json" \
-d 'viewer'
You should see that user johndoe was assigned role viewer, as shown below:
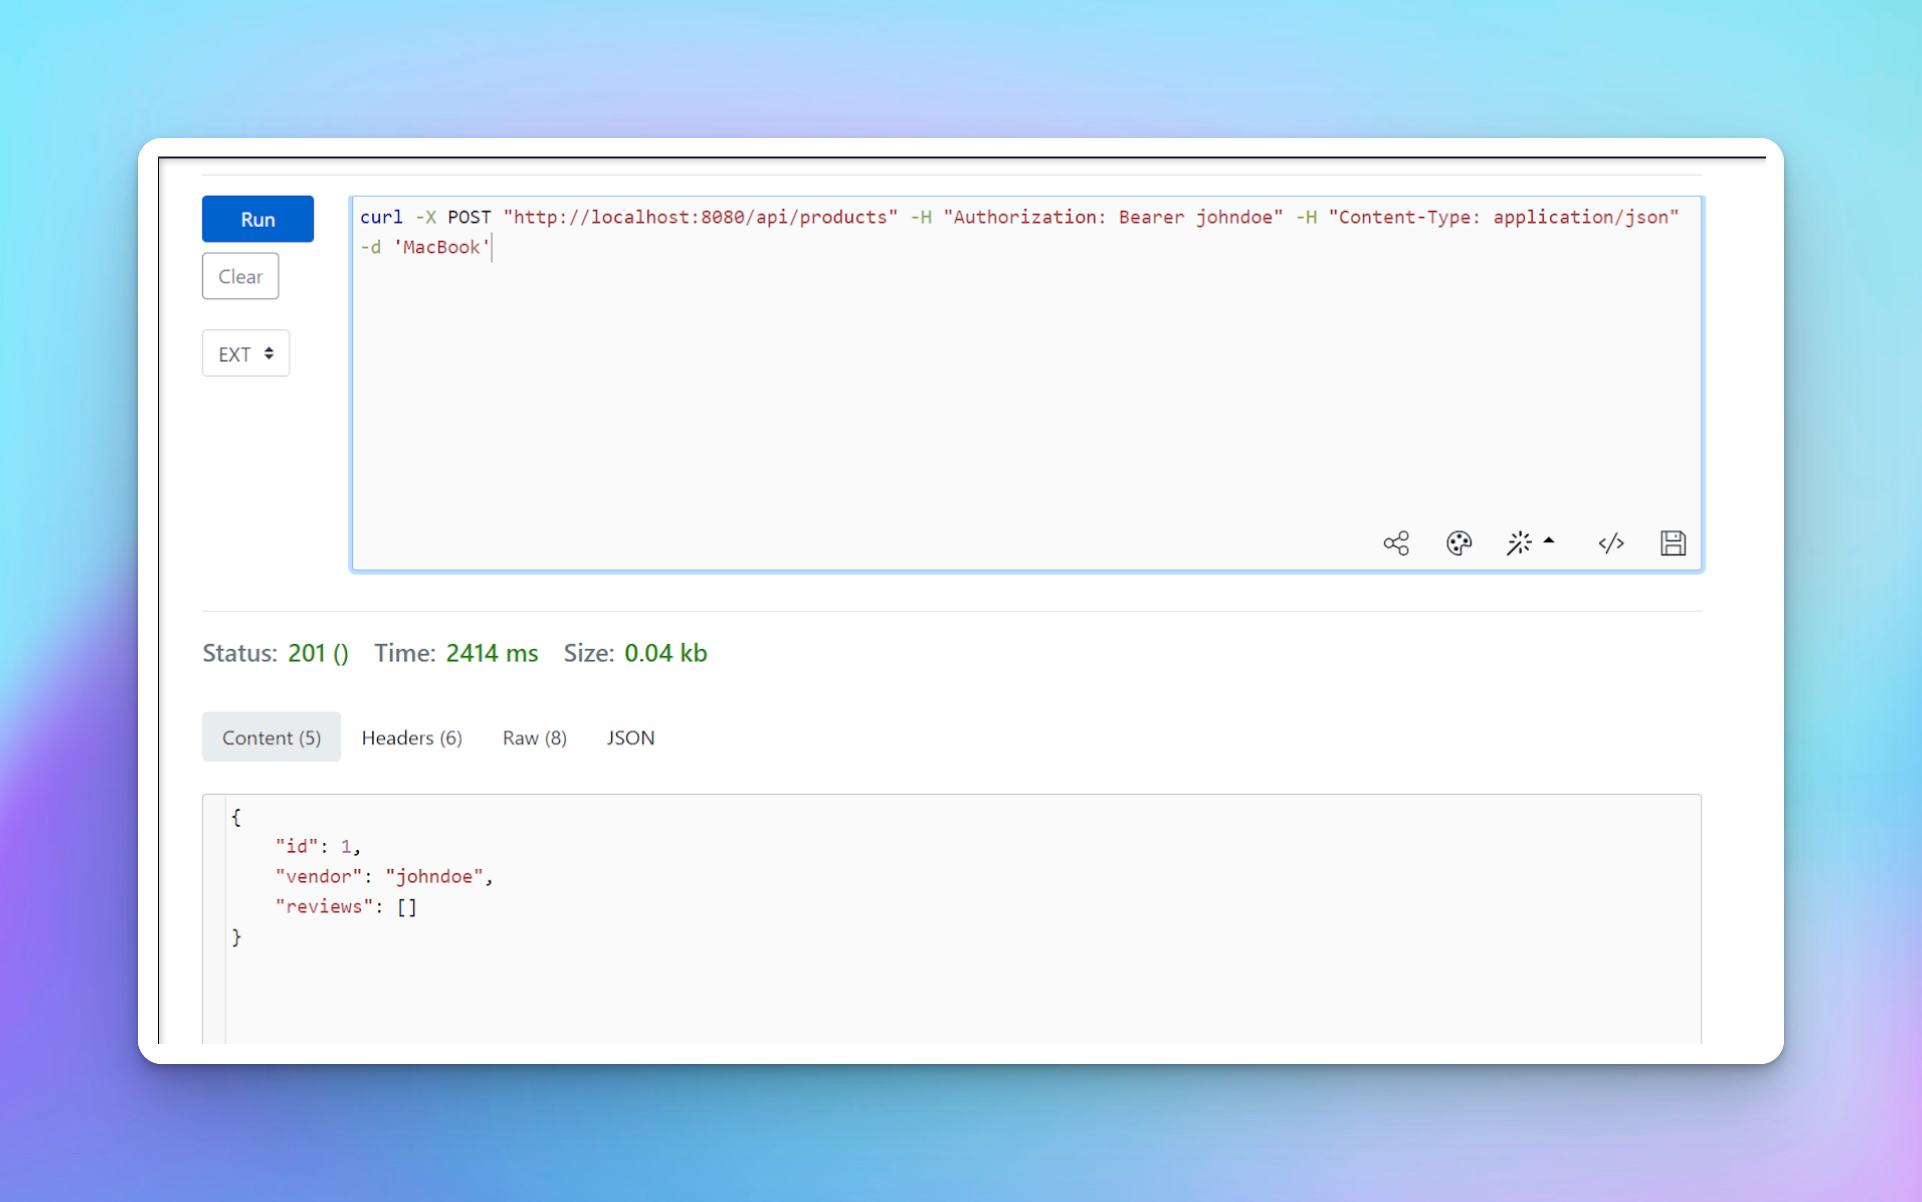
Since a viewer can create a product, use the command below to create a product with user johndoe.
curl -X POST "http://localhost:8080/api/products" -H "Authorization: Bearer johndoe" -H "Content-Type: application/json" -d 'MacBook'
You should see that a new product is created with ID 1 and that the user johndoe has been added as the vendor.
Adding Reviews To Products
To add reviews to products, create another user called jane.
curl -X POST "http://localhost:8080/api/users/signup" -H "Content-Type: application/json" -d 'jane'
For the user to add a review to products, assign them a viewer role using the command below:
curl -X POST "http://localhost:8080/api/users/assign-role" \
-H "Authorization: Bearer jane" \
-H "Content-Type: application/json" \
-d 'viewer'
Then you can add a review to the product added by johndoe using the command below:
curl -X POST "http://localhost:8080/api/products/1/review" -H "Authorization: Bearer jane" -H "Content-Type: application/json" -d 'The product was in good quality'
Congratulations! You’ve completed the project for this tutorial.
Next Steps
Now that you've learned how to implement fine-grained authorization in your Java and Spring Boot applications using Permit.io, you might want to explore further.
Here are some valuable resources:
Before We End
I hope you found this tutorial insightful.
Here are some of my other recent blog posts that you might enjoy:
Learn React – A Guide to the Key Concepts
Full Stack Development with Next.js, Clerk, and Neon Postgres
For more tutorials on amazing developer tools, be sure to check out my blog DTA.
Follow me on Twitter to get live updates on my other projects.
Happy coding.