Serverless computing emerged as a response to the challenges of traditional server-based architectures. With serverless, developers no longer need to manage or scale servers manually. Instead, cloud providers handle infrastructure management, allowing teams to focus solely on writing and deploying code.
Serverless solutions automatically scale based on demand and offer a pay-as-you-go model. This means that you only pay for the resources your application actually uses. This approach significantly reduces operational overhead, increases flexibility and accelerates development cycles, making it an attractive option for modern application development.
By abstracting server management, Serverless platforms let you concentrate on business logic and application functionality. This leads to faster deployments and more innovation. Serverless architectures are also event-driven, which means they can automatically respond to real-time events and scale to meet user demands without manual intervention.
Table of Contents
Important Concepts to Understand
Application Programming Interface (API)
HTTP Methods
Amazon API Gateway
Amazon DynamoDB
Serverless CRUD Application
The Serverless Framework
GitHub Actions
Postman
Prerequisites
Our Use Case
Tutorial Objectives
How to get Started:Clone the Git Repository
Step 1: Set up the Serverless Framework Environment
Step 2: Define the API in the Serverless YAML File
Step 3: Develop the Lambda Functions for CRUD Operations
Create Coffee Lambda function
Get Coffee Lambda function
Update Coffee Lambda function
Delete Coffee Lambda function
Step 4: Set Up CI/CD Pipeline Multi-stage Deployments for Dev and Prod Environments
Step 5: Test the Dev and Prod Pipelines
Step 6: Test and Validate Prod and Dev APIs using Postman
Conclusion
Before diving into the technical details, we'll go over some key background concepts.
Important Concepts to Understand
Application Programming Interface (API)
An Application Programming Interface (API) allows different software applications to communicate and interact with each other. It defines the methods and data formats that applications can use to request and exchange information for integration and data sharing between diverse systems.
HTTP Methods
HTTP methods or request methods are a critical component of web services and APIs. They indicate the desired action to be performed on a resource in a given request URL.
The most commonly used methods in RESTful APIs are:
GET: used to retrieve data from a server
POST: sends data, included in the body of the request, to create or update a resource
PUT: updates or replaces an existing resource or creates a new resource if it doesn’t exist
DELETE: deletes the specified data from the server.
Amazon API Gateway
Amazon API Gateway is a fully managed service that makes it easy for developers to create, publish, maintain, monitor and secure APIs at scale. It acts as an entry point for multiple APIs, managing and controlling the interactions between clients (such as web or mobile applications) and backend services.
It also provides various functions, including request routing, security, authentication, caching and rate limiting that help simplify the management and deployment of APIs.
Amazon DynamoDB
DynamoDB is a fully managed NoSQL database service designed for high scalability, low latency, and replication of data across multiple regions.
DynamoDB stores data in a schema-less format, allowing for flexible and fast storage and retrieval of structured and semi-structured data. It is commonly used for building scalable and responsive applications in cloud-based environments.
Serverless CRUD Application
A serverless CRUD application refers to the ability to Create, Read, Update and Delete data. But the architecture and components involved differ from traditional server-based applications.
Create involves adding new entries to a DynamoDB table. The Read operation retrieves data from a DynamoDB table. Update updates existing data in DynamoDB. And the Delete operation deletes data from DynamoDB.
The Serverless Framework
The Serverless Framework is an open-source tool that simplifies the deployment and management of serverless applications across multiple cloud providers, including AWS. It abstracts away the complexity of provisioning and managing infrastructure by allowing developers to define their infrastructure as code using a YAML file.
The framework handles the deployment, scaling and updating of serverless functions, APIs and other resources.
GitHub Actions
GitHub Actions is a powerful CI/CD automation tool that allows developers to automate their software workflows directly from their GitHub repository.
With GitHub Actions, you can create custom pipelines triggered by events such as code pushes, pull requests, or branch merges. These workflows are defined in YAML files within the repository and can perform tasks like testing, building and deploying applications to various environments.
Postman
Postman is a popular collaboration platform that simplifies the process of designing, testing, and documenting APIs. It offers a user-friendly interface for developers to create and send HTTP requests, test API endpoints, and automate testing workflows.
Alright, now that you're familiar with the tools and technologies we'll use here, let's dive in.
Prerequisites
Node.js and npm installed
AWS CLI configured with access to your AWS account
A Serverlesss Framework account
Serverlesss Framework globally installed in your local CLI
Our Use Case
Meet Alyx, an entrepreneur who has recently been learning about serverless architecture. She's read about how it's a powerful and efficient way to build backends for web applications, offering a more modern approach to web application development.
She wants to apply what she's learned so far about of the fundamentals of AWS serverless computing. She knows that serverless doesn’t mean there are no servers involved – rather, it just abstracts away the management and provisioning of servers. And now she wants to focus solely on writing code and implementing business logic.
Let’s check out how Alyx, the owner of a thriving coffee shop, begins to leverage serverless architecture for the backend of her web application.
Alyx’s Coffee Haven, an online coffee shop, offers an array of coffee blends and treats for sale. Initially, Alyx managed the shop’s orders and inventory with traditional web hosting services and operations, where she handled multiple servers and resources. But as her coffee shop grew in popularity, she started facing an increasing number of orders, especially during peak hours and seasonal promotions.
Managing the servers and ensuring the application could handle the surge in traffic became a challenge for Alyx. She found herself constantly worrying about server capacity, scalability, and the cost of maintaining the infrastructure.
She also wanted to introduce new features like personalized recommendations and loyalty programs, but this became a daunting task given the limitations of her traditional setup.
Then Alyx learned about the concept of serverless. She likened a serverless backend to a barista who automatically brews coffee in real-time, without her having to worry about the intricate details of the coffee-making process.
Excited by this idea, Alyx decided to migrate her coffee shop’s backend to a serverless platform using AWS Lambda, AWS API Gateway, and Amazon DynamoDB. This setup will let her focus more on crafting the perfect coffee blends and treats for her customers.
With serverless, each customer’s order becomes an event that triggers a series of serverless functions. Separate AWS Lambda functions processes the orders and handles all the business logic behind the scenes. For instance, it creates a customer’s order and is able to retrieve that order. It can also delete someone's order or update an order’s status.
Alyx no longer needs to worry about managing servers, as the serverless platform automatically scales up and down based on incoming order requests. Also, the cost-efficiency of serverless is huge for Alyx. With a pay-as-you-go model, she only pays for the actual compute time her functions consume, offering her a more a cost-effective solution for her growing business.
But she doesn’t stop there! She also wants to automate everything, from deploying infrastructure to updating her application whenever there’s a new change. By utilizing Infrastructure as Code (IaC) with the Serverless Framework, she can define all her infrastructure in code and manage it easily.
On top of that, she sets up GitHub Actions for continuous integration and delivery (CI/CD), so that every change she makes is automatically deployed through a pipeline, whether it’s a new feature in development or a hot fix for production.
Tutorial Objectives
Set up the Serverless Framework environment
Define an API in the YAML file
Develop AWS Lambda functions to process CRUD operations
Set up multi-stage deployments for Dev and Prod
Test the Dev and Prod pipelines
Test and validate Dev and Prod APIs using Postman
How to Get Started: Clone the Git Repository
To enhance your understanding and so you can follow along with this tutorial more effectively, go ahead and clone the project’s repository from my GitHub. You can do that by going here. As we move forward, feel free to edit the files as you feel necessary.
After cloning the repository, you will notice the presence of multiple files in your folder, as you can see in the image below. We’ll use all of these files to build our serverless coffee shop API.

Step 1: Set up the Serverless Framework Environment
To set up the Serverless Framework environment for automated deployments, you'll need to authenticate your Serverless Framework account via the CLI.
This requires creating an access key that enables the CI/CD pipeline and utilizes the Serverless Framework to authenticate securely into your account without exposing your credentials. By signing into your Serverless account and generating an access key, the pipeline can deploy your serverless application automatically from the build configuration file.
To do this, head to your Serverless account and navigate to the Access Keys section. Click on “+add,” name it SERVERLESS_ACCESS_KEY, and then create the key.
Once you’ve created your access key, be sure to copy and store it securely. You'll use this key as a secret variable in your GitHub repository to authenticate and authorize your CI/CD pipeline.
It will provide access to your Serverless Framework account during the deployment process. You’ll add this key to your GitHub repository’s secrets later, so your pipeline can securely use it to deploy the serverless resources without exposing sensitive information in your codebase.
Now, let’s define the AWS resources as code in the severless.yaml file.
Step 2: Define the API in the Serverless YAML File
In this file, you'll define the core infrastructure and functionality of the Coffee Shop API using the Serverless Framework’s YAML configuration.
This file defines the AWS services being utilized, including API Gateway, Lambda functions for CRUD operations, and DynamoDB for data storage.
You'll also configure an IAM role so the Lambda functions have the necessary permissions to interact with the DynamoDB service.
The API Gateway is set up with appropriate HTTP methods (POST, GET, PUT, and DELETE) to handle incoming requests and trigger the corresponding Lambda functions.
Let’s check out the code:
service: coffee-shop-api
frameworkVersion: '4'
provider:
  name: aws
  runtime: nodejs20.x
  region: us-east-1
  stage: ${opt:stage}
  iam:
    role:
      statements:
        - Effect: Allow
          Action:
            - dynamodb:PutItem
            - dynamodb:GetItem
            - dynamodb:Scan
            - dynamodb:UpdateItem
            - dynamodb:DeleteItem
          Resource: arn:aws:dynamodb:${self:provider.region}:*:table/CoffeeOrders-${self:provider.stage}
functions:
  createCoffee:
    handler: createCoffee.handler
    environment:
      COFFEE_ORDERS_TABLE: CoffeeOrders-${self:provider.stage}
    events:
      - http:
          path: coffee
          method: post
  getCoffee:
    handler: getCoffee.handler
    environment:
      COFFEE_ORDERS_TABLE: CoffeeOrders-${self:provider.stage}
    events:
      - http:
          path: coffee
          method: get
  updateCoffee:
    handler: updateCoffee.handler
    environment:
      COFFEE_ORDERS_TABLE: CoffeeOrders-${self:provider.stage}
    events:
      - http:
          path: coffee
          method: put
  deleteCoffee:
    handler: deleteCoffee.handler
    environment:
      COFFEE_ORDERS_TABLE: CoffeeOrders-${self:provider.stage}
    events:
      - http:
          path: coffee
          method: delete
resources:
  Resources:
    CoffeeTable:
      Type: AWS::DynamoDB::Table
      Properties:
        TableName: CoffeeOrders-${self:provider.stage}
        AttributeDefinitions:
          - AttributeName: OrderId
            AttributeType: S
          - AttributeName: CustomerName
            AttributeType: S
        KeySchema:
          - AttributeName: OrderId
            KeyType: HASH
          - AttributeName: CustomerName
            KeyType: RANGE
        BillingMode: PAY_PER_REQUEST
The serverless.yml configuration defines how Alyx's Coffee Shop API will run in a serverless environment on AWS. The provider section specifies that the application will use AWS as the cloud provider, with Node.js as the runtime environment.
The region is set to us-east-1 and the stage variable allows for dynamic deployment across different environments, like dev and prod. This means that the same code can deploy to different environments, with resources being named accordingly to avoid conflicts.
In the iam section, permissions are granted to Lambda functions to interact with the DynamoDB table. The ${self:provider.stage} syntax dynamically names the DynamoDB table, so that each environment has its own separate resources, like CoffeeOrders-dev for the development environment and CoffeeOrders-prod for production. This dynamic naming helps manage multiple environments without manually configuring separate tables for each one.
The functions section defines the four core Lambda functions, createCoffee, getCoffee, updateCoffee and deleteCoffee. These handle the CRUD operations for the Coffee Shop API.
Each function is connected to a specific HTTP method in the API Gateway, such as POST, GET, PUT and DELETE. These functions interact with the DynamoDB table that’s dynamically named based on the current stage.
The last resources section defines the DynamoDB table itself. It sets up the table with the attributes OrderId and CustomerName, which are used as the primary key. The table is configured to use a pay-per-request billing mode, making it cost-effective for Alyx's growing business.
By automating the deployment of these resources using the Serverless Framework, Alyx can easily manage her infrastructure, freeing her from the burden of manually provisioning and scaling resources.
Step 3: Develop the Lambda Functions for CRUD Operations
In this step, we implement the core logic of Alyx’s Coffee Shop API by creating Lambda functions with JavaScript that perform the essential CRUD operations createCoffee, getCoffee, updateCoffee and deleteCoffee.
These functions utilize the AWS SDK to interact with AWS services, particularly DynamoDB. Each function will be responsible for handling specific API requests such as creating an order, retrieving orders, updating order statuses, and deleting orders.
Create Coffee Lambda function
This function creates an order:
const AWS = require('aws-sdk');
const dynamoDb = new AWS.DynamoDB.DocumentClient();
const { v4: uuidv4 } = require('uuid');
module.exports.handler = async (event) => {
  const requestBody = JSON.parse(event.body);
  const customerName = requestBody.customer_name;
  const coffeeBlend = requestBody.coffee_blend;
  const orderId = uuidv4();
  const params = {
    TableName: process.env.COFFEE_ORDERS_TABLE,
    Item: {
      OrderId: orderId,
      CustomerName: customerName,
      CoffeeBlend: coffeeBlend,
      OrderStatus: 'Pending'
    }
  };
  try {
    await dynamoDb.put(params).promise();
    return {
      statusCode: 200,
      body: JSON.stringify({ message: 'Order created successfully!', OrderId: orderId })
    };
  } catch (error) {
    return {
      statusCode: 500,
      body: JSON.stringify({ error: `Could not create order: ${error.message}` })
    };
  }
};
This Lambda function handles the creation of a new coffee order in the DynamoDB table. First we import the AWS SDK and initialize a DynamoDB.DocumentClient to interact with DynamoDB. The uuid library is also imported to generate unique order IDs.
Inside the handler function, we parse the incoming request body to extract customer information, such as the customer's name and preferred coffee blend. A unique orderId is generated using uuidv4() and this data is prepared for insertion into DynamoDB.
The params object defines the table where the data will be stored, with TableName dynamically set to the value of the environment variable COFFEE_ORDERS_TABLE. The new order includes fields such as OrderId, CustomerName, CoffeeBlend, and an initial status of Pending.
In the try block, the code attempts to add the order to the DynamoDB table using the put() method. If successful, the function returns a status code of 200 with a success message and the OrderId. If there’s an error, the code catches it and returns a 500 status code along with an error message.
Get Coffee Lambda function
This function retrieves all coffee items:
const AWS = require('aws-sdk');
const dynamoDb = new AWS.DynamoDB.DocumentClient();
module.exports.handler = async () => {
  const params = {
    TableName: process.env.COFFEE_ORDERS_TABLE
  };
  try {
    const result = await dynamoDb.scan(params).promise();
    return {
      statusCode: 200,
      body: JSON.stringify(result.Items)
    };
  } catch (error) {
    return {
      statusCode: 500,
      body: JSON.stringify({ error: `Could not retrieve orders: ${error.message}` })
    };
  }
};
This Lambda function is responsible for retrieving all coffee orders from a DynamoDB table and exemplifies a serverless approach to retrieving data from DynamoDB in a scalable manner.
We again use the AWS SDK to initialize a DynamoDB.DocumentClient instance to interact with DynamoDB. The handler function constructs the params object, specifying the TableName, which is dynamically set using the COFFEE_ORDERS_TABLE environment variable.
The scan() method retrieves all items from the table. Again, if the operation is successful, the function returns a status code of 200 along with the retrieved items in JSON format. In case of an error, a 500 status code and an error message are returned.
Update Coffee Lambda function
This function updates a coffee item by its ID:
const AWS = require('aws-sdk');
const dynamoDb = new AWS.DynamoDB.DocumentClient();
module.exports.handler = async (event) => {
  const requestBody = JSON.parse(event.body);
  const { order_id, new_status, customer_name } = requestBody;
  const params = {
    TableName: process.env.COFFEE_ORDERS_TABLE,
    Key: {
      OrderId: order_id,
      CustomerName: customer_name
    },
    UpdateExpression: 'SET OrderStatus = :status',
    ExpressionAttributeValues: {
      ':status': new_status
    }
  };
  try {
    await dynamoDb.update(params).promise();
    return {
      statusCode: 200,
      body: JSON.stringify({ message: 'Order status updated successfully!', OrderId: order_id })
    };
  } catch (error) {
    return {
      statusCode: 500,
      body: JSON.stringify({ error: `Could not update order: ${error.message}` })
    };
  }
};
This Lambda function handles updating the status of a specific coffee order in the DynamoDB table.
The handler function extracts the order_id, new_status, and customer_name from the request body. It then constructs the params object to specify the table name and the primary key for the order (using OrderId and CustomerName). The UpdateExpression sets the new status of the order.
In the try block, the code attempts to update the order in DynamoDB using the update() method. Once again, of course if successful, the function returns a status code of 200 with a success message. If an error occurs, it catches the error and returns a 500 status code along with an error message.
Delete Coffee Lambda function
This function deletes a coffee item by its ID:
const AWS = require('aws-sdk');
const dynamoDb = new AWS.DynamoDB.DocumentClient();
module.exports.handler = async (event) => {
  const requestBody = JSON.parse(event.body);
  const { order_id, customer_name } = requestBody;
  const params = {
    TableName: process.env.COFFEE_ORDERS_TABLE,
    Key: {
      OrderId: order_id,
      CustomerName: customer_name
    }
  };
  try {
    await dynamoDb.delete(params).promise();
    return {
      statusCode: 200,
      body: JSON.stringify({ message: 'Order deleted successfully!', OrderId: order_id })
    };
  } catch (error) {
    return {
      statusCode: 500,
      body: JSON.stringify({ error: `Could not delete order: ${error.message}` })
    };
  }
};
The Lambda function deletes a specific coffee order from the DynamoDB table. In the handler function, the code parses the request body to extract the order_id and customer_name. These values are used as the primary key to identify the item to be deleted from the table. The params object specifies the table name and key for the item to be deleted.
In the try block, the code attempts to delete the order from DynamoDB using the delete() method. If successful, again it returns a 200 status code with a success message, indicating that the order was deleted. If an error occurs, the code catches it and returns a 500 status code along with an error message.
Now that we’ve explained each Lambda function, let’s set up a multi-stage CI/CD pipeline.
Step 4: Set Up CI/CD Pipeline Multi-stage Deployments for Dev and Prod Environments
To set up AWS secrets in your GitHub repository, first navigate to the repository’s settings. Select Settings on the top right, then go to the bottom left and select Secrets and variables.

Next, click on Actions as seen in the image below:
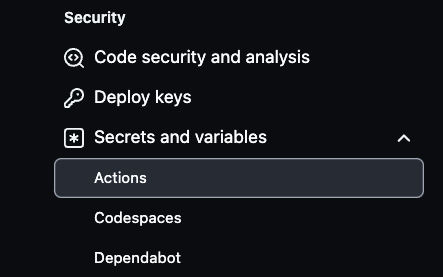
From there, select New repository secret to create secrets.

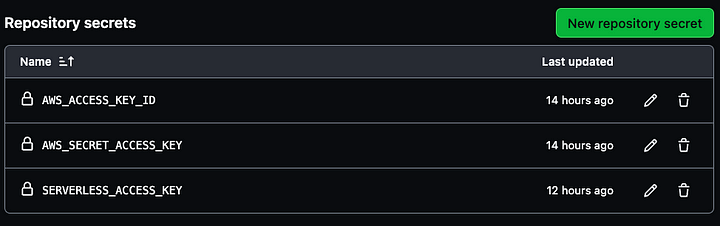
Three secrets are needed to create for your pipeline, AWS_ACCESS_KEY_ID, AWS_SECRET_ACCESS_KEY, and SERVERLESS_ACCESS_KEY.
Use your AWS account access key credentials for the first two variables and then the serverless access key previously saved to create the SERVERLESS_ACCESS_KEY. These secrets will securely authenticate your CI/CD pipeline as seen in the image below.
Make sure that your main branch is named “main,” as this will serve as the production branch. Next, create a new branch called “dev” for development work.
You can also create feature-specific branches, such as “dev/feature,” for more granular development. GitHub Actions will use these branches to deploy changes automatically, with dev representing the development environment and main representing production.
This branching strategy allows you to manage the CI/CD pipeline efficiently, deploying new code changes whenever there's a merge into either the dev or prod environments.
How to Use GitHub Actions to Deploy the YAML File
To automate the deployment process for the Coffee Shop API, you'll utilize GitHub Actions, which integrates with your GitHub repository.
This deployment pipeline is triggered whenever code is pushed to the main or dev branches. By configuring environment-specific deployments, you'll ensure that updates to the dev branch deploy to the development environment, while changes to the main branch trigger production deployments.
Now, let’s review the code:
name: deploy-coffee-shop-api
on:
  push:
    branches:
      - main
      - dev
jobs:
  deploy:
    runs-on: ubuntu-latest
    steps:
    - name: Checkout code
      uses: actions/checkout@v3
    - name: Setup Node.js
      uses: actions/setup-node@v3
      with:
        node-version: '20.x'
    - name: Install dependencies
      run: |
        cd coffee-shop-api
        npm install

    - name: Install Serverless Framework
      run: npm install -g serverless
    - name: Deploy to AWS (Dev)
      if: github.ref == 'refs/heads/dev'
      run: |
        cd coffee-shop-api
        npx serverless deploy --stage dev
      env:
        AWS_ACCESS_KEY_ID: ${{ secrets.AWS_ACCESS_KEY_ID }}
        AWS_SECRET_ACCESS_KEY: ${{ secrets.AWS_SECRET_ACCESS_KEY }}
        SERVERLESS_ACCESS_KEY: ${{secrets.SERVERLESS_ACCESS_KEY}}
    - name: Deploy to AWS (Prod)
      if: github.ref == 'refs/heads/main'
      run: |
        cd coffee-shop-api
        npx serverless deploy --stage prod
      env:
        AWS_ACCESS_KEY_ID: ${{ secrets.AWS_ACCESS_KEY_ID }}
        AWS_SECRET_ACCESS_KEY: ${{ secrets.AWS_SECRET_ACCESS_KEY }}
        SERVERLESS_ACCESS_KEY: ${{secrets.SERVERLESS_ACCESS_KEY}}
The GitHub Actions YAML configuration is what automates the deployment process of the Coffee Shop API to AWS using the Serverless Framework. The workflow triggers whenever changes are pushed to the main or dev branches.
It begins by checking out the repository’s code, then setting up Node.js with version 20.x to match the runtime used by the Lambda functions. After that, it installs the project dependencies by navigating to the coffee-shop-api directory and running npm install.
The workflow also installs the Serverless Framework globally, allowing the serverless CLI to be used for deployments. Depending on which branch is updated, the workflow conditionally deploys to the appropriate environment.
If the changes are pushed to the dev branch, it deploys to the dev stage. If they are pushed to the main branch, it deploys to the prod stage. The deployment commands, npx serverless deploy --stage dev or npx serverless deploy --stage prod are executed within the coffee-shop-api directory.
For a secure deployment, the workflow accesses AWS credentials and the Serverless access key via environment variables stored in GitHub Secrets. This allows the CI/CD pipeline to authenticate with AWS and the Serverless Framework without exposing sensitive information in the repository.
Now, we can proceed to test out the pipeline.
Step 5: Test the Dev and Prod Pipelines
First, you'll need to verify that the main (prod) branch is called “main”. Then create a dev branch called “dev”. Once you make any valid changes to the dev branch, commit them to trigger the GitHub Actions pipeline. This will automatically deploy the updated resources to the development environment. After verifying everything in dev, you can then merge the dev branch into the main branch.
Merging changes into the main branch also automatically triggers the deployment pipeline for the production environment. This way, all necessary updates are applied and production resources are deployed seamlessly.
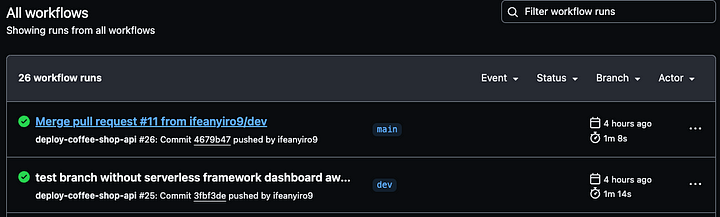
You can monitor the deployment process and review detailed logs of each GitHub Actions run by navigating to the Actions tab in your GitHub repository.
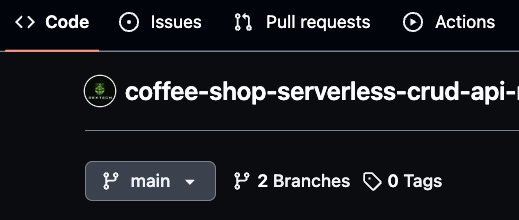
The logs provide visibility into each step of the pipeline, helping you verify that everything is working as expected.
You can select any build run to review detailed logs for both the development and production environment deployments so you can track the progress and ensure that everything is running smoothly.
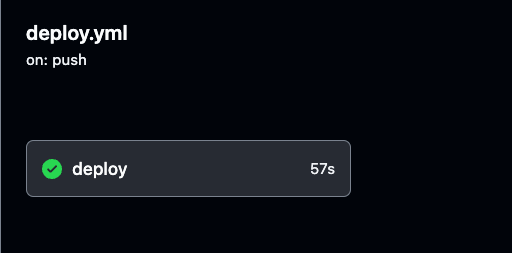
Navigate to the specific build run in GitHub Actions, as demonstrated in the image below. There, you can view the execution details and outcomes for either the development or production pipelines.
Make sure to thoroughly test both the development and production environments to confirm successful pipeline executing.
Step 6: Test and Validate Prod and Dev APIs using Postman
Now that the APIs and resources are deployed and configured, we need to locate the unique API endpoints (URLs) generated by AWS to begin making requests to test functionality.
These URLs can test the API functionality by simply pasting them into a web browser. The API URLs are found in the output results of your CI/CD build.
To retrieve them, navigate to the GitHub Actions logs, select the most recent environment’s successful build, and click deploy to check the deployment details for the generated API endpoints.
Click on the Deploy to AWS stage for the selected environment (Prod or Dev) in your GitHub Actions logs. Once there, you’ll find the generated API URL.
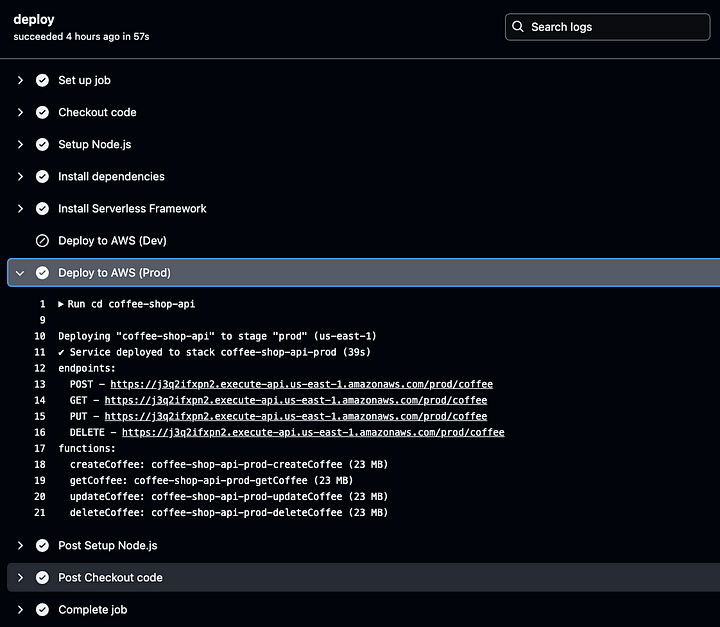
Copy and save this URL, as it will be needed when testing your API’s functionality. This URL is your gateway to verifying that the deployed API works as expected.
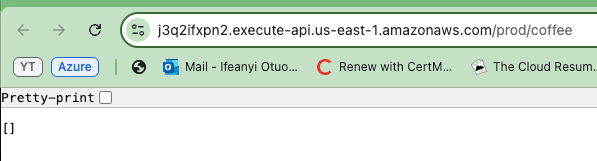
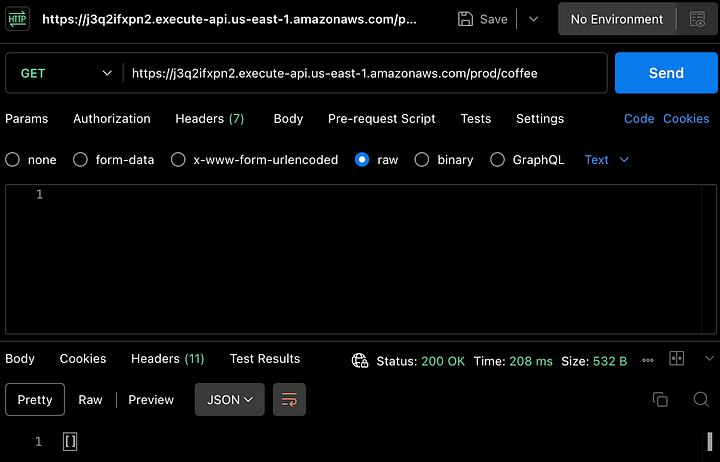
Now copy one of the generated API URLs and paste it into your browser. You will see an empty array or list displayed in the response. This actually confirms that the API is functioning correctly and that you are successfully retrieving data from the DynamoDB table.
Even though the list is empty, it indicates that the API can connect to the database and return information.
To verify that your API works across both environments, repeat the steps for the other API environment (Prod and Dev).
For more comprehensive testing, we’ll use Postman to test all the API methods, Create, Read, Update and Delete, and perform these tests for both the development and production environments.
To test the GET method, use Postman to send a GET request to the API’s endpoint using the URL. You will receive the same response, an empty list of coffee orders as seen in the bottom of the image below. This confirms the API’s ability to retrieve data successfully, as shown in the image below.
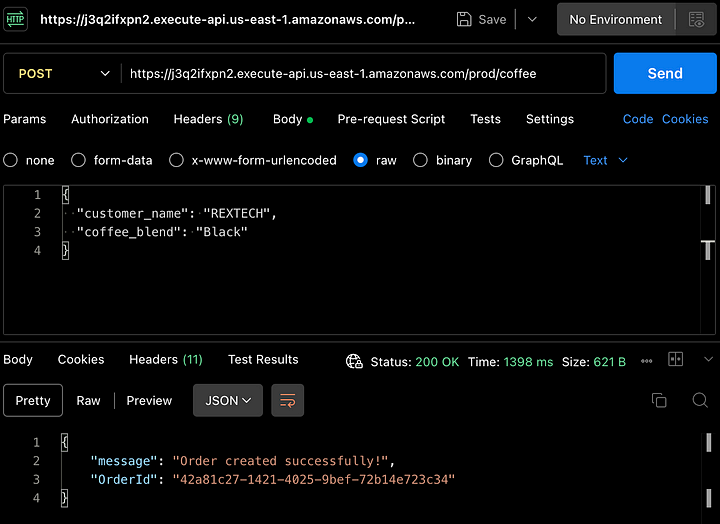
To actually create an order, let’s test the POST method. Use Postman again to make a POST request to the API endpoint, providing the customer’s name and coffee blend in the request body, as show below :
{
  "customer_name": "REXTECH",
  "coffee_blend": "Black"
}
The response will be a success message with a unique OrderId of the order placed.
Verify that the new order was saved in the DynamoDB table by reviewing the items in the environments specific table :

To test the PUT method, make a PUT request to the API endpoint by providing the previous order ID and a new order status in the request body as shown below :
{
  "order_id": "42a81c27-1421-4025-9bef-72b14e723c34",
  "new_status": "Ready",
  "customer_name": "REXTECH"
}
The response will be a successful order update message with the OrderId of the order placed.

You can also verify that the order status was updated from the DynamoDB table item.

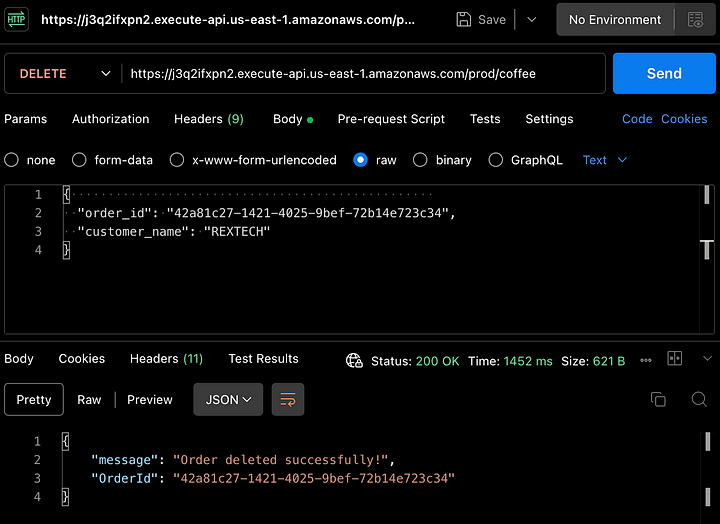
To test the DELETE method, using Postman, make a DELETE request providing the previous order ID and the customer name in the request body as shown below:
{
  "order_id": "42a81c27-1421-4025-9bef-72b14e723c34",
  "customer_name": "REXTECH"
}
The response will be a successful order deleted message with the order ID of the order placed.
Again, you can verify that the order has been deleted in the DynamoDB table.

Conclusion
That’s it – congratulations! You’ve successfully completed all the steps. We’ve built a serverless REST API that supports CRUD (Create, Read, Update, Delete) functionality with API Gateway, Lambda, DynamoDB, Serverless Framework and Node.js, automating deployment of approved code changes with Github Actions.
If you’ve gotten this far, thanks for reading! I hope it was worthwhile to you.
Ifeanyi Otuonye is a 6X AWS Certified Cloud Engineer skilled in DevOps, Technical Writing and instructional expertise as a Technical Instructor. He is motivated by his eagerness to learn and develop and thrives in collaborative environments. Before transitioning to the Cloud, he spend six years as a Professional Track and Field athlete.
In the early 2022, he strategically embarked on an mission to be a Cloud/DevOps Engineer through self study and joining a 6 month accelerated Cloud program.
In May 2023, he accomplished that goal and landed his first Cloud Engineering role and has now set another personal mission to empower other individuals on their journey to the Cloud.