
In this tutorial, you will learn how to build an invoicing web app that allows users to add their bank information, manage a list of customers, and create and send invoices to customers. You'll also learn how to print and send React components as invoices and email templates directly from the application to the customer's email.
This will be a great project to help you learn how to put together full stack apps, and how to create an app where the backend can communicate with the frontend in real time.
While building the application, you will gain hands-on experience working with the following developer tools:
- Neon: a Postgres database that enables us to store and retrieve data easily within the application.
- Clerk: a complete authentication system that ensures only authenticated users can perform specific actions within the application.
- React-to-print: a package that allows us to convert and print React components as PDF files.
- Resend and React Email: for sending beautifully designed digital invoices directly to the customers' email.
Here is the source code (remember to give it a star ⭐).
Table of Contents
- What is Neon?
- Building the Invoice Application with Next.js
- How to Authenticate Users Using Clerk
- How to Add Neon to a Next.js app
- How to Set Up Neon Serverless Driver with Drizzle ORM in Next.js
- Creating the API endpoints for the application
- How to Print and Download Invoices in Next.js
- How to Send Digital Invoices with Resend and React Email
- Next Steps
What is Neon?
Neon is an open-source, scalable, and efficient Postgres DB that separates compute from storage. This means that database computation processes (queries, transactions, and so on) are handled by one set of resources (compute), while the data itself is stored on a separate set of resources (storage).
This architecture allows for greater scalability and performance, making Neon a solid choice for modern web applications.
Building the Invoice Application with Next.js
In this section, I'll guide you through building the various pages of the invoicing application using Next.js. The application is divided into six key pages, each serving a specific purpose:
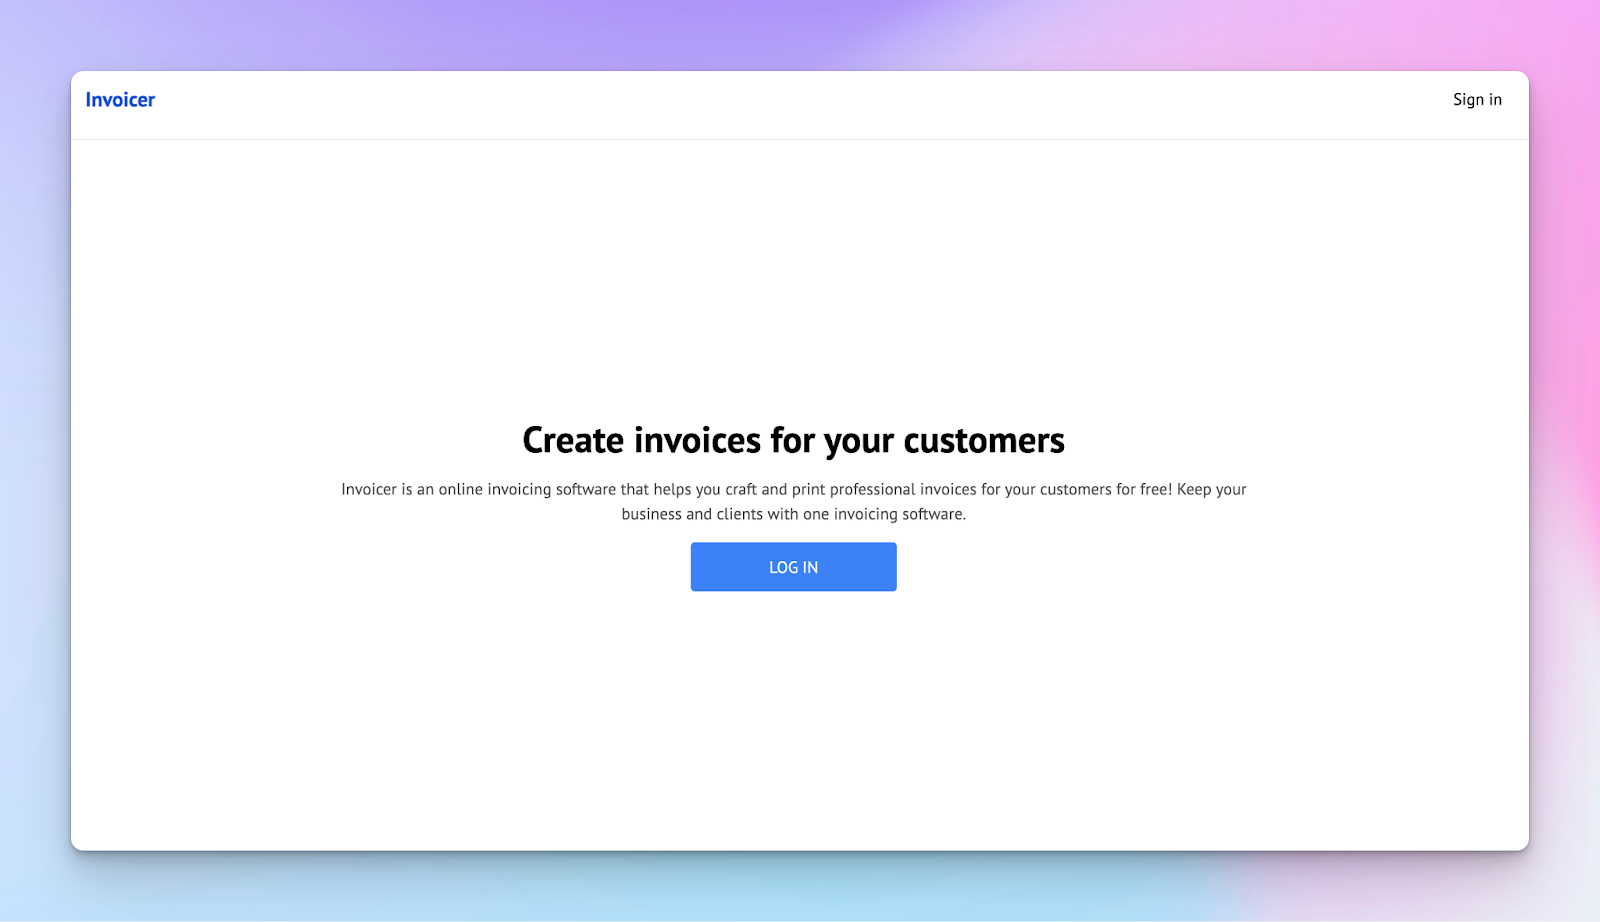
- Home Page: This is the landing page. It provides an overview of the application and signs users into the application.
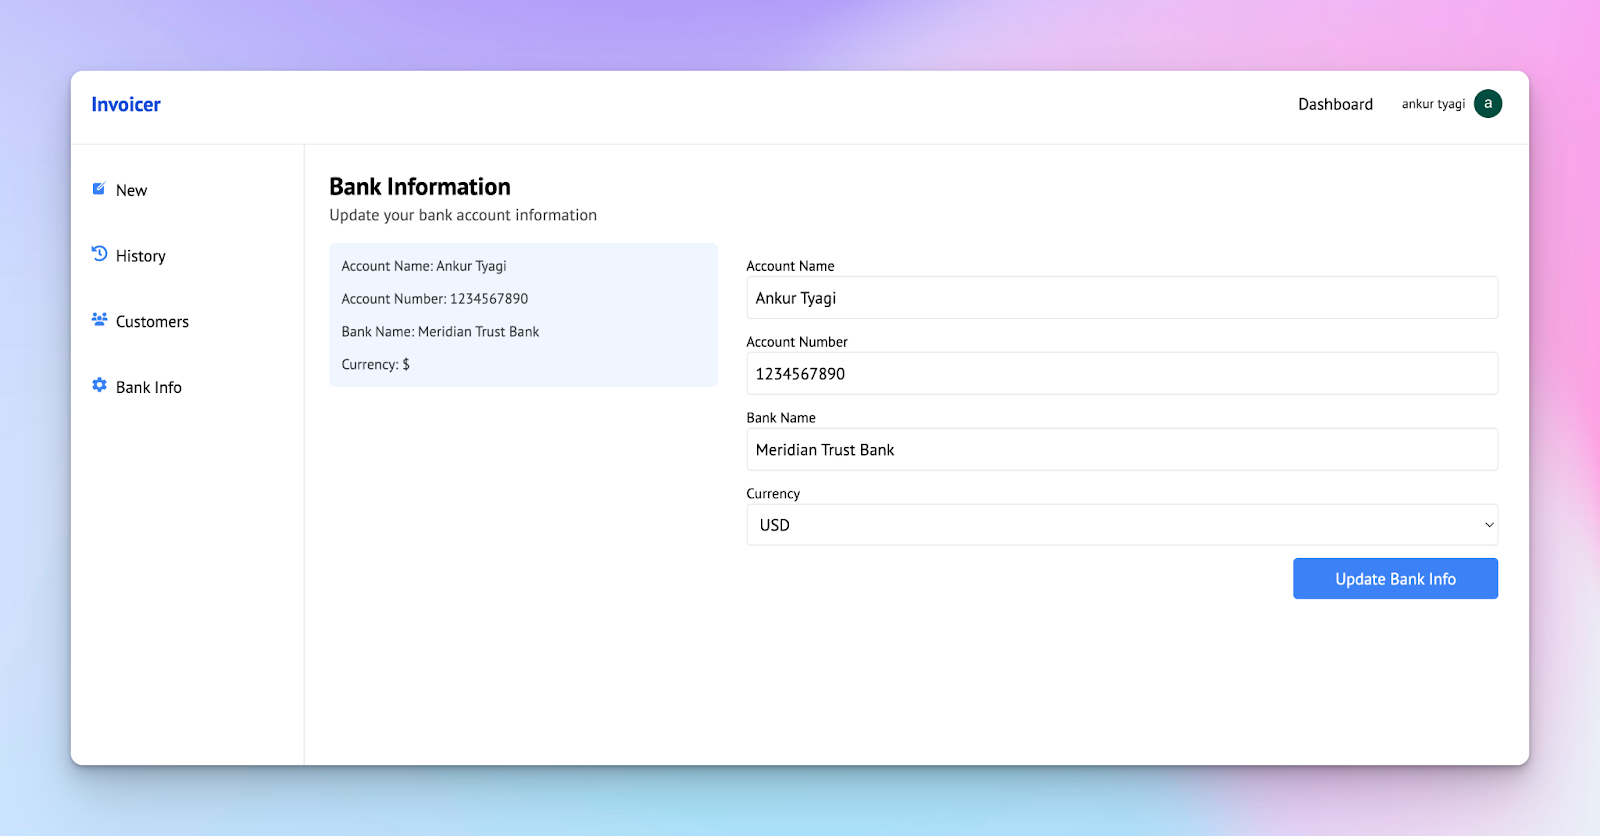
- Settings Page: Here, users can update their bank information as it will be displayed on the invoices.
- Customers Page: This page allows users to manage their customer base, and add or delete customers when needed.
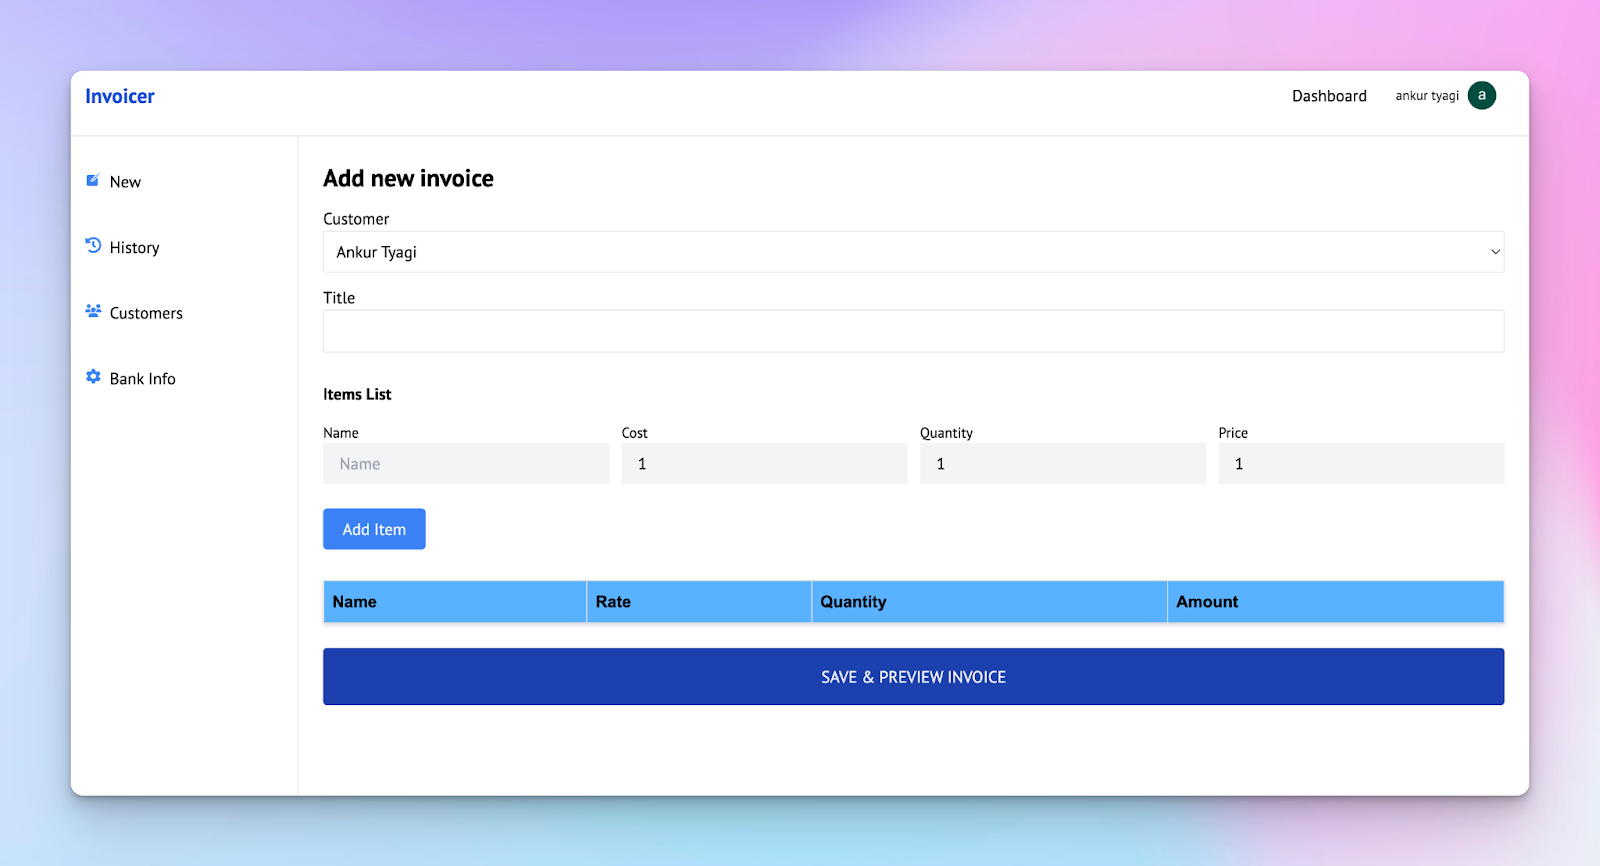
- Dashboard: The core of the application where users can create new invoices. Users can select a customer, enter the title and description of the invoice, and generate invoices.
- History Page: This page displays recently created invoices. It includes links that enable users to preview each invoice, providing a quick way to review past transactions.
- Print and Send Invoice Page: This page allows users to print and send invoices to customers.
Before we proceed, create a TypeScript Next.js project by running the following code snippet in your terminal:
npx create-next-app invoice-app-with-neon |
Add a types.d.ts file within the project folder. It will contain the type declarations for the variables within the application.
interface Item {
    id: string;
    name: string;
    cost: number;
    quantity: number;
    price: number;
}
interface Invoice {
    id?: string,
    created_at?: string,
    user_id:  string,
    customer_id: number,
    title: string,
    items: string,
    total_amount: number,
}
interface Customer {
    user_id: string,
    name: string,
    email: string,
    address: string
}
interface BankInfo {
    user_id: string,
    account_name: string,
    account_number: number,
    bank_name: string,
    currency: string
}
Home Page
Copy the code snippet below into the app/page.tsx file. It displays brief information about the application and a button that redirects users to the dashboard or login page, depending on their authentication status.
import Link from "next/link";
export default function Home() {
  return (
    <main className='w-full'>
      <section className='p-8 h-[90vh] md:w-2/3 mx-auto text-center w-full flex flex-col items-center justify-center'>
        <h2 className='text-3xl font-bold mb-4 md:text-4xl'>
          Create invoices for your customers
        </h2>
        <p className='opacity-70 mb-4 text-sm md:text-base leading-loose'>
          Invoicer is an online invoicing software that helps you craft and
          print professional invoices for your customers for free! Keep your
          business and clients with one invoicing software.
        </p>
        <Link
          href='/dashboard'
          className='rounded w-[200px] px-2 py-3 bg-blue-500 text-gray-50'
        >
          LOG IN
        </Link>
      </section>
    </main>
  );
}
Settings Page
Add a settings folder containing a page.tsx file within the Next.js app directory and copy the following code snippet into the file:
"use client";
import { ChangeEvent, useEffect, useState, useCallback } from "react";
import SideNav from "@/app/components/SideNav";
export default function Settings() {
    //👇🏻 default bank info
    const [bankInfo, setBankInfo] = useState({
        account_name: "",
        account_number: 1234567890,
        bank_name: "",
        currency: "",
 });
    //👇🏻 bank info from the form entries
    const [inputBankInfo, setInputBankInfo] = useState({
        accountName: "",
        accountNumber: 1234567890,
        bankName: "",
        currency: "",
 });
    //👇🏻 updates the form entries state
    const handleUpdateBankInfo = (
        e: ChangeEvent<HTMLInputElement | HTMLSelectElement>
 ) => {
        const { name, value } = e.target;
        setInputBankInfo((prevState) => ({
 ...prevState,
 [name]: value,
 }));
 };
    //👇🏻 updates the bank info
    const handleSubmit = (e: React.FormEvent<HTMLFormElement>) => {
        e.preventDefault();
        console.log("Tries to update bank info...");
 };
return ()
}
The code snippet above shows that the page displays the user’s bank information and also allows the user to update it when necessary.
Return the UI elements below from the component:
export default function Settings() {
  //…React states and functions
  return (
    <div className='w-full'>
      <main className='min-h-[90vh] flex items-start'>
        <SideNav />
        <div className='md:w-5/6 w-full h-full p-6'>
          <h2 className='text-2xl font-bold'>Bank Information</h2>
          <p className='opacity-70 mb-4'>
            Update your bank account information
          </p>
          <div className='flex md:flex-row flex-col items-start justify-between w-full md:space-x-4'>
            <section className='md:w-1/3 w-full bg-blue-50 h-full p-3 rounded-md space-y-3'>
              <p className='text-sm opacity-75'>
                Account Name: {bankInfo.account_name}
              </p>
              <p className='text-sm opacity-75'>
                Account Number: {bankInfo.account_number}
              </p>
              <p className='text-sm opacity-75'>
                Bank Name: {bankInfo.bank_name}
              </p>
              <p className='text-sm opacity-75'>
                Currency: {bankInfo.currency}
              </p>
            </section>
            <form
              className='md:w-2/3 w-full p-3 flex flex-col'
              method='POST'
              onSubmit={handleSubmit}
            >
              <label htmlFor='accountName' className='text-sm'>
                Account Name
              </label>
              <input
                type='text'
                name='accountName'
                id='accountName'
                className='border-[1px] p-2 rounded mb-3'
                required
                value={inputBankInfo.accountName}
                onChange={handleUpdateBankInfo}
              />
              <label htmlFor='accountNumber' className='text-sm'>
                Account Number
              </label>
              <input
                type='number'
                name='accountNumber'
                id='accountNumber'
                className='border-[1px] p-2 rounded mb-3'
                required
                value={inputBankInfo.accountNumber}
                onChange={handleUpdateBankInfo}
              />
              <label htmlFor='bankName' className='text-sm'>
                Bank Name
              </label>
              <input
                type='text'
                name='bankName'
                id='bankName'
                className='border-[1px] p-2 rounded mb-3'
                required
                value={inputBankInfo.bankName}
                onChange={handleUpdateBankInfo}
              />
              <label htmlFor='currency' className='text-sm'>
                Currency
              </label>
              <select
                name='currency'
                id='currency'
                className='border-[1px] p-2 rounded mb-3'
                required
                value={inputBankInfo.currency}
                onChange={handleUpdateBankInfo}
              >
                <option value=''>Select</option>
                <option value='$'>USD</option>
                <option value='€'>EUR</option>
                <option value='£'>GBP</option>
              </select>
              <div className='flex items-center justify-end'>
                <button
                  type='submit'
                  className='bg-blue-500 text-white p-2 w-[200px] rounded'
                >
                  Update Bank Info
                </button>
              </div>
            </form>
          </div>
        </div>
      </main>
    </div>
  );
}
Customers Page
Add a customers folder containing a page.tsx file within the Next.js directory and copy the code snippet below into the file:
import CustomersTable from "../components/CustomersTable";
import { useCallback, useEffect, useState } from "react";
import SideNav from "@/app/components/SideNav";
export default function Customers() {
const [customerName, setCustomerName] = useState<string>("");
const [customerEmail, setCustomerEmail] = useState<string>("");
const [customerAddress, setCustomerAddress] = useState<string>("");
const [loading, setLoading] = useState<boolean>(false);
const [customers, setCustomers] = useState([]);
const handleAddCustomer = (e: React.FormEvent<HTMLFormElement>) => {
e.preventDefault();
// 👉🏻 createCustomer();
};
return (
<div className='w-full'>
<main className='min-h-[90vh] flex items-start'>
<SideNav />
<div className='md:w-5/6 w-full h-full p-6'>
<h2 className='text-2xl font-bold'>Customers</h2>
<p className='opacity-70 mb-4'>Create and view all your customers</p>
<form className='w-full' onSubmit={handleAddCustomer} method='POST'>
<div className='w-full flex items-center space-x-4 mb-3'>
<section className='w-1/2'>
<label>Customer's Name</label>
<input
type='text'
className='w-full p-2 border border-gray-200 rounded-sm'
value={customerName}
required
onChange={(e) => setCustomerName(e.target.value)}
/>
</section>
<section className='w-1/2'>
<label>Email Address</label>
<input
type='email'
className='w-full p-2 border border-gray-200 rounded-sm'
value={customerEmail}
onChange={(e) => setCustomerEmail(e.target.value)}
required
/>
</section>
</div>
<label htmlFor='address'>Billing Address</label>
<textarea
name='address'
id='address'
rows={3}
className='w-full p-2 border border-gray-200 rounded-sm'
value={customerAddress}
onChange={(e) => setCustomerAddress(e.target.value)}
required
/>
<button
className='bg-blue-500 text-white p-2 rounded-md mb-6'
disabled={loading}
>
{loading ? "Adding..." : "Add Customer"}
</button>
</form>
<CustomersTable customers={customers} />
</div>
</main>
</div>
);
}
The code snippet above allows users to view, create, and delete customers from the application.

Dashboard Page
Create a dashboard folder containing a page.tsx within the Next.js app directory and copy the code snippet below into the file:
"use client";
import InvoiceTable from "@/app/components/InvoiceTable";
import React, { useState, useEffect, useCallback } from "react";
import { useRouter } from "next/navigation";
import SideNav from "@/app/components/SideNav";
export default function Dashboard() {
  const { isLoaded, isSignedIn, user } = useUser();
  const [itemList, setItemList] = useState<Item[]>([]);
  const [customer, setCustomer] = useState<string>("");
  const [invoiceTitle, setInvoiceTitle] = useState<string>("");
  const [itemCost, setItemCost] = useState<number>(1);
  const [itemQuantity, setItemQuantity] = useState<number>(1);
  const [itemName, setItemName] = useState<string>("");
  const [customers, setCustomers] = useState([]);
  const router = useRouter();
  const handleAddItem = (e: React.FormEvent) => {
    e.preventDefault();
    if (itemName.trim() && itemCost > 0 && itemQuantity >= 1) {
      setItemList([
        ...itemList,
        {
          id: Math.random().toString(36).substring(2, 9),
          name: itemName,
          cost: itemCost,
          quantity: itemQuantity,
          price: itemCost * itemQuantity,
        },
      ]);
    }
    setItemName("");
    setItemCost(0);
    setItemQuantity(0);
  };
  const getTotalAmount = () => {
    let total = 0;
    itemList.forEach((item) => {
      total += item.price;
    });
    return total;
  };
  const handleFormSubmit = (e: React.FormEvent<HTMLFormElement>) => {
    e.preventDefault();
    //👉🏻 createInvoice();
  };
  return (
    <div className='w-full'>
      <main className='min-h-[90vh] flex items-start'>
        <SideNav />
        <div className='md:w-5/6 w-full h-full p-6'>
          <h2 className='font-bold text-2xl mb-3'>Add new invoice</h2>
          <form className='w-full flex flex-col' onSubmit={handleFormSubmit}>
            <label htmlFor='customer'>Customer</label>
            <select
              className='border-[1px] p-2 rounded-sm mb-3'
              required
              value={customer}
              onChange={(e) => setCustomer(e.target.value)}
            >
              {customers.map((customer: any) => (
                <option key={customer.id} value={customer.name}>
                  {customer.name}
                </option>
              ))}
            </select>
            <label htmlFor='title'>Title</label>
            <input
              className='border-[1px] rounded-sm mb-3 py-2 px-3'
              required
              value={invoiceTitle}
              onChange={(e) => setInvoiceTitle(e.target.value)}
            />
            <div className='w-full flex justify-between flex-col'>
              <h3 className='my-4 font-bold'>Items List</h3>
              <div className='flex space-x-3'>
                <div className='flex flex-col w-1/4'>
                  <label htmlFor='itemName' className='text-sm'>
                    Name
                  </label>
                  <input
                    type='text'
                    name='itemName'
                    placeholder='Name'
                    className='py-2 px-4 mb-6 bg-gray-100'
                    value={itemName}
                    onChange={(e) => setItemName(e.target.value)}
                  />
                </div>
                <div className='flex flex-col w-1/4'>
                  <label htmlFor='itemCost' className='text-sm'>
                    Cost
                  </label>
                  <input
                    type='number'
                    name='itemCost'
                    placeholder='Cost'
                    className='py-2 px-4 mb-6 bg-gray-100'
                    value={itemCost}
                    onChange={(e) => setItemCost(Number(e.target.value))}
                  />
                </div>
                <div className='flex flex-col justify-center w-1/4'>
                  <label htmlFor='itemQuantity' className='text-sm'>
                    Quantity
                  </label>
                  <input
                    type='number'
                    name='itemQuantity'
                    placeholder='Quantity'
                    className='py-2 px-4 mb-6 bg-gray-100'
                    value={itemQuantity}
                    onChange={(e) => setItemQuantity(Number(e.target.value))}
                  />
                </div>
                <div className='flex flex-col justify-center w-1/4'>
                  <p className='text-sm'>Price</p>
                  <p className='py-2 px-4 mb-6 bg-gray-100'>
                    {Number(itemCost * itemQuantity).toLocaleString("en-US")}
                  </p>
                </div>
              </div>
              <button
                className='bg-blue-500 text-gray-100 w-[100px] p-2 rounded'
                onClick={handleAddItem}
              >
                Add Item
              </button>
            </div>
            <InvoiceTable itemList={itemList} />
            <button
              className='bg-blue-800 text-gray-100 w-full p-4 rounded my-6'
              type='submit'
            >
              SAVE & PREVIEW INVOICE
            </button>
          </form>
        </div>
      </main>
    </div>
  );
}
The code snippet above displays a form that accepts the invoice details, such as the customer’s name, invoice title, and items list needed to create an invoice.
History Page
Create a history folder containing a page.tsx file within the Next.js app directory and copy the following code into the file:
"use client";
import { useState, useEffect, useCallback } from "react";
import Link from "next/link";
import SideNav from "@/app/components/SideNav";
export default function History() {
  const { isLoaded, isSignedIn, user } = useUser();
  const [invoices, setInvoices] = useState<Invoice[]>([]);
  return (
    <div className='w-full'>
      <main className='min-h-[90vh] flex items-start'>
        <SideNav />
        <div className='md:w-5/6 w-full h-full p-6'>
          <h2 className='text-2xl font-bold'>History</h2>
          <p className='opacity-70 mb-4'>View all your invoices and their status</p>
          {invoices.map((invoice) => (
            <div
              className='bg-blue-50 w-full mb-3 rounded-md p-3 flex items-center justify-between'
              key={invoice.id}
            >
              <div>
                <p className='text-sm text-gray-500 mb-2'>
                  Invoice - #0{invoice.id} issued to{" "}
                  <span className='font-bold'>{invoice.customer_id}</span>
                </p>
                <h3 className='text-lg font-bold mb-[1px]'>
                  {Number(invoice.total_amount).toLocaleString()}
                </h3>
              </div>
              <Link
                href={{
                  pathname: `/invoices/${invoice.id}`,
                  query: { customer: invoice.customer_id },
                }}
                className='bg-blue-500 text-blue-50 rounded p-3'
              >
                Preview
              </Link>
            </div>
          ))}
        </div>
      </main>
    </div>
  );
}
The code snippet above displays the recently created invoices and enables users to preview them when needed.
How to Authenticate Users Using Clerk
Clerk is a complete user management platform that enables you to add various forms of authentication to your software applications. It provides easy-to-use, flexible UI components and APIs that can be integrated seamlessly into your application.
Install the Clerk Next.js SDK by running the following code snippet in your terminal:
npm install @clerk/nextjs |
Create a middleware.ts file within the Next.js src folder and copy the code snippet below into the file:
import { clerkMiddleware, createRouteMatcher } from "@clerk/nextjs/server";
// the createRouteMatcher function accepts an array of routes to be protected
const protectedRoutes = createRouteMatcher([
    "/customers",
    "/settings",
    "/dashboard",
    "/history",
    "/invoices(.*)",
]);
// protects the route
export default clerkMiddleware((auth, req) => {
    if (protectedRoutes(req)) {
        auth().protect();
 }
});
export const config = {
    matcher: ["/((?!.*\\..*|_next).*)", "/", "/(api|trpc)(.*)"],
};
The createRouteMatcher() function accepts an array containing routes to be protected from unauthenticated users, and the clerkMiddleware() function ensures the routes are protected.
Next, import the following Clerk components into the app/layout.tsx file and update the RootLayout function as shown below:
import {
    ClerkProvider,
    SignInButton,
    SignedIn,
    SignedOut,
    UserButton,
} from "@clerk/nextjs";
import Link from "next/link";
export default function RootLayout({
    children,
}: Readonly<{
    children: React.ReactNode;
}>) {
    return (
 <ClerkProvider>
 <html lang='en'>
 <body className={inter.className}>
 <nav className='flex justify-between items-center h-[10vh] px-8 border-b-[1px]'>
 <Link href='/' className='text-xl font-extrabold text-blue-700'>
 Invoicer
 </Link>
 <div className='flex items-center gap-5'>
                            {/*-- if user is signed out --*/}
 <SignedOut>
 <SignInButton mode='modal' />
 </SignedOut>
                            {/*-- if user is signed in --*/}
 <SignedIn>
 <Link href='/dashboard' className=''>
 Dashboard
 </Link>
 <UserButton showName />
 </SignedIn>
 </div>
 </nav>
                    {children}
 </body>
 </html>
 </ClerkProvider>
 );
}
When a user is not signed in, the Sign in button component is rendered.
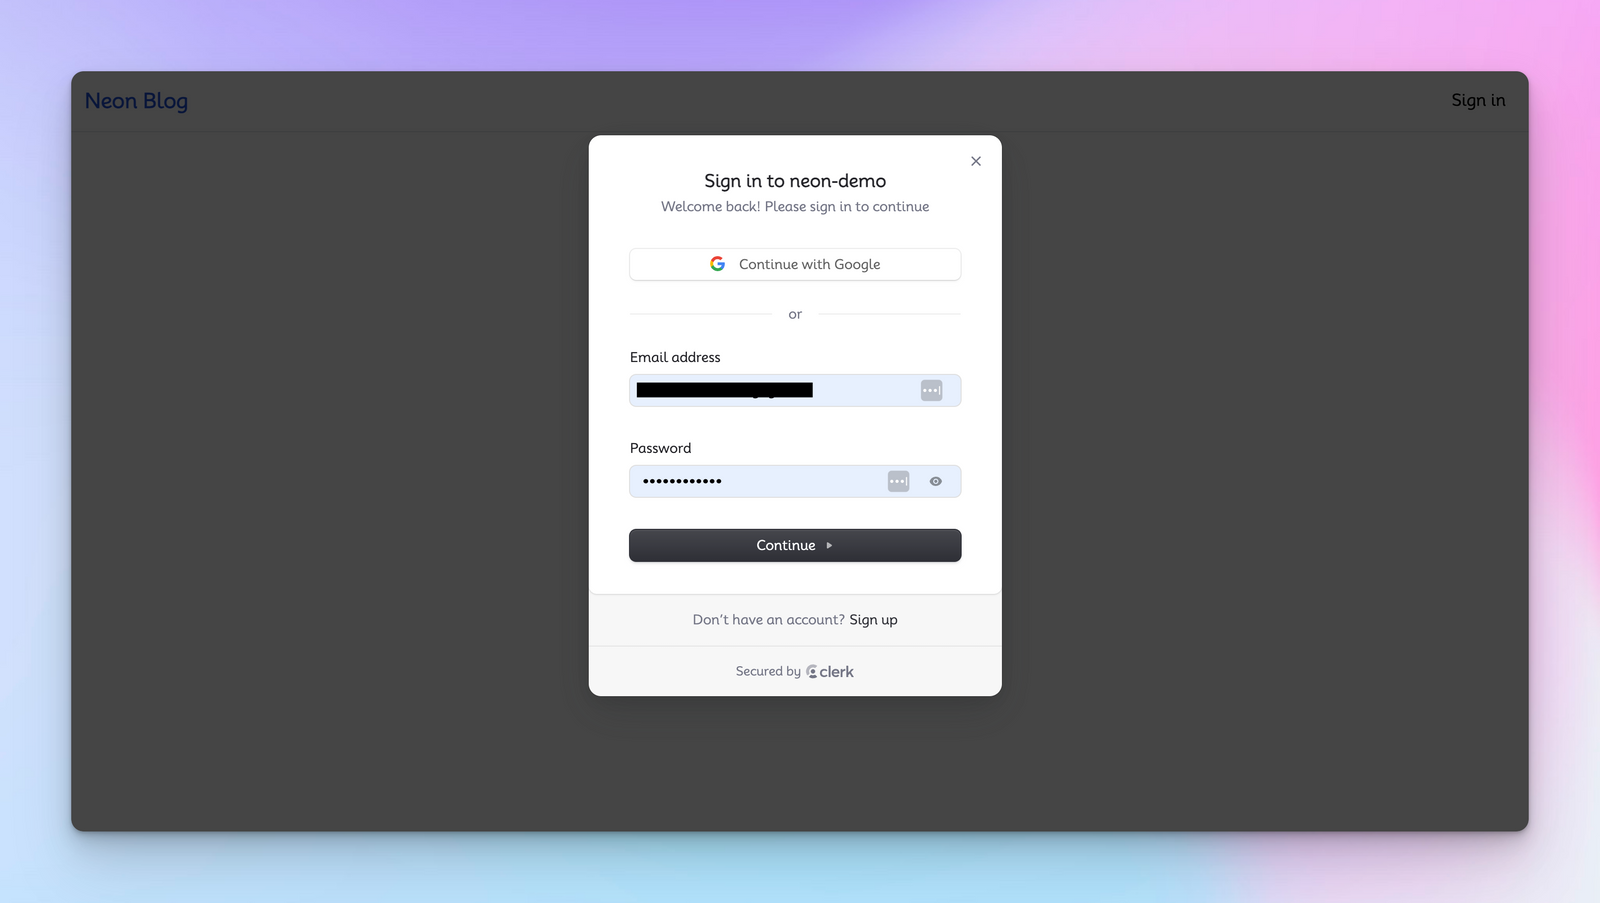
Then, after signing into the application, Clerk's User Button component and a link to the dashboard are displayed.
Next, create a Clerk account and add a new application project.
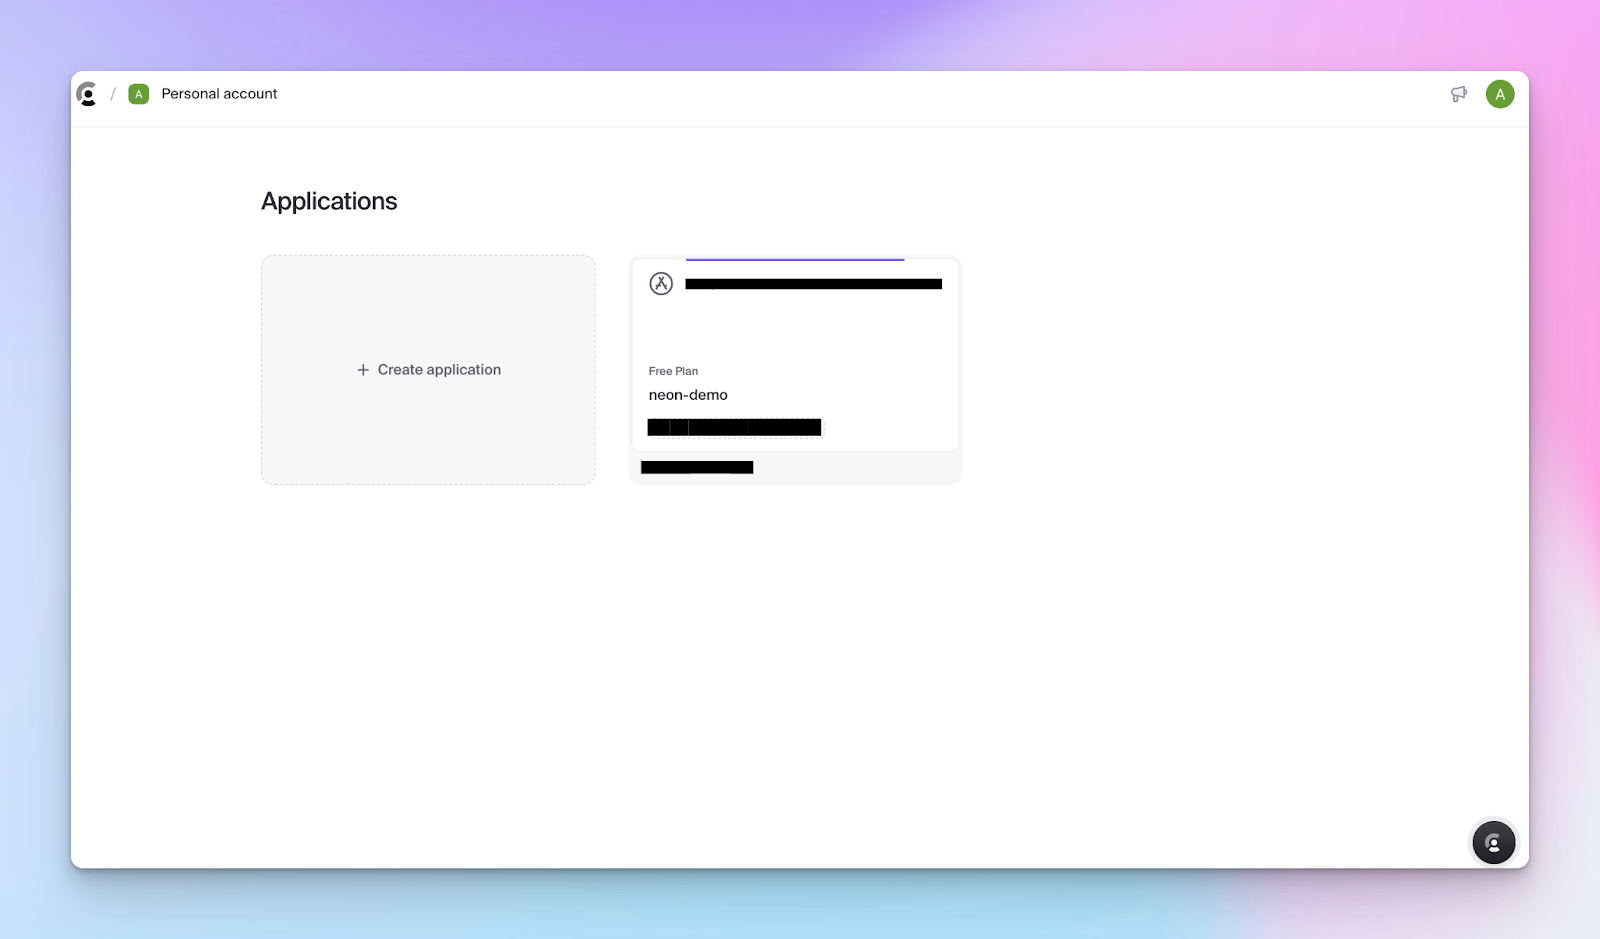
Select email as the authentication method and create the Clerk project.
Finally, add your Clerk publishable and secret keys into the .env.local file.
NEXT_PUBLIC_CLERK_PUBLISHABLE_KEY=<your_publishable_key> |
Clerk provides various ways to read user's data on the client and the server, which is essential for identifying users within the application.
Neon supports multiple frameworks and libraries and provides clear and detailed documentation on adding Neon to them. The Neon serverless driver lets you connect to and interact with Neon in a Next.js application.
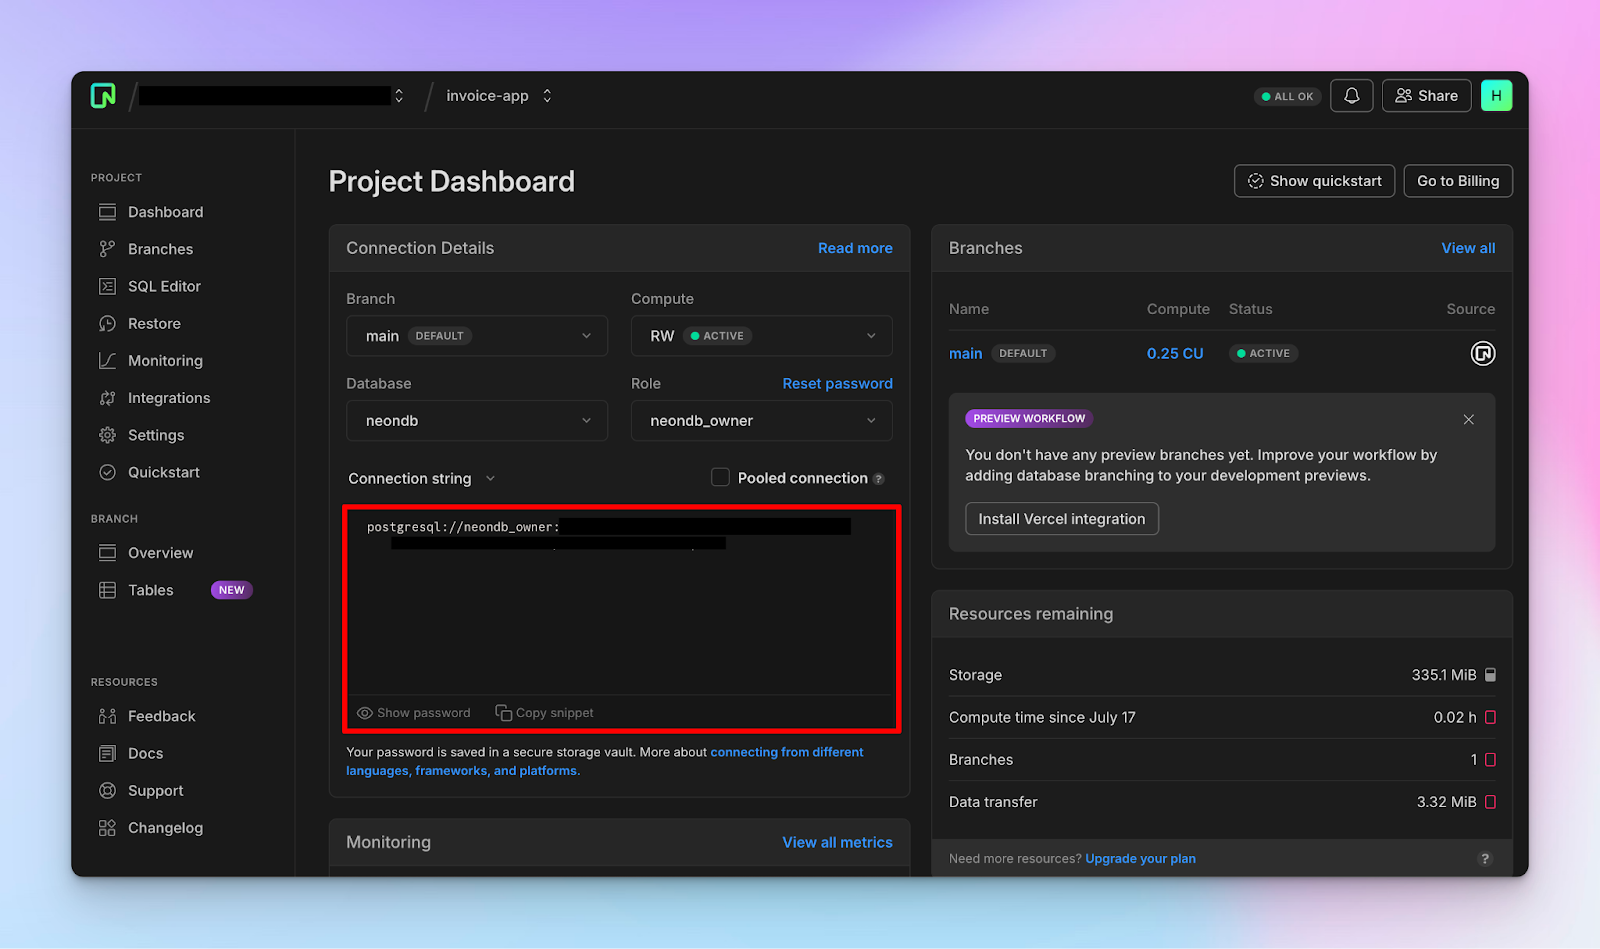
Before we proceed, let’s create a Neon account and project.
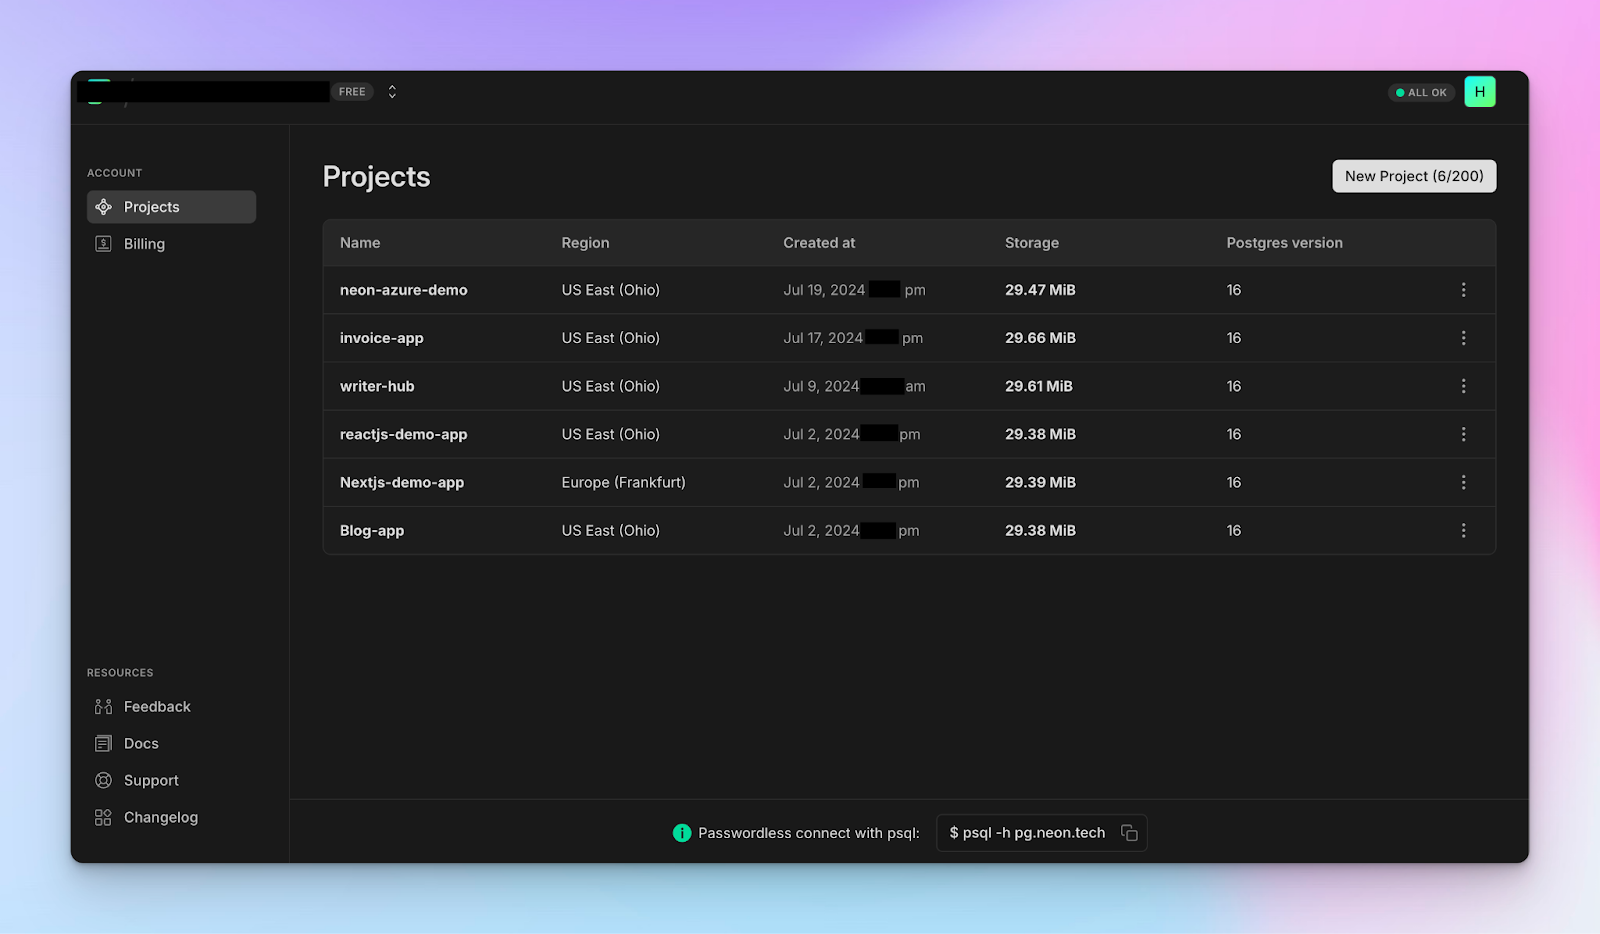
Within your project dashboard, you'll find a database connection string. You'll use this to interact with your Neon database.
Next, install the Neon Serverless package into the Next.js project:
npm install @neondatabase/serverless |
Copy your database connection string into the .env.local file.
NEON_DATABASE_URL="postgres://<user>:<password>@<endpoint_hostname>.neon.tech:<port>/<dbname>?sslmode=require" |
Create a db folder containing an index.ts file within the Next.js app directory and copy the code snippet below into the file:
import { neon } from '@neondatabase/serverless';
if (!process.env.NEON_DATABASE_URL) {
  throw new Error('NEON_DATABASE_URL must be a Neon postgres connection string')
}
export const getDBVersion = async() => {
    const sql = neon(process.env.NEON_DATABASE_URL!);
    const response = await sql`SELECT version()`;
    return { version: response[0].version }
}
Convert the app/page.tsx file to a server component and execute the getDBVersion() function:
import { getDBVersion } from "./db";
export default async function Home() {
    const { version } = await getDBVersion();
    console.log({version})
   return (<div>{/** -- UI elements -- */}</div>)
}
The getDBVersion() function establishes a connection with the Neon database and allows us to run SQL queries using the Postgres client. This function returns the database version, which is then logged to the console.
{ |
Congratulations – you’ve successfully added Neon to your Next.js app.
However, interacting with the Neon database by writing SQL queries directly can require extra learning or introduce complexities for developers who are not familiar with SQL. It can also lead to errors or performance issues when performing complex queries.
This is why Neon supports database ORMs such as Drizzle ORM, which provide a higher-level interface for interacting with the database. Drizzle ORM enables you to write complex query functions and interact with the database easily using TypeScript.
How to Set Up Neon Serverless Driver with Drizzle ORM in Next.js
Drizzle ORM lets you query data and perform various operations on the database using simple TypeScript query commands. It is lightweight, typesafe, and easy to use.
First, you'll need to install the Drizzle Kit and the Drizzle ORM package.
Drizzle Kit lets you manage the database schema and migrations.
npm i drizzle-orm |
Inside the db folder, add an actions.ts, and schema.ts file:
cd db |
The actions.ts file will contain the required database queries and operations, while the schema.ts file will define the database schema for the invoicing application.
Database Design for the invoice application
Recall that users can add customers, update their bank information, and create invoices within the application. So you need to create database tables for the data in Neon.
The user's ID will be used as a foreign key to identify each row of data that belongs to a specific user.
Copy the code snippet below into the db/schema.ts file:
import {  text, serial, pgTable, timestamp, numeric } from "drizzle-orm/pg-core";
//👇🏻 invoice table with its column types
export const invoicesTable = pgTable("invoices", {
    id: serial("id").primaryKey().notNull(),
    owner_id: text("owner_id").notNull(),
    customer_id: text("customer_id").notNull(),
    title: text("title").notNull(),
    items: text("items").notNull(),
    created_at: timestamp("created_at").defaultNow(),
    total_amount: numeric("total_amount").notNull(),
});
//👇🏻 customers table with its column types
export const customersTable = pgTable("customers", {
    id: serial("id").primaryKey().notNull(),
    created_at: timestamp("created_at").defaultNow(),
    owner_id: text("owner_id").notNull(),
    name: text("name").notNull(),
    email: text("email").notNull(),
    address: text("address").notNull(),
})
//👇🏻 bank_info table with its column types
export const bankInfoTable = pgTable("bank_info", {
    id: serial("id").primaryKey().notNull(),
    owner_id: text("owner_id").notNull().unique(),
    bank_name: text("bank_name").notNull(),
    account_number: numeric("account_number").notNull(),
    account_name: text("account_name").notNull(),
    created_at: timestamp("created_at").defaultNow(),
    currency: text("currency").notNull(),
})
The actions.ts file will contain the various database operations required within the application. First, add the code snippet below to the file:
import { invoicesDB, customersDB, bankInfoDB } from ".";
import { invoicesTable, customersTable, bankInfoTable } from './schema';
import { desc, eq } from "drizzle-orm";
//👇🏻 add a new row to the invoices table
export const createInvoice = async (invoice: any) => {
    await invoicesDB.insert(invoicesTable).values({
    owner_id: invoice.user_id,
    customer_id: invoice.customer_id,
    title: invoice.title,
    items: invoice.items,
    total_amount: invoice.total_amount,
 });
};
//👇🏻 get all user's invoices
export const getUserInvoices = async (user_id: string) => {
    return await invoicesDB.select().from(invoicesTable).where(eq(invoicesTable.owner_id, user_id)).orderBy(desc(invoicesTable.created_at));
};
//👇🏻 get single invoice
export const getSingleInvoice = async (id: number) => {
    return await invoicesDB.select().from(invoicesTable).where(eq(invoicesTable.id, id));
};
The createInvoice function accepts invoice details as a parameter and adds a new row of data to its invoice table. The getUserInvoices function filters the table and returns an array of invoices created by the user. The getSingleInvoice function accepts an invoice ID, filters the table, and returns the invoice with a matching ID.
Add the following functions to the db/actions file:
//👇🏻 get customers list
export const getCustomers = async (user_id: string) => {
    return await customersDB.select().from(customersTable).where(eq(customersTable.owner_id, user_id)).orderBy(desc(customersTable.created_at));
};
//👇🏻 get single customer
export const getSingleCustomer = async (name: string) => {
    return await customersDB.select().from(customersTable).where(eq(customersTable.name, name));
};
//👇🏻 add a new row to the customers table
export const addCustomer = async (customer: Customer) => {
    await customersDB.insert(customersTable).values({
        owner_id: customer.user_id,
        name: customer.name,
        email: customer.email,
        address: customer.address,
 });
};
//👇🏻 delete a customer
export const deleteCustomer = async (id: number) => {
  await customersDB.delete(customersTable).where(eq(customersTable.id, id));
};
This code snippet enables users to retrieve all their customers from the database, get a single customer via its ID, add new customers, and delete customers from the customers table.
Finally, add this also to the db/actions.ts file:
//👇🏻 get user's bank info
export const getUserBankInfo = async (user_id: string) => {
    return await bankInfoDB.select().from(bankInfoTable).where(eq(bankInfoTable.owner_id, user_id));
};
//👇🏻 update bank info table
export const updateBankInfo = async (info: any) => {
await bankInfoDB.insert(bankInfoTable)
 .values({
        owner_id: info.user_id,
        bank_name: info.bank_name,
        account_number: info.account_number,
        account_name: info.account_name,
        currency: info.currency,
 })
 .onConflictDoUpdate({
            target: bankInfoTable.owner_id,
            set: {
                bank_name: info.bank_name,
                account_number: info.account_number,
                account_name: info.account_name,
                currency: info.currency,
 },
 });
};
The getUserBankInfo function fetches the user’s bank information from the database, while the updateBankInfo function updates it. If the user already has one, the function updates it with the new details – otherwise, it creates a new entry.
Next, update the db/index.ts file to connect to the Neon database and export the Drizzle instance for each table. This will be used to execute typesafe SQL queries against your Postgres database hosted on Neon.
import { neon } from '@neondatabase/serverless';
import { drizzle } from 'drizzle-orm/neon-http';
import { invoicesTable, customersTable, bankInfoTable } from './schema';
if (!process.env.NEON_DATABASE_URL) {
  throw new Error('DATABASE_URL must be a Neon postgres connection string')
}
const sql = neon(process.env.NEON_DATABASE_URL!);
export const invoicesDB = drizzle(sql, {
  schema: { invoicesTable }
});
export const customersDB = drizzle(sql, {
  schema: { customersTable }
});
export const bankInfoDB = drizzle(sql, {
  schema: { bankInfoTable }
});
Create a drizzle.config.ts file at the root of the Next.js folder and add the following configuration. Ensure you install the Dotenv package.
import type { Config } from "drizzle-kit";
import * as dotenv from "dotenv";
dotenv.config();
if (!process.env.NEON_DATABASE_URL)
    throw new Error("NEON DATABASE_URL not found in environment");
export default {
    schema: "./src/app/db/schema.ts",
    out: "./src/app/db/migrations",
    dialect: "postgresql",
    dbCredentials: {
        url: process.env.NEON_DATABASE_URL,
 },
    strict: true,
} satisfies Config;
The drizzle.config.ts file contains all the information about your database connection, migration folder, and schema files.
Finally, update the package.json file to include the Drizzle Kit commands for generating database migrations and creating the tables.
{ |
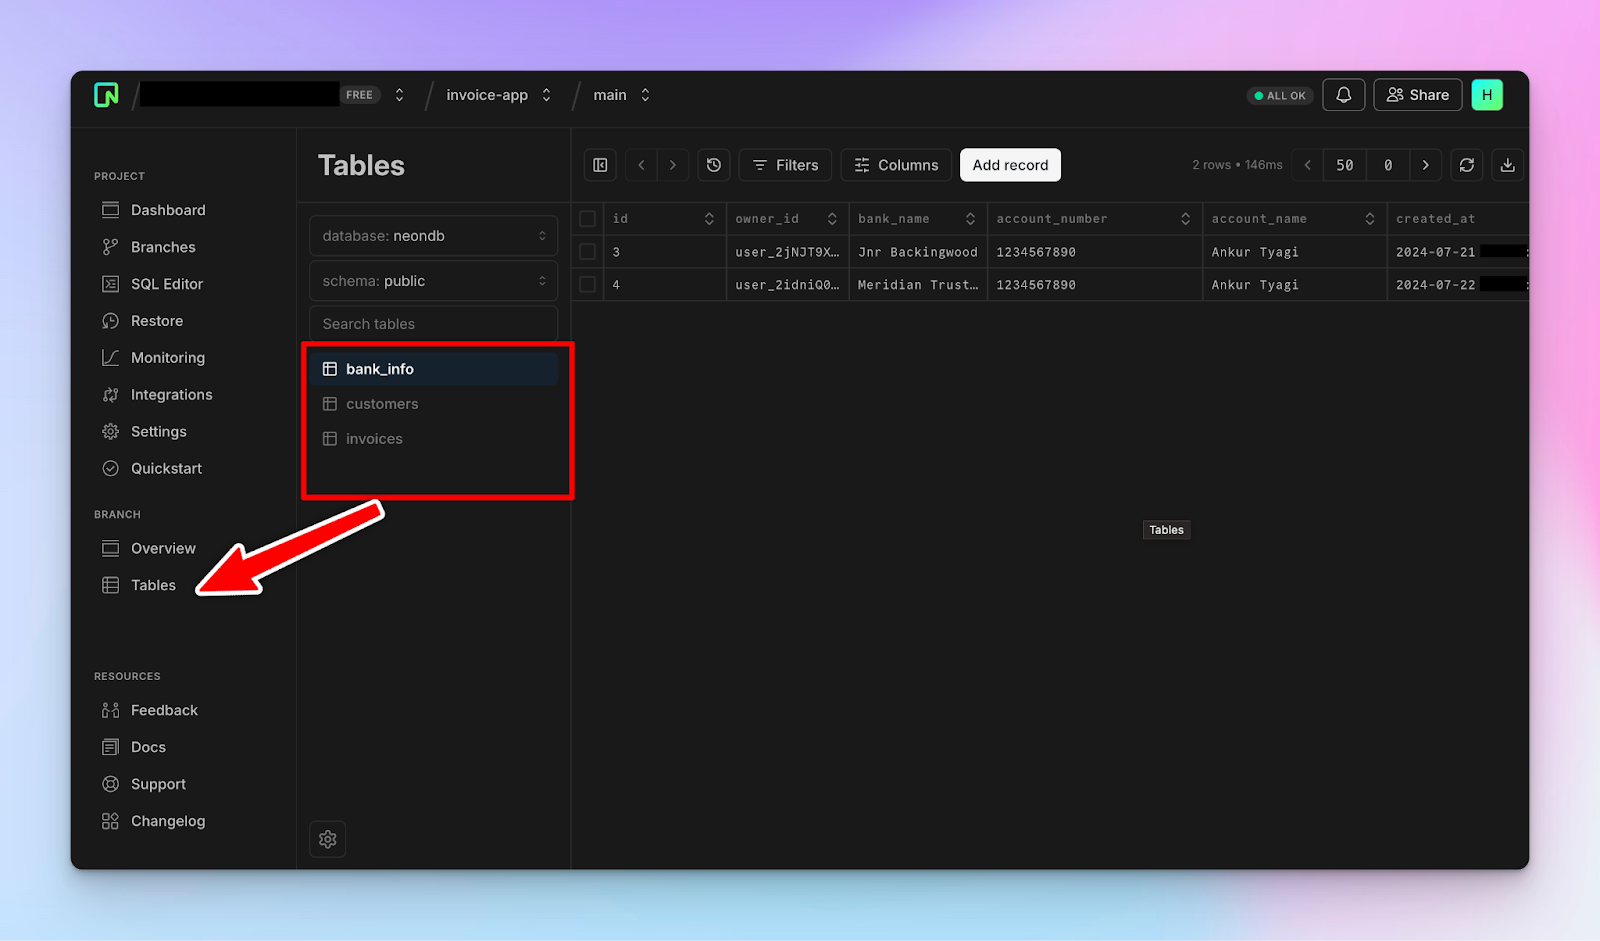
You can now run npm run db-create to push the database tables to the Neon console.
Creating the API Endpoints for the Application
In the previous section, you created the necessary functions to interact with the database. In this section, you will learn how to create the API endpoints for each database operation.
First, create an api folder within the Next.js app directory. It will contain all the API routes for the application.
cd app |
Add a bank-info folder containing a route.ts within the api folder. This means that the API route (/api/bank-info) will handle updating and fetching the user’s bank information.
cd api |
Copy the code snippet below into the /bank-info/route.ts file. The POST request method updates the user’s bank information and returns a response and the GET request method retrieves the bank information from the database using the user’s ID.
import { updateBankInfo, getUserBankInfo } from "@/app/db/actions";
import { NextRequest, NextResponse } from "next/server";
export async function POST(req: NextRequest) {
    const { accountName, userID, accountNumber, bankName, currency } = await req.json();
    try {
        await updateBankInfo({
            user_id: userID,
            bank_name: bankName,
            account_number: Number(accountNumber),
            account_name: accountName,
            currency: currency,
 });
        return NextResponse.json({ message: "Bank Details Updated!" }, { status: 201 });
 } catch (err) {
        return NextResponse.json(
 { message: "An error occurred", err },
 { status: 400 }
 );
 }
}
export async function GET(req: NextRequest) {
   const userID  = req.nextUrl.searchParams.get("userID");
    try {
        const bankInfo = await getUserBankInfo(userID!);
        return NextResponse.json({ message: "Fetched bank details", bankInfo }, { status: 200 });
 } catch (err) {
        return NextResponse.json(
 { message: "An error occurred", err },
 { status: 400 }
 );
 }
}
Next, add an invoice folder containing a route.ts file to the api directory. Copy the code snippet below into the /api/invoice/route.ts file:
import { createInvoice, getUserInvoices } from "@/app/db/actions";
import { NextRequest, NextResponse } from "next/server";
export async function POST(req: NextRequest) {
    const { customer, title, items, total, ownerID } = await req.json();
    try {
        await createInvoice({
            user_id: ownerID,
            customer_id: customer,
            title,
            total_amount: total,
            items: JSON.stringify(items),
 })
        return NextResponse.json(
 { message: "New Invoice Created!" },
 { status: 201 }
 );
 } catch (err) {
        return NextResponse.json(
 { message: "An error occurred", err },
 { status: 400 }
 );
 }
}
export async function GET(req: NextRequest) {
    const userID = req.nextUrl.searchParams.get("userID");
    try {
        const invoices = await getUserInvoices(userID!);
        return NextResponse.json({message: "Invoices retrieved successfully!", invoices}, { status: 200 });
 } catch (err) {
        return NextResponse.json(
 { message: "An error occurred", err },
 { status: 400 }
 );
 }
}
The POST request method creates a new invoice and the GET request method returns all the user’s invoices from the database.
You can also create a sub-folder named single within the /api/invoices folder, and add a route.ts file within it.
import { NextRequest, NextResponse } from "next/server";
import { getSingleInvoice } from "@/app/db/actions";
export async function GET(req: NextRequest) {
   const invoiceID = req.nextUrl.searchParams.get("id");
    try {
        const invoice = await getSingleInvoice(invoiceID);
        return NextResponse.json({ message: "Inovice retrieved successfully!", invoice }, { status: 200 });
 } catch (err) {
        return NextResponse.json(
 { message: "An error occurred", err },
 { status: 400 }
 );
 }
}
The code snippet above accepts an invoice ID and retrieves all its data available within the database table. You can do the same with the customers table as well.
Congratulations! You’ve learned how to create, store, and retrieve data from the Neon Postgres database. In the upcoming sections, you’ll uncover how to print and send invoices to customers.
How to Print and Download Invoices in Next.js
The React-to-print package is a simple JavaScript library that allows you to print the contents of a React component easily without tampering with the component's CSS styles. It converts React components exactly as they are into downloadable PDF files.
First, execute the following code snippet in your terminal to install the package:
npm install -save react-to-print |
Create a client page (/invoice/[id].tsx).
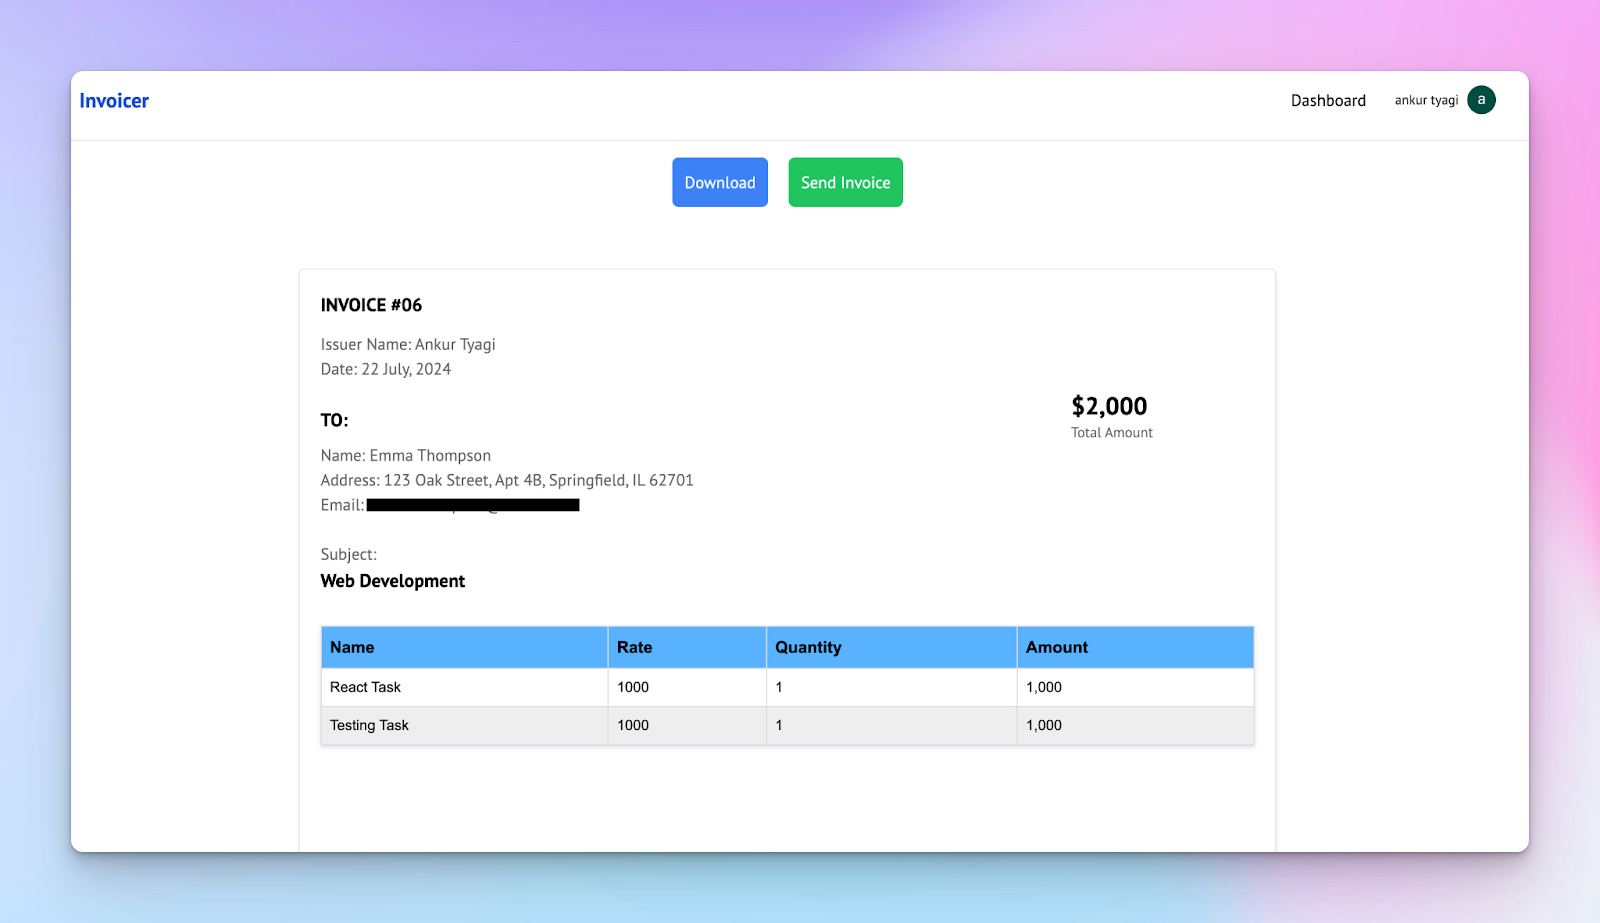
To do this, add an invoice folder containing a [id] sub-folder to the Next.js app directory. Inside the [id] folder, add a page.tsx file. This page displays all the information about an invoice and allows users to print, download, and send invoices to customers.
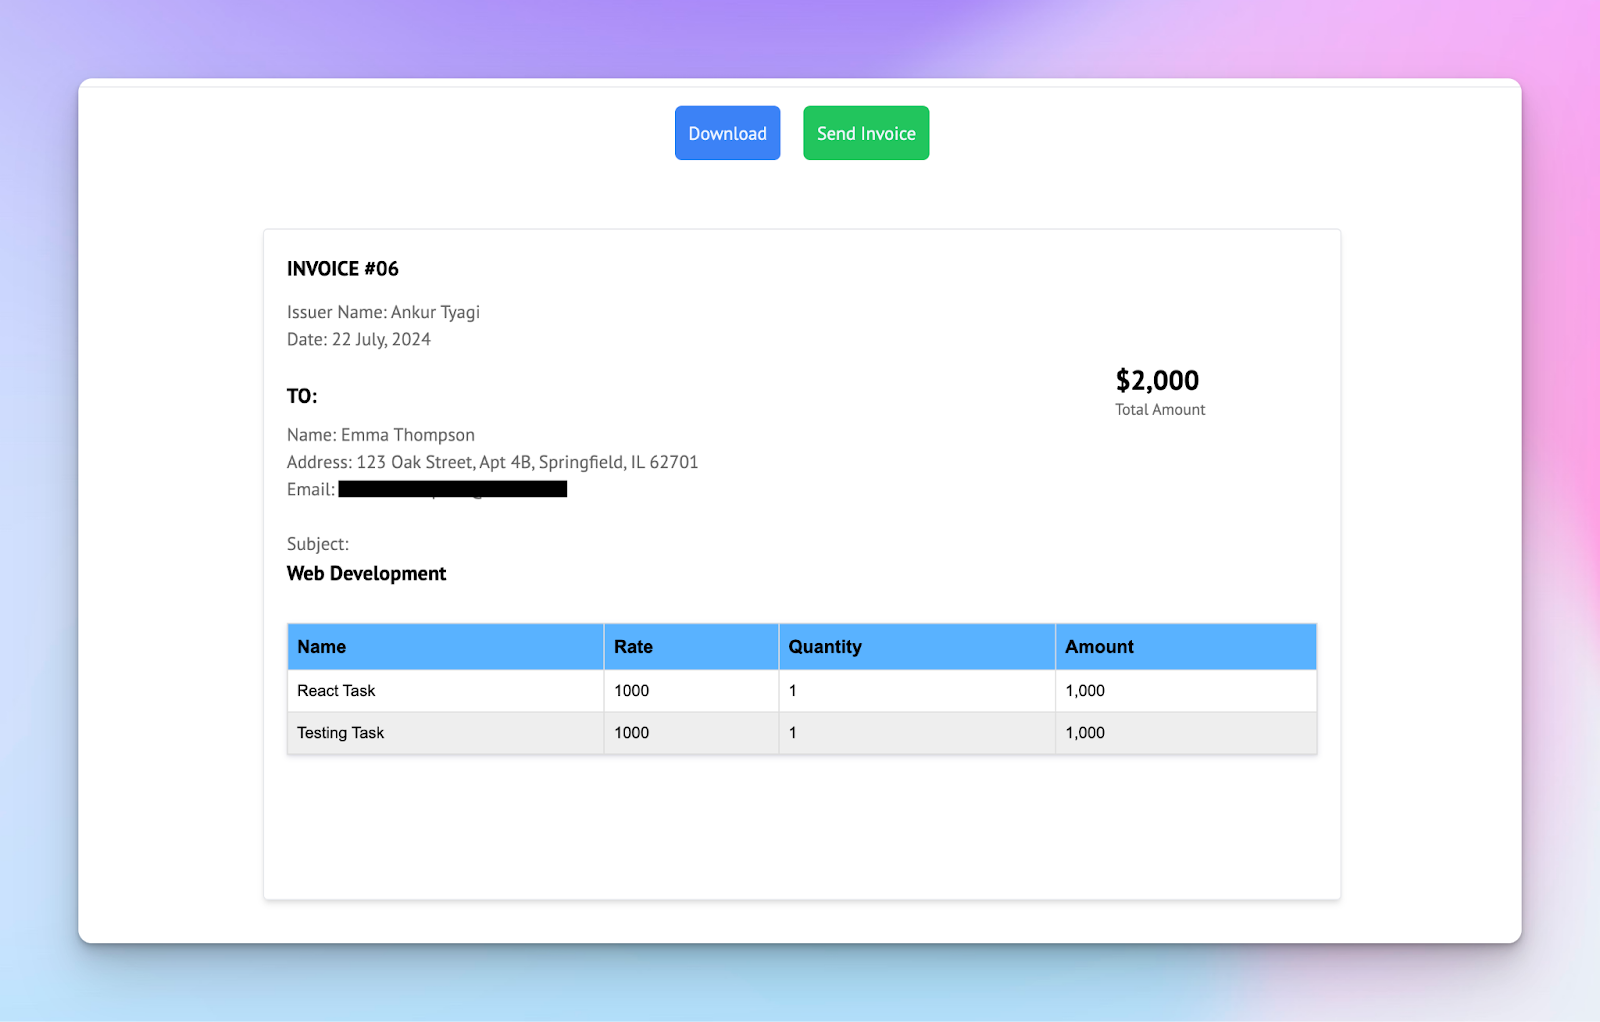
Create a invoice design similar to the image above by copying the code snippet below into the page.tsx file:
const ComponentToPrint = forwardRef<HTMLDivElement, Props>((props, ref) => {
  const { id, customer, invoice, bankInfo } = props as Props;
  return (
    <div className='w-full px-2 py-8' ref={ref}>
      <div className='lg:w-2/3 w-full mx-auto shadow-md border-[1px] rounded min-h-[75vh] p-5'>
        <header className='w-full flex items-center space-x-4 justify-between'>
          <div className='w-4/5'>
            <h2 className='text-lg font-semibold mb-3'>INVOICE #0{id}</h2>
            <section className='mb-6'>
              <p className='opacity-60'>Issuer Name: {bankInfo?.account_name}</p>
              <p className='opacity-60'>Date: {formatDateString(invoice?.created_at!)}</p>
            </section>
            <h2 className='text-lg font-semibold mb-2'>TO:</h2>
            <section className='mb-6'>
              <p className='opacity-60'>Name: {invoice?.customer_id}</p>
              <p className='opacity-60'>Address: {customer?.address}</p>
              <p className='opacity-60'>Email: {customer?.email}</p>
            </section>
          </div>
          <div className='w-1/5 flex flex-col'>
            <p className='font-extrabold text-2xl'>
              {`${bankInfo?.currency}${Number(invoice?.total_amount).toLocaleString()}`}
            </p>
            <p className='text-sm opacity-60'>Total Amount</p>
          </div>
        </header>
        <div>
          <p className='opacity-60'>Subject:</p>
          <h2 className='text-lg font-semibold'>{invoice?.title}</h2>
        </div>
        <InvoiceTable itemList={invoice?.items ? JSON.parse(invoice.items) : []} />
      </div>
    </div>
  );
});
ComponentToPrint.displayName = "ComponentToPrint";
The code snippet accepts invoice details, including the customer and user’s bank information and renders them within the component.
Finally, you need to wrap this component with another parent one and instruct React-to-print to print the sub-component. Add the following code snippet below the ComponentToPrint component.
import { useReactToPrint } from "react-to-print";
export default function Invoices() {
  const { id } = useParams<{ id: string }>();
  // Reference to the component to be printed
  const componentRef = useRef<any>();
  // States for the data
  const [customer, setCustomer] = useState<Customer>();
  const [bankInfo, setBankInfo] = useState<BankInfo>();
  const [invoice, setInvoice] = useState<Invoice>();
  // Function that sends invoice via email
  const handleSendInvoice = async () => {};
  // Function that prints the invoice
  const handlePrint = useReactToPrint({
    documentTitle: "Invoice",
    content: () => componentRef.current,
  });
  return (
    <main className='w-full min-h-screen'>
      <section className='w-full flex p-4 items-center justify-center space-x-5 mb-3'>
        <button
          className='p-3 text-blue-50 bg-blue-500 rounded-md'
          onClick={handlePrint}
        >
          Download
        </button>
        <button
          className='p-3 text-blue-50 bg-green-500 rounded-md'
          onClick={() => {
            handleSendInvoice();
          }}
        >
          Send Invoice
        </button>
      </section>
      <ComponentToPrint
        ref={componentRef}
        id={id}
        customer={customer}
        bankInfo={bankInfo}
        invoice={invoice}
      />
    </main>
  );
}
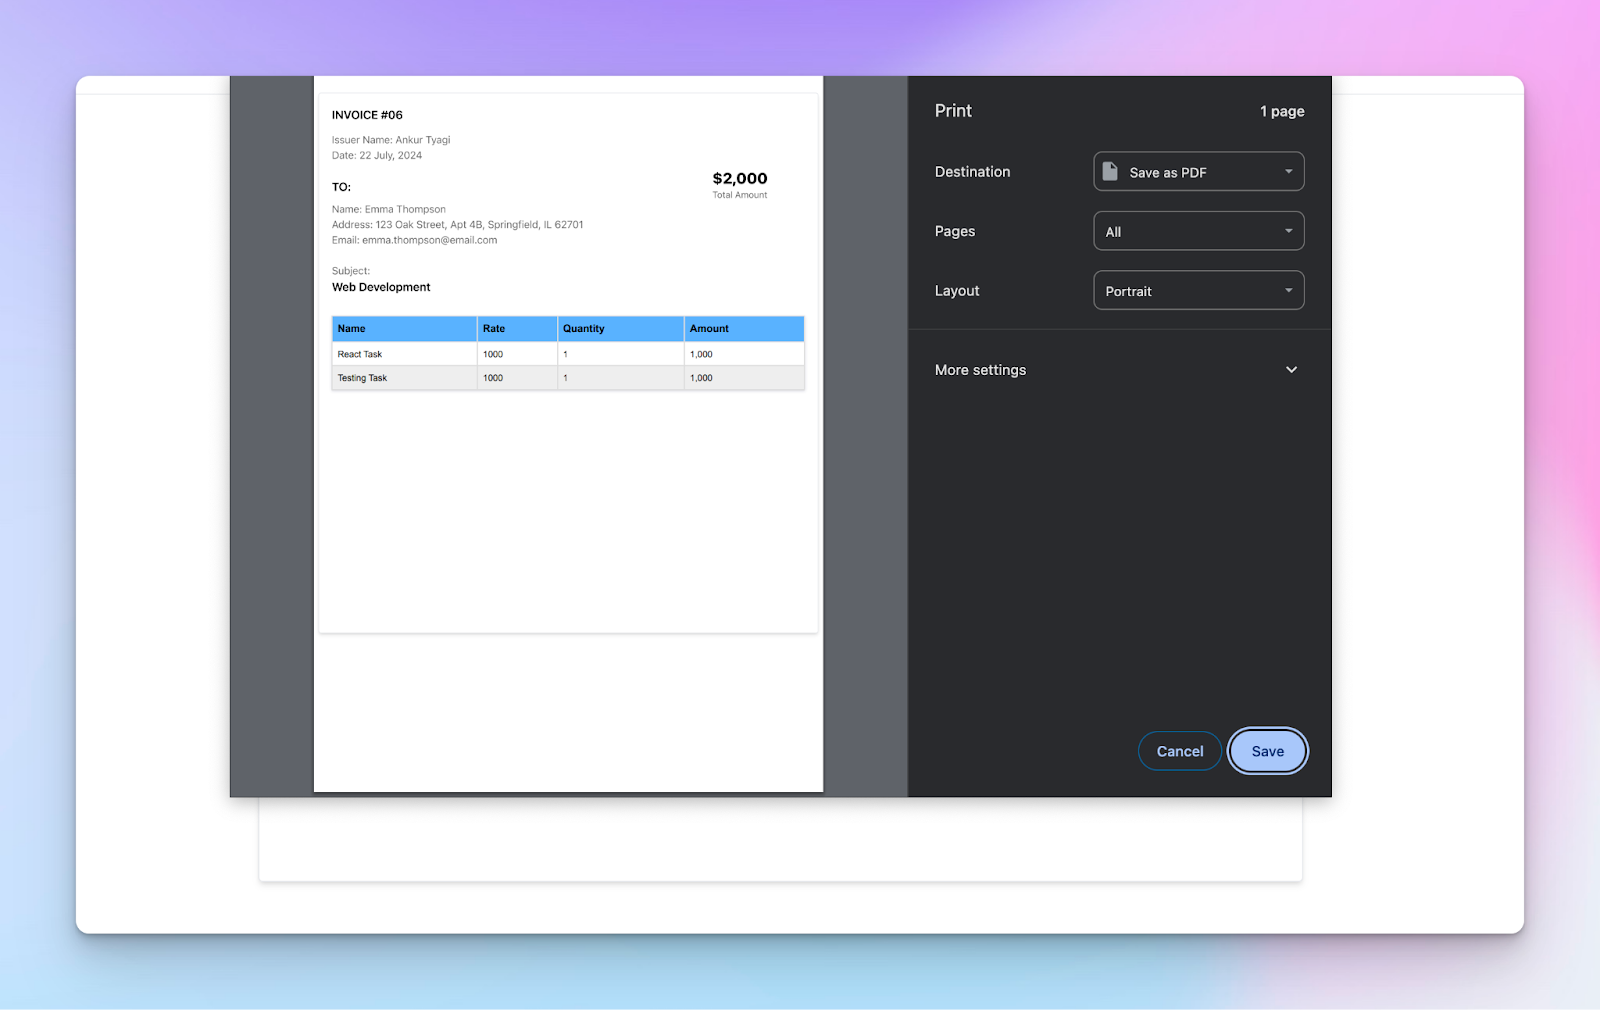
The component renders the ComponentToPrint component, creates a reference to it, and prints it using the useReactToPrint hook.
How to Send Digital Invoices with Resend and React Email
Resend is an API service that enables us to send and manage emails programmatically, making it easy to integrate email functionality into software applications.
React Email is a library that allows us to create reusable, beautifully designed email templates using React components. Both packages are created by the person, allowing for smooth integration between the two services.
Install both packages by running the code snippet below:
npm install resend |
Configure React Email by including the following script in your package.json file.
The --dir flag gives React Email access to the email templates located within the project. In this case, the email templates are located in the src/app/emails folder.
{ |
Next, create the emails folder containing the email template to be sent to the customers’ email:
import { Heading, Hr, Text } from "@react-email/components";
export default function EmailTemplate({
    invoiceID,
    items,
    amount,
    issuerName,
    accountNumber,
    currency,
}: Props) {
    return (
 <div>
 <Heading as='h2' style={{ color: "#0ea5e9" }}>
 Purhcase Invoice from {issuerName}
 </Heading>
 <Text style={{ marginBottom: 5 }}>Invoice No: INV0{invoiceID}</Text>
 <Heading as='h3'> Payment Details:</Heading>
 <Text>Account Details: {issuerName}</Text>
 <Text>Account Number: {accountNumber}</Text>
 <Text>Total Amount: {`${currency}${amount}`}</Text>
 <Hr />
 <Heading as='h3'> Items: </Heading>
            {items &&
                items.map((item, index) => (
 <div key={index}>
 <Text>
                            {item.cost} x {item.quantity} = {item.price}
 </Text>
 </div>
 ))}
 </div>
 );
}
The email template accepts all the invoice details as props and sends a dynamic email template to the user. You can also preview the invoice layout by running npm run email within your terminal.
Next, create a Resend account, and select API Keys from the sidebar menu on your dashboard to create one.
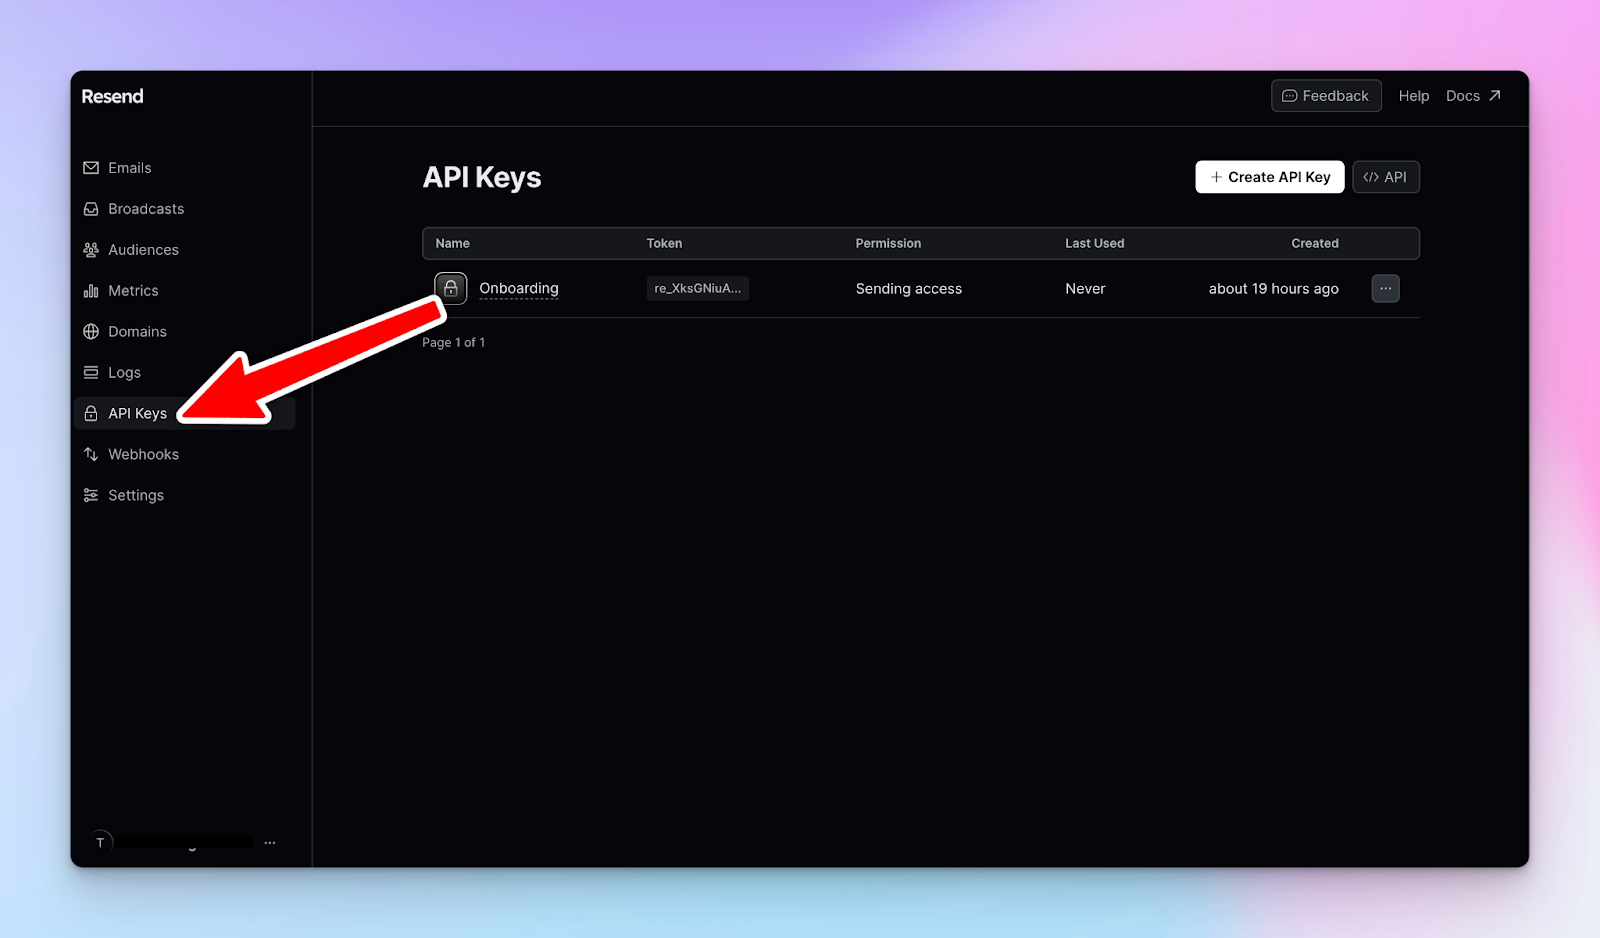
Copy the API key into the .env.local file.
Finally, create an API endpoint that accepts the invoice details from the frontend and sends an invoice containing the data to a customer.
import { NextRequest, NextResponse } from "next/server";
import EmailTemplate from "@/app/emails/email";
import { Resend } from "resend";
const resend = new Resend(process.env.RESEND_API_KEY!);
export async function POST(req: NextRequest) {
    const {
        invoiceID,
        items,
        title,
        amount,
        customerEmail,
        issuerName,
        accountNumber,
        currency,
 } = await req.json();
    try {
        const { data, error } = await resend.emails.send({
            from: "Acme <onboarding@resend.dev>",
            to: [customerEmail],
            subject: title,
            react: EmailTemplate({
                invoiceID,
                items: JSON.parse(items),
                amount: Number(amount),
                issuerName,
                accountNumber,
                currency,
 }) as React.ReactElement,
 });
        if (error) {
            return Response.json(
 { message: "Email not sent!", error },
 { status: 500 }
 );
 }
        return NextResponse.json({ message: "Email delivered!" }, { status: 200 });
 } catch (error) {
        return NextResponse.json(
 { message: "Email not sent!", error },
 { status: 500 }
 );
 }
}
The code snippet above accepts invoice details from the frontend, passes the required data into the email template, and sends an email to the user.
Next Steps
Congratulations. By now, you should have a good understanding of how to build full-stack applications with Clerk, Resend, Neon Postgres and Next.js.
If you'd like to learn more about how you can leverage Neon Postgres to build advanced and scalable apps, you can check out the following resources:
- Neon documentation
- Awesome Neon
- Neon example projects
- How to integrate Neon with Vercel
- How to import your data from a Postgres database to Neon
Thank you for reading
If you found this article useful, you can:
- Subscribe to my newsletter.
- Follow me on Twitter where I post about my business and writing journey, side projects, and current learnings.
- Checkout my blog for more tutorials like this on developer tools.