
CRUD operations are the basis of every application, so it is essential to become proficient in them when learning new technologies.
In this tutorial, you’ll learn how to build a CRUD application using React and Convex. We’ll cover these operations by building a project called Book Collections. In this project, users will be able to add books and update their status once they complete a book.
Table of Contents
What is Convex?
How to Set Up Your Project
How to Create the Schema
How to Create the UI
How to Create CRUD Functions
Styling
Summary
What is Convex?
Convex is the Baas Platform that simplifies backend development. Convex comes with a real-time database, and you do not need to worry about writing server-side logic separately because it provides methods for querying and mutating the database.
Prerequisites
In order to follow this tutorial, you must know the fundamentals of React. I will be using TypeScript in this project, but it is optional, so you can also follow along with JavaScript.
How to Set Up Your Project
Create a separate folder for the project and name it as you wish – I will name mine Books. We’ll set up Convex and React in that folder.
You can create a React app using this command:
npm create vite@latest my-app -- --template react-ts
If you want to work with JavaScript, then remove the ts at the end. That is:
npm create vite@latest my-app -- --template react
How to Setup Convex
We have to install Convex in the same folder. You can do that using this command:
npm install convex
Next, run npx convex dev. If you’re doing this for the first time, it should ask you for authentication. Otherwise, it should ask for the project name.
You can visit the Convex dashboard to see the project that you have created.
Now that we have the Convex and React App set up, we need to connect the Convex backend to the React app.
In the src/main.tsx, wrap your App component with the ConvexReactClient:
import { createRoot } from "react-dom/client";
import App from "./App.tsx";
import { ConvexProvider, ConvexReactClient } from "convex/react";
import "./index.css"
const convex = new ConvexReactClient(import.meta.env.VITE_CONVEX_URL as string);
createRoot(document.getElementById("root")!).render(
  <ConvexProvider client={convex}>
    <App />
  </ConvexProvider>
);
When you set up Convex, a .env.local was created. You can see your backend URL in that file.
In the line below, we instantiated the React Convex Client with the URL.
const convex = new ConvexReactClient(import.meta.env.VITE_CONVEX_URL as string);
How to Create the Schema
In your main project directory, you should see the convex directory. We’ll handle the database queries and mutations here.
Create a schema.ts file in the convex folder:
import { defineSchema, defineTable } from "convex/server";
import { v } from "convex/values";
export default defineSchema({
  books: defineTable({
    title: v.string(),
    author: v.string(),
    isCompleted: v.boolean(),
  }),
});
You can define a Schema for your document with defineSchema and create a table with defineTable. Convex provides these functions for defining a schema and creating a table.
v is the type validator, it is used to provide types for each data we add to the table.
For this project, as it is a book collection application, the structure will have title, author, and isCompleted. You can add more fields.
Now that you have defined your schema, let’s set up the basic UI in React.
How to Create the UI
In the src folder, create a folder called component and a file Home.tsx. Here, you can define the UI.
import { useState } from "react";
import "../styles/home.css";
const Home = () => {
  const [title, setTitle] = useState("");
  const [author, setAuthor] = useState("");
  return (
    <div className="main-container">
      <h1>Book Collections</h1>
      <form onSubmit={handleSubmit}>
        <input
          type="text"
          name="title"
          value={title}
          onChange={(e) => setTitle(e.target.value)}
          placeholder="book title"
        />
        <br />
        <input
          type="text"
          name="author"
          value={author}
          onChange={(e) => setAuthor(e.target.value)}
          placeholder="book author"
        />
        <br />
        <input type="submit" />
      </form>
      {books ? <Books books={books} /> : "Loading..."}
    </div>
  );
};
export default Home;
You can create your component as you wish. I added two input fields title, author, and submit button. This is the basic structure. Now we can create CRUD methods in the backend.
How to Create CRUD Functions
In the convex folder, you can create a separate queries.ts file for the CRUD functions.
Create Function
In convex/queries.ts:
You can define a function createBooks. You can use the mutation function from Convex to create, update, and delete data. Reading the data will come under query.
The mutation function expects these arguments:
agrs: the data we need to store in the database.handler: handles the logic to store date in the database. Thehandleris an async function, and it has two arguments:ctxandargs. Here,ctxis the context object that we’ll use to handle the database operations.
You’ll use the insert method to insert new data. The first parameter in the insert is the table name and the second is the data that needs to be inserted.
Lastly, you can return the data from the database.
Here’s the code:
import { mutation} from "./_generated/server";
import { v } from "convex/values";
export const createBooks = mutation({
  args: { title: v.string(), author: v.string() },
  handler: async (ctx, args) => {
    const newBookId = await ctx.db.insert("books", {
      title: args.title,
      author: args.author,
      isCompleted: false,
    });
    return newBookId;
  },
});
Read Function
In convex/queries.ts:
import { query } from "./_generated/server";
import { v } from "convex/values";
//read
export const getBooks = query({
  args: {},
  handler: async (ctx) => {
    return await ctx.db.query("books").collect();
  },
});
In this read operation, we used the built-in query function from Convex. Here, args will be empty since we are not getting any data from the user. Similarly, the handler function is async and uses the ctx object to query the database and return the data.
Update Function
In convex/queries.ts:
Create a updateStatus function. We are only going to update the isCompleted status.
Here, you need to get the document ID and the status from the user. In the args, we’ll define id and the isCompleted, which will come from the user.
In the handler, we’ll use the patch method to update the data. The patch method expects two arguments: the first argument is the id of the document and the second is the updated data.
import { mutation } from "./_generated/server";
import { v } from "convex/values";
//update
export const updateStatus = mutation({
  args: { id: v.id("books"), isCompleted: v.boolean() },
  handler: async (ctx, args) => {
    const { id } = args;
    await ctx.db.patch(id, { isCompleted: args.isCompleted });
    return "updated"
  },
});
Delete Function
In convex/queries.ts:
Create a deleteBooks function and use the mutation function. We’ll need the ID of the document to be deleted. In the args, define an ID. In the handler, use the ctx object delete method, and pass the ID. This will delete the document.
import { mutation } from "./_generated/server";
import { v } from "convex/values";
//delete
export const deleteBooks = mutation({
  args: { id: v.id("books") },
  handler: async (ctx, args) => {
    await ctx.db.delete(args.id);
    return "deleted";
  },
});
As of now, you have completed the CRUD functions in the backend. Now we need to make it work in the UI. Let’s jump back to React.
Update the UI
You’ve already created some basic UI in the React app, along with some input fields. Let’s update it.
In src/component/Home.tsx:
import { useQuery, useMutation } from "convex/react";
import { api } from "../../convex/_generated/api";
import { Books } from "./Books";
import { useState } from "react";
import "../styles/home.css";
const Home = () => {
  const [title, setTitle] = useState("");
  const [author, setAuthor] = useState("");
  const books = useQuery(api.queries.getBooks);
  const createBooks = useMutation(api.queries.createBooks);
  const handleSubmit = (e: React.FormEvent<HTMLFormElement>): void => {
    e.preventDefault();
    createBooks({ title, author })
      .then(() => {
        console.log("created");
        setTitle("");
        setAuthor("");
      })
      .catch((err) => console.log(err));
  };
  return (
    <div className="main-container">
      <h1>Book Collections</h1>
      <form onSubmit={handleSubmit}>
        <input
          type="text"
          name="title"
          value={title}
          onChange={(e) => setTitle(e.target.value)}
          placeholder="book title"
        />
        <br />
        <input
          type="text"
          name="author"
          value={author}
          onChange={(e) => setAuthor(e.target.value)}
          placeholder="book author"
        />
        <br />
        <input type="submit" />
      </form>
      {books ? <Books books={books} /> : "Loading..."}
    </div>
  );
};
export default Home;
We can now use the backend API functions by using api from Convex. As you can see, we called two API functions: you can use useQuery if you’re going to read data and useMutation if you want to change data. Now in this file, we are doing, two operations that are create and read.
We got all the data by using this method:
const books = useQuery(api.queries.getBooks);
The array of objects will be stored in the books variable.
We got the create function from the backend with this line of code:
const createBooks = useMutation(api.queries.createBooks);
How to Use the Create Function in the UI
Let’s use the create function in the UI.
Since input fields are in the form tag, we’ll use the onSubmit attribute to handle the form submission.
//In the Home.tsx
const handleSubmit = (e: React.FormEvent<HTMLFormElement>): void => {
    e.preventDefault();
    createBooks({ title, author })
      .then(() => {
        console.log("created");
        setTitle("");
        setAuthor("");
      })
      .catch((err) => console.log(err));
  };
When you click submit, it triggers the handleSubmit function.
We used the createBooks to pass the title and author from the state. The endpoint function is async, so we can use the handleSubmit as async or use .then. I used the .then method to handle the asynchronous data.
You can create a separate component to display the data fetched from the database. The returned data is in the Home.tsx, so we will pass the data to the Books.tsx component as props.
In Books.tsx:
import { useState } from "react";
import { book } from "../types/book.type";
import { useMutation } from "convex/react";
import { api } from "../../convex/_generated/api";
import { Id } from "../../convex/_generated/dataModel";
import "../styles/book.css";
export const Books = ({ books }: { books: book[] }) => {
  const [update, setUpdate] = useState(false);
  const [id, setId] = useState("");
  const deleteBooks = useMutation(api.queries.deleteBooks);
  const updateStatus = useMutation(api.queries.updateStatus);
  const handleClick = (id: string) => {
    setId(id);
    setUpdate(!update);
  };
  const handleDelete = (id: string) => {
    deleteBooks({ id: id as Id<"books"> })
      .then((mess) => console.log(mess))
      .catch((err) => console.log(err));
  };
  const handleUpdate = (e: React.FormEvent<HTMLFormElement>, id: string) => {
    e.preventDefault();
    const formdata = new FormData(e.currentTarget);
    const isCompleted: boolean =
      (formdata.get("completed") as string) === "true";
    updateStatus({ id: id as Id<"books">, isCompleted })
      .then((mess) => console.log(mess))
      .catch((err) => console.log(err));
    setUpdate(false);
  };
  return (
    <div>
      {books.map((data: book, index: number) => {
        return (
          <div
            key={data._id}
            className={`book-container ${data.isCompleted ? "completed" : "not-completed"}`}
          >
            <h3>Book no: {index + 1}</h3>
            <p>Book title: {data.title}</p>
            <p>Book Author: {data.author}</p>
            <p>
              Completed Status:{" "}
              {data.isCompleted ? "Completed" : "Not Completed"}
            </p>
            <button onClick={() => handleClick(data._id)}>Update</button>
            {id === data._id && update && (
              <>
                <form onSubmit={(e) => handleUpdate(e, data._id)}>
                  <select name="completed">
                    <option value="true">Completed</option>
                    <option value="false">Not Completed</option>
                  </select>
                  <input type="submit" />
                </form>
              </>
            )}
            <button onClick={() => handleDelete(data._id)}>delete</button>
          </div>
        );
      })}
    </div>
  );
};
In the Books.jsx component, you can display data from the database and handle the functionality for updating and deleting records.
Let’s walk through each of these features step by step.
How to Display the Data
You can get the data passed as a prop in the Home.tsx component. If you are using TypeScript, I have defined a type for the object that is returned from the query. You can ignore this if you are using JavaScript.
Create `books.types.ts:
export type book = {
    _id: string,
    title: string,
    author: string,
    isCompleted: boolean
}
You can use the map function to display the data.
import { useState } from "react";
import { book } from "../types/book.type";
import { useMutation } from "convex/react";
import { api } from "../../convex/_generated/api";
import { Id } from "../../convex/_generated/dataModel";
import "../styles/book.css";
export const Books = ({ books }: { books: book[] }) => {
  const [update, setUpdate] = useState(false);
  return (
    <div>
      {books.map((data: book, index: number) => {
        return (
          <div
            key={data._id}
            className={`book-container ${data.isCompleted ? "completed" : "not-completed"}`}
          >
            <h3>Book no: {index + 1}</h3>
            <p>Book title: {data.title}</p>
            <p>Book Author: {data.author}</p>
            <p>
              Completed Status:{" "}
              {data.isCompleted ? "Completed" : "Not Completed"}
            </p>
            <button onClick={() => handleClick(data._id)}>Update</button>
            {id === data._id && update && (
              <>
                <form onSubmit={(e) => handleUpdate(e, data._id)}>
                  <select name="completed">
                    <option value="true">Completed</option>
                    <option value="false">Not Completed</option>
                  </select>
                  <input type="submit" />
                </form>
              </>
            )}
            <button onClick={() => handleDelete(data._id)}>delete</button>
          </div>
        );
      })}
    </div>
  );
};
This is the basic structure. We displayed the title, author, and status, along with an update and delete button.
Now, let’s add the functionalities.
import { useState } from "react";
import { book } from "../types/book.type";
import { useMutation } from "convex/react";
import { api } from "../../convex/_generated/api";
import { Id } from "../../convex/_generated/dataModel";
import "../styles/book.css";
export const Books = ({ books }: { books: book[] }) => {
  const [update, setUpdate] = useState(false);
  const [id, setId] = useState("");
  const deleteBooks = useMutation(api.queries.deleteBooks);
  const updateStatus = useMutation(api.queries.updateStatus);
  const handleClick = (id: string) => {
    setId(id);
    setUpdate(!update);
  };
  const handleDelete = (id: string) => {
    deleteBooks({ id: id as Id<"books"> })
      .then((mess) => console.log(mess))
      .catch((err) => console.log(err));
  };
  const handleUpdate = (e: React.FormEvent<HTMLFormElement>, id: string) => {
    e.preventDefault();
    const formdata = new FormData(e.currentTarget);
    const isCompleted: boolean =
      (formdata.get("completed") as string) === "true";
    updateStatus({ id: id as Id<"books">, isCompleted })
      .then((mess) => console.log(mess))
      .catch((err) => console.log(err));
    setUpdate(false);
  };
  return (
    <div>
      {books.map((data: book, index: number) => {
        return (
          <div
            key={data._id}
            className={`book-container ${data.isCompleted ? "completed" : "not-completed"}`}
          >
            <h3>Book no: {index + 1}</h3>
            <p>Book title: {data.title}</p>
            <p>Book Author: {data.author}</p>
            <p>
              Completed Status:{" "}
              {data.isCompleted ? "Completed" : "Not Completed"}
            </p>
            <button onClick={() => handleClick(data._id)}>Update</button>
            {id === data._id && update && (
              <>
                <form onSubmit={(e) => handleUpdate(e, data._id)}>
                  <select name="completed">
                    <option value="true">Completed</option>
                    <option value="false">Not Completed</option>
                  </select>
                  <input type="submit" />
                </form>
              </>
            )}
            <button onClick={() => handleDelete(data._id)}>delete</button>
          </div>
        );
      })}
    </div>
  );
};
This is the entire component code. Let me explain what we did.
First, we need to toggle the update, so we defined the handleClick function, and passed a document ID to it.
//handleClick
 const handleClick = (id: string) => {
    setId(id);
    setUpdate(!update);
  };
In the handleClick you can update the ID state and toggle the update state so that it will toggle the update input when clicked, and on another click, it will close.
Next, we have handleUpdate. We need the document ID to update the data, so we passed the event object as well as the document ID. To get the input, we can use FormData.
const updateStatus = useMutation(api.queries.updateStatus);
const handleUpdate = (e: React.FormEvent<HTMLFormElement>, id: string) => {
    e.preventDefault();
    const formdata = new FormData(e.currentTarget);
    const isCompleted: boolean =
      (formdata.get("completed") as string) === "true";
    updateStatus({ id: id as Id<"books">, isCompleted })
      .then((mess) => console.log(mess))
      .catch((err) => console.log(err));
    setUpdate(false);
  };
We need to use the useMutation to get the updateStatus function. Pass the ID and the completed status to the function, and handle the asynchronous part using .then
For the delete function, the document ID is enough. Just like the previous one, call the delete function using the useMutation and pass the ID to it.
Then pass the document ID and handle the promise.
const deleteBooks = useMutation(api.queries.deleteBooks);
const handleDelete = (id: string) => {
    deleteBooks({ id: id as Id<"books"> })
      .then((mess) => console.log(mess))
      .catch((err) => console.log(err));
 };
Styling
Finally, what’s left is to add some styling. I added some basic styling. If the book has not been completed, it will be in red, and if the book has been completed, it will be in green.
Here’s the screenshot:
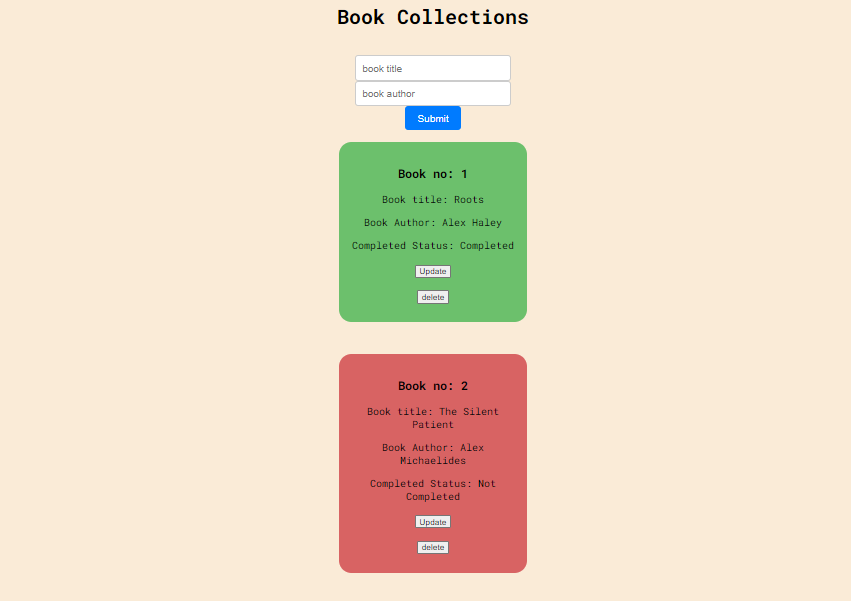
This is it guys!!
You can check my repository for the full code: convex-curd
Summary
In this article, we implemented the CRUD (Create, Read, Update, and Delete) operations by building a book collections app. We begin by setting up Convex and React, and writing CRUD logic.
This tutorial covered both the frontend and the backend, demonstrating how to build a serverless application.
You can find the full code here: convex-curd
If there are any mistakes or any doubt contact me on LinkedIn, Instagram.
Thank you for reading!