
Angular is a famous framework for building robust and complex enterprise applications. It is widely used by large companies. Therefore, having the skills to build a performant application using Angular is one of the top skills for a developer..
Angular's rise to fame can be attributed to a special feature called reactivity. Reactivity is the ability of the framework to change the user interface (UI) when underlying data or state of the application changes.
This change can be due to asynchronous events like getting response from an API call, or from a user action such as clicking a button. To achieve this reactivity, Angular deploys a mechanism called change detection. Reactivity is a double-edged sword though, and can often lead to performance issues due to unwanted updates to UI.
Angular recently released a new feature called signals, which allows developers to improve the performance of existing applications built with Angular, as well build new applications which have significant performance gains over traditional Angular applications.
Signals give you control over change detection, and prevent unwanted updates to UI. It can be very tricky to transform existing applications to use signals, and this tutorial aims to guide you on getting started with it. In this tutorial, an existing Angular application, which was built traditionally, will be transformed step by step to use signals.
Table of Contents
Prerequisites
How to Run an Existing Application
Understanding the Existing Application Code
How to Transform the Application to Use Angular Signals
Conclusion
Prerequisites
To follow this tutorial you must meet below prerequisites:
Have an understanding of JavaScript, TypeScript and the Angular framework.
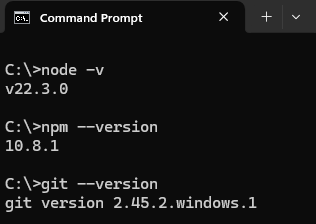
Node.js and NPM installed on your machine. You can verify this using these commands:
node -vandnpm --version.Git installed on your machine. You can verify this using
git --version.A code editor installed on your machine. This tutorial has been developed using Visual Studio Code, but any code editor should work.
How to Run an Existing Application
We'll transform an existing application using Angular signal. The application is a timesheet management application in which a team lead/shift manager can see the number of hours each employee has worked each week, as well as team total hours.
The team lead can also update the hours of an employee as well. Follow the steps below to clone and run the application locally on your machine:
Clone the application using the GitHub URL - https://github.com/anujkumartech/emp-time-tracker-1.git. You can use terminal or clone it directly inside your editor.
After cloning the app, open a new terminal if not already opened and go to the application folder using
cd emp-time-tracker-1.Once you are inside the application folder, install the project dependencies using
npm install.
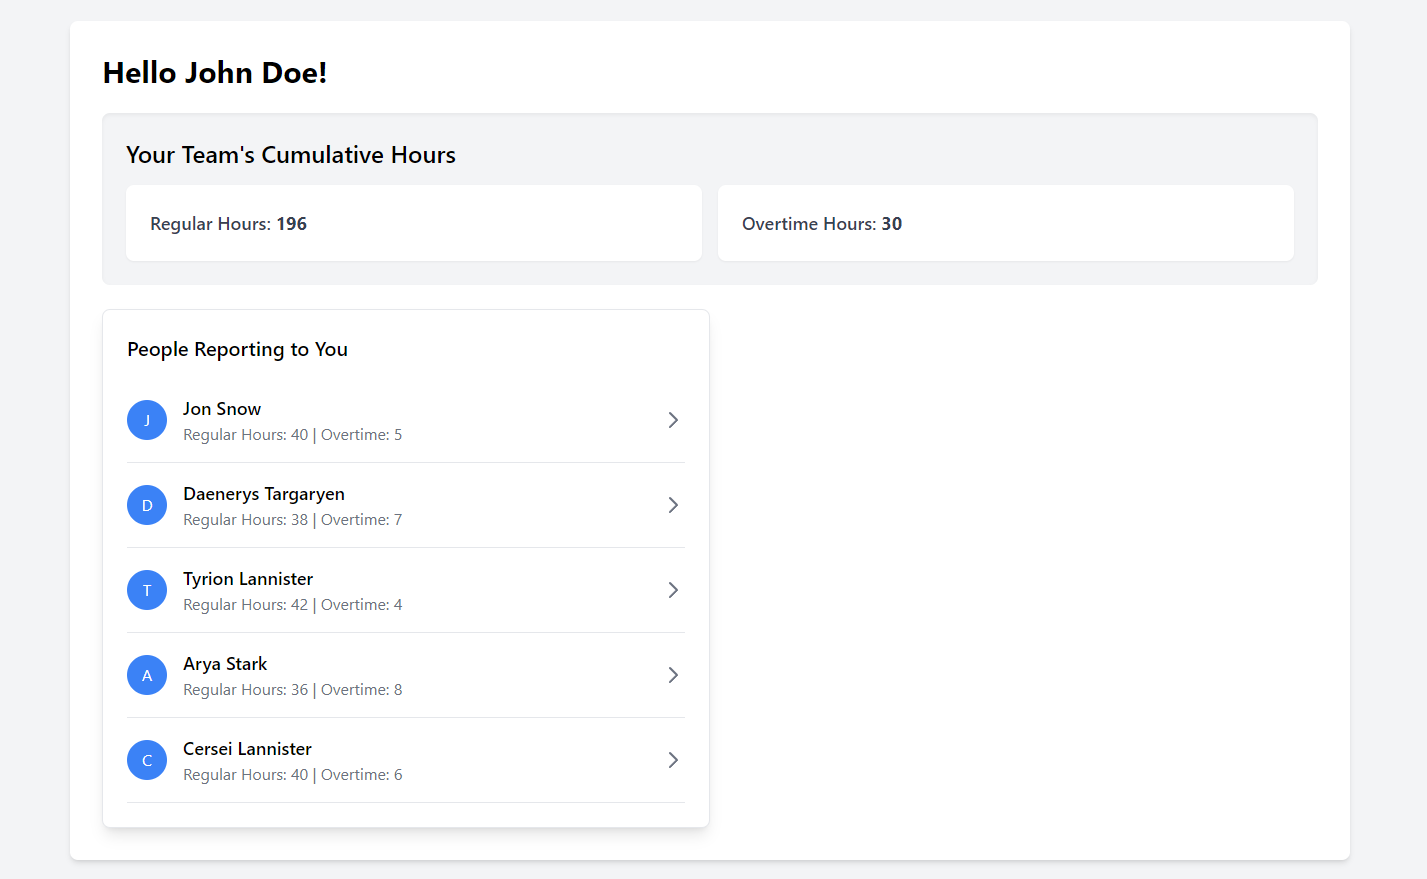
After dependencies have been installed, open the application using npm start. Once the application has started, navigate to http://localhost:4200/ and you should see the below page rendered.
Understanding the Existing Application Code
It is very important to understand the code and component architecture which renders the application. Open the application in your code editor by navigating to src -> app. You should see a structure like this.
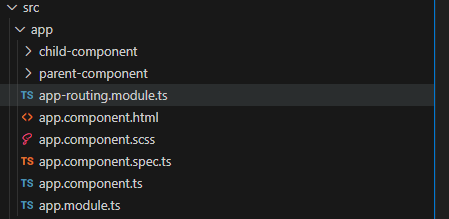
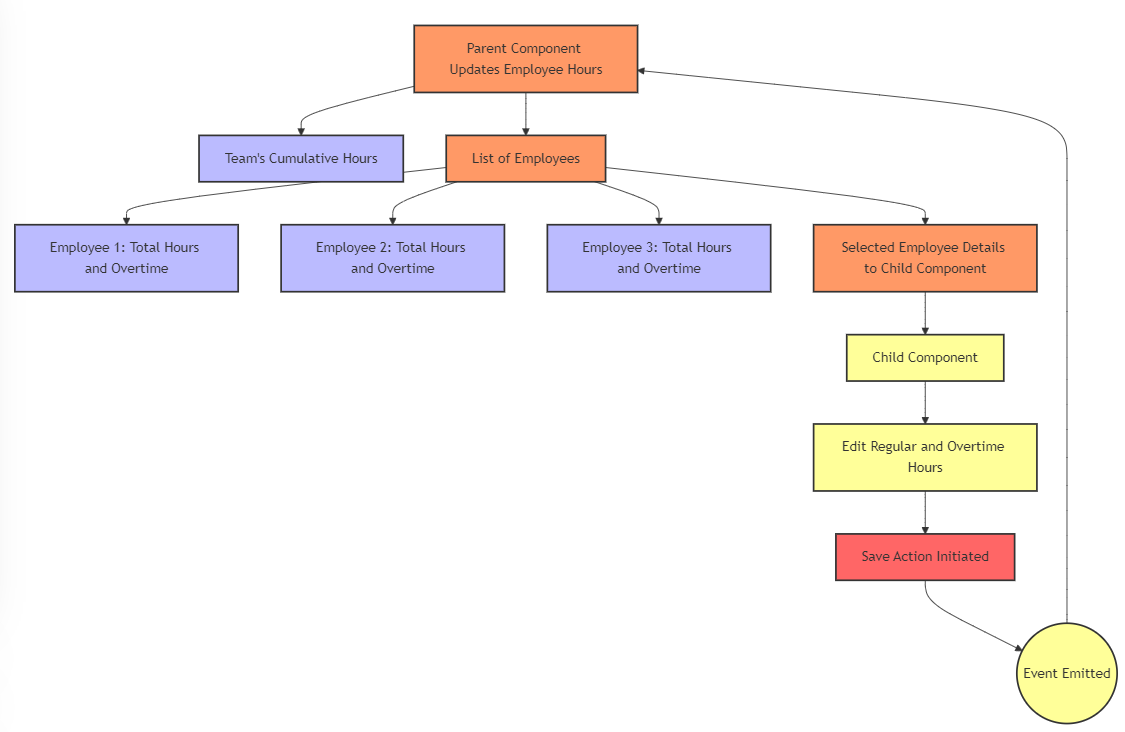
This application has two main components, the parent component and the child component. The parent component displays the team’s cumulative hours as well a list of employees reporting to the team lead and each employee’s total hours and overtime hours. The parent component has necessary code to render the list as well calculate cumulative team hours from this list. Moreover, the parent component also provides the details of the selected employee to the child component.
The child component receives the selected employee details as its input and allows editing the regular as well overtime hours. Once the team lead is satisfied, a save action is initiated. The save action emits an event from the child component back to the parent component. Parent component acts on this event and does necessary updates to hours of the selected employee. This update triggers recalculation of cumulative hours.
Please go through the code in the editor as well, and pay special attention to code inside files parent-component.ts and child-component.ts. In the next section you will transform both of these components to use the new feature Angular Signals.
The transformation of the code can begin with parent component code. Change the managerName variable to use signals. This highlights how a new signal variable can be created. A signal can be initiated with the signal keyword and option type definition along with initial value for the signal. Code below showcases how a new signal called managerName which has a type of string can be initiated with the initial value of John Doe.
// parent-component.ts
managerName = signal<string>('John Doe');
You would observe rendering issues once you update managerName in the component file to use the signal. This is because, to read a signal value, it needs to be executed. Update the component HTML code to below to read the value of the signal properly.
<!-- parent-component.html -->
<h1 class="text-3xl font-bold mb-6">Hello {{managerName()}}!</h1>
List of employees inside parent component is a simple array, transform it to signal as well.
// parent-component.ts
 employees = signal<Employee[]>([
    {
      id: 1,
      name: 'Jon Snow',
      regularHours: 40,
      overtimeHours: 5
    },
    ...restOfEmployees
    }
  ])
As soon as the employee array is transformed to a signal, the parent component will observe several errors. For the moment, comment out the code inside getTeamRegularHoursTotal, getTeamOvertimeHoursTotal and employeeChange methods as highlighted in the illustration given below.
  // parent-component.ts
  getTeamRegularHoursTotal() {
    let total = 0;
    // this.employees.forEach(employee => total += employee.regularHours);
    return total;
  }
  getTeamOvertimeHoursTotal() {
    let total = 0;
    // this.employees.forEach(employee => total += employee.overtimeHours);
    return total;
  }
  employeeChange(updatedEmployee: Employee | null) {
    // if (updatedEmployee) {
    //   const index = this.employees.findIndex(emp => emp.id === updatedEmployee.id);
    //   if (index !== -1) {
    //     this.employees[index] = updatedEmployee;
    //   }
    // }
    // this.selectedEmployee = null;
  }
To render the application again, update the parent component template HTML and execute employee signal as per the code given below.
<!-- parent-component.html -->
<div class="flex items-center py-4 space-x-4 group border-b cursor-pointer hover:bg-gray-50" *ngFor="let employee of employees()" (click)="selectEmployee(employee)">
It's time to transform logic to calculate the value of regular hours which are showing as zero currently. This leads to examination of another important type of signal known as "computed".
Computed signals, as the name implies, rely on other signals for their value. Their value updates as soon as underlying signals change, without the need of any additional code to handle the change.
Create a computed signal teamRegularHoursTotal as shown in the code below, which depends on the employees signal directly. Thus, whenever an employees signal changes, the value of teamRegularHoursTotal gets updated automatically.
Define the computed signal as shown in the code below, and ensure the computed dependency is imported from Angular's core package. Also, remove or comment out method getTeamRegularHoursTotal completely.
// parent-component.ts
 teamRegularHoursTotal = computed(() => {
    let total = 0;
    this.employees().forEach(employee => total += employee.regularHours);
    return total;
  })
Update the HTML template of the parent component to reflect this change and show total hours value.
<!-- parent-component.html -->
<p class="text-lg font-medium text-gray-700">Regular Hours: <span class="font-bold">
{{teamRegularHoursTotal() }}</span></p>
Similarly, overtime hours can be transformed to a computed signal as well. Refer to the code below to update both the component code and its HTML template. Also, comment out or remove the getTeamOvertimeHoursTotal method completely.
// parent-component.ts
 teamOvertimeHoursTotal = computed(() => {
    let total = 0;
    this.employees().forEach(employee => total += employee.overtimeHours);
    return total;
  })
<!-- parent-component.html -->
<p class="text-lg font-medium text-gray-700">Overtime Hours: <span class="font-bold">
{{teamOvertimeHoursTotal() }}</span></p>
It is time to convert the selectedEmployee variable in the parent component to a signal. Transform it using the code below:
// parent-component.ts
selectedEmployee = signal<Employee | null>(null);
As soon as this change is made, the selectEmployee method in the parent component will have errors. These errors are a great opening to an important topic: changing values of a signal. Angular signals can be updated using the set or update API from signals.
As the name implies, the set method assigns a new value to a signal, and the update method updates the value of a signal. Use the set method to change the selectedEmployee signal value. You'll be seeing update method in the action soon.
// parent-component.ts
selectEmployee(employee: Employee): void {
    this.selectedEmployee.set(employee);
}
Along with this change, the parent component’s template needs to be updated. Update the code containing the child component as shown in the code below.
After this change, verify that the application is rendering properly and you are able to select an employee and see the details on the screen. This is important as because we'll be taking this signal transformation journey to the child component.
<!-- parent-component.html -->
<section class="w-full md:w-1/2 bg-white p-6 rounded-lg shadow-lg border border-gray-200 order-1 md:order-2 mb-4 md:mb-0"
      *ngIf="selectedEmployee() !== null">
    <app-child-component [employee]="selectedEmployee()" (employeeChange)="employeeChange($event)"></app-child-component>
</section>
The child component receives the value of the selected employee through its input, which is currently defined using the @Input decorator. This can be transformed using a signal conveniently known as input. Change the employee variable to be of type input as shown in the code below. Comment out the code shown in saveChanges and resetForm method as highlighted.
// child-component.ts
employee  = input<Employee | null>();
saveChanges() {
    // this.employee.regularHours = this.editedRegularHours;
    // this.employee.overtimeHours = this.editedOvertimeHours;
    // this.employeeChange.emit(this.employee);
}
private resetForm() {
    // this.editedRegularHours = this.employee.regularHours;
    // this.editedOvertimeHours = this.employee.overtimeHours;
}
The form inside the child component displays selected employee’s regular hours and overtime hours using two model variables: editedRegularHours and editedOvertimeHours.
These variables are no longer necessary and the inputs inside the form of the child components can be updated to use the signal’s value directly.
<!-- child-component.html -->
<input
     type="number"
     id="regularHours"
     [ngModel]="editedRegularHours"
     (ngModelChange)="onRegularHoursChange($event)"
      class="shadow appearance-none border rounded w-full py-2 px-3 text-gray-700 leading-tight focus:outline-none focus:shadow-outline"
 />
 <input
      type="number"
      id="overtimeHours"
      [ngModel]="editedOvertimeHours"
      (ngModelChange)="onOvertimeHoursChange($event)"
      class="shadow appearance-none border rounded w-full py-2 px-3 text-gray-700 leading-tight focus:outline-none focus:shadow-outline"
  />
The logic to capture updated values for regular and overtime hours can be transformed as well. Ideally, updating the code below should work but you will get an error as highlighted below.
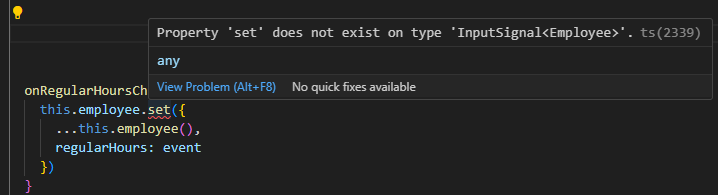
The reason behind the error is that the input type signal can not be mutated with set and update methods. Angular provides a different kind of signal known as model to have input to components which can be mutated within the component itself. Change the employee to type model as seen below.
// child-component.ts
employee = model<Employee | null>();
Update the overtime update method as shown in the code below. With this, the child component regains the ability to update regular and overtime hours values of the received employee from the parent component.
// child-component.ts
  onOvertimeHoursChange(event: number) {
    this.employee.set({
      ...this.employee(),
      overtimeHours: event
    })
  }
Currently, the child component is communicating back the changes to the parent component using the @Output decorator. Similar to the input and the model, Angular has a signal of type output to enable two way communication between child and parent components. Update employeeChange event to output type as seen below.
// child-component.ts
employeeChange = output<Employee | null>();
Update the saveChanges method and emit an updated employee object.
// child-component.ts
 saveChanges() {
    this.employeeChange.emit(this.employee());
 }
For the final step in the child component update the resetForm and cancelChanges methods to reflect the changes made as shown in the code below.
// child-component.ts
cancelChanges() {
    this.employeeChange.emit(null);
 }
resetForm() {
    this.employee.set(null);
}
Moving back to the parent component now, it is important to make changes to the template to ensure smooth communication between both components.
The employee input in the child component has changed to a model type input. A model has two ways of data binding. Make updates to the code as seen below to use banana in the box (special syntax [( )], which is a shorthand for two-way data binding) notation for the input.
<!-- parent-component.html -->
<section class="w-full md:w-1/2 bg-white p-6 rounded-lg shadow-lg border border-gray-200 order-1 md:order-2 mb-4 md:mb-0"
    *ngIf="selectedEmployee() !== null">
    <app-child-component [(employee)]="selectedEmployee" (employeeChange)="employeeChange($event)"></app-child-component>
</section>
It’s time to update the employeeChange method in the parent component so that updated hour values of the selected employee can be reflected back to the screen.
To achieve this, another key method used for mutating values can be leveraged. This is the update method, which takes in a function as argument instead of full value. The function passes the current value of the signal as the first parameter and returns the updated value of the signal.
Refer to the updated code for the employeeChange method as seen below to understand this better.
// parent-component.ts
employeeChange() {
    if (this.selectedEmployee()) {
      this.employees.update(employees => employees.map(employee => {
        if (employee.id === this.selectedEmployee().id) {
          employee.regularHours = this.selectedEmployee().regularHours;
          employee.overtimeHours = this.selectedEmployee().overtimeHours;
        }
        return employee;
      }))
    }
    this.selectedEmployee.set(null);
  }
With this change the entire transformation of the app to use signals is complete. Ensure all loads properly and all the functionality are working as expected as well.
Conclusion
Congratulations on completing this tutorial. During this journey, you have created regular a signal and updated its value using set and update methods.
You also learned how computed signals are defined and utilized. Additionally you have enabled communication between two components using input, model and output signals.
If you encounter any issues during this transformation journey, you can check the code in the feature/signals branch of the same repo you had cloned earlier. It is recommended that you follow along instead of copying the solution from this feature branch.
Once you feel confident about the signal types discussed above, continue your learnings by exploring RxJS Interop from the Angular team to manage your signal integration with RxJS observables.