This project demonstrates a custom jitter shader inspired by the visual style of PS1-era games. The shader replicates the nostalgic ‘jitter’ effect, adding a retro aesthetic to 3D models—perfect for developers looking to add a retro feel to low-poly projects.
I’ve always found PS1 games fascinating. Inspired by their nostalgic 3D environments, I decided to create a portfolio that captures this retro aesthetic. However, while developing the components, I noticed a scarcity of resources for web developers aiming to recreate this style. It’s time to bring a touch of nostalgia to the modern web.
A bit of background: The PS1 jitter effect results from the console’s limited precision in vertex calculations, leading to the characteristic “wobbling” of polygons. This was a byproduct of its fixed-point arithmetic and lack of sub-pixel accuracy, which, although seen as a limitation at the time, has now become a cherished visual quirk. This is especially interesting for Indie games and digital art that aim to evoke nostalgia or explore lo-fi visuals.
Here’s a video from the demo:
The Setup
Firstly, we create our stage.
import { Canvas } from "@react-three/fiber";
<Canvas
dpr={1}
camera={{ fov: 30, position: [0, 1, 3.5] }}
shadows // Enable shadows
>
	<ambientLight intensity={3} />
	<directionalLight position={[0, 1, 0.5]} intensity={3} castShadow />
</Canvas>
Next, we need to create a custom shader material based on the MeshStandardMaterial. The key here is ensuring it works with model animations and properly handles shadows.
The most important step is to adjust the default shader code using onBeforeCompile before compiling the shader.
In this modification process on the Vertex Shader, the X and Y coordinates of each vertex are scaled by uJitterLevel and rounded (using floor) on a specific grid. This creates the PS1-style jitter effect. Scaling the X and Y coordinates by uJitterLevel and applying floor() simulates the jitter effect by snapping vertex positions to a grid.
With the code we added in the Fragment Shader, we make the colors appear a bit more pale. Rendered colors can sometimes be too bright, so this can be useful when adjusting the shadow settings. Reducing color brightness with diffuseColor.rgb *= 0.8; is essential for achieving a more authentic retro look, as it helps mimic the limited color palette and lighting of older consoles. Additionally, the color settings can be expanded further if needed.
const createCustomMaterial = (color, jitterLevel, texture) => {
  return new THREE.MeshStandardMaterial({
    color,
    map: texture || null,
    onBeforeCompile: (shader) => {
      shader.uniforms.uJitterLevel = { value: jitterLevel };
      shader.vertexShader = `
        uniform float uJitterLevel;
        ${shader.vertexShader}
      `.replace(
        `#include <project_vertex>`,
        `
          vec4 mvPosition = modelViewMatrix * vec4( transformed, 1.0 );
          gl_Position = projectionMatrix * mvPosition;
          gl_Position.xy /= gl_Position.w;
          gl_Position.xy = floor(gl_Position.xy * uJitterLevel) / uJitterLevel * gl_Position.w;
        `
      );
      shader.fragmentShader = shader.fragmentShader.replace(
        `vec4 diffuseColor = vec4( diffuse, opacity );`,
        `
         vec4 diffuseColor = vec4( diffuse, opacity );
         diffuseColor.rgb *= 0.8; // Little darker colors
        `
      );
    },
  });
};
Importing the model with textures
We need to select a model and export its textures. We will process these textures through the shader. The easiest option for exporting textures from the model is the glTF Report tool.
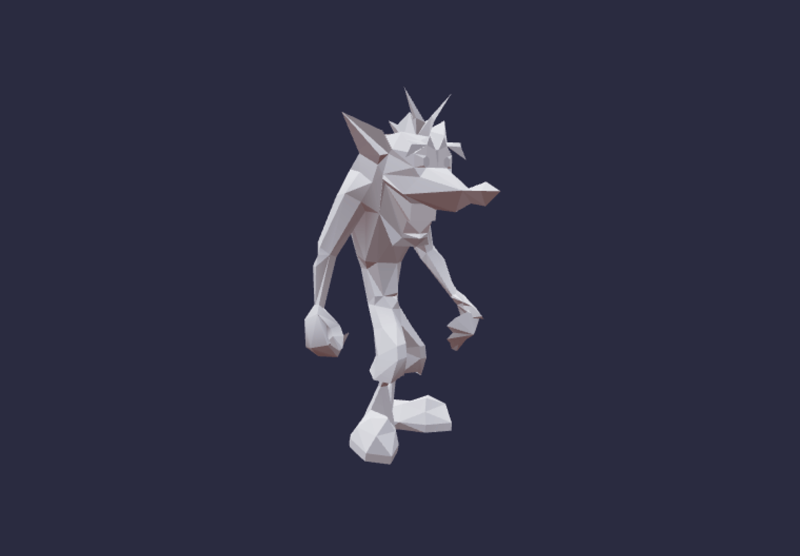
The Crash Bandicoot model I chose for this demo consists of several parts. This is particularly relevant because the models I used in my portfolio also consisted of separate parts for various reasons, requiring different solutions.
After making the model compatible with React Three Fiber using the gltfjsx tool, we can see that the model uses skinnedMesh because it contains animations.
<skinnedMesh
name="Material2"
geometry={nodes.Material2.geometry}
material={materials['CrashBack.003']}
skeleton={nodes.Material2.skeleton}
          />
<skinnedMesh
name="Material2001"
geometry={nodes.Material2001.geometry}
material={materials['material_1.003']}
skeleton={nodes.Material2001.skeleton}
          />
<skinnedMesh
name="Material2002"
geometry={nodes.Material2002.geometry}
material={materials['CrashShoes.003']}
skeleton={nodes.Material2002.skeleton}
          />
<skinnedMesh
name="Material2003"
geometry={nodes.Material2003.geometry}
material={materials['material.003']}
skeleton={nodes.Material2003.skeleton}
          />
After exporting the three texture images from the model using glTF.report, I removed the model’s textures. Although textures do not significantly affect this model, some textures may be large in size. This optimization helps to avoid processing the textures twice. You can delete the textures using the glTF Report tool.
For skinnedMesh materials, we’ll now apply the custom shader function we discussed earlier. This allows us to incorporate the textures we exported from the model.
If you are working on a simple model with a single texture, it does not need to be created separately. After that, we place our materials in the skinnedMesh.
const [crashTextureOne, crashTextureTwo, crashTextureThree] = useTexture([
    "/textures/texture.png",
    "/textures/texture-1.png",
    "/textures/texture-2.png",
  ]);
  const crashMaterials = useMemo(() => {
    const baseColor = "#ffffff";
    const materials = [
      createCustomMaterial(
        baseColor,
        jitterLevel,
        enableTexture ? crashTextureOne : null
      ),
      createCustomMaterial(
        baseColor,
        jitterLevel,
        enableTexture ? crashTextureTwo : null
      ),
      createCustomMaterial(
        baseColor,
        jitterLevel,
        enableTexture ? crashTextureThree : null
      ),
      createCustomMaterial(baseColor, jitterLevel)
    ];
    return materials;
  }, [
    jitterLevel,
    enableTexture,
  ]);
By following these steps, we’ve successfully integrated a custom jitter shader into our 3D model, achieving the nostalgic aesthetic of PS1-era games!
Thank you for reading!
Credits
- Crash Bandicoot Low Poly model by smitty462_