Over one billion people worldwide live with some form of disability. That is about 16% of the global population. Now, imagine how many of these individuals might be trying to access your website. Would they navigate easily through your site, or would they encounter barriers that might drive them away?
A web accessibility audit helps you identify and fix issues that prevent users from interacting with your website effectively. In this guide, you’ll learn how to perform a web accessibility audit and improve your site’s usability.
Table of Contents
What is Web Accessibility?
What is a Web Accessibility Audit?
What to Do Before the Audit
How to Audit Your Website
What to Do After the Audit
Accessibility is an Ongoing Process
What is Web Accessibility?
Web accessibility means that websites and web applications are designed and developed so that people with disabilities can use them. This includes individuals with visual, auditory, motor, cognitive, and neurological disabilities. An accessible website provides a better user experience for all users, regardless of their abilities.
A web accessibility audit is the process of evaluating a website or web application to determine how easily people with disabilities can use it. This evaluation is done against established standards set by the World Wide Web Consortium (W3C). These standards, known as the Web Content Accessibility Guidelines (WCAG), provide the criteria for evaluating a website's accessibility.
An accessibility audit helps you identify barriers that prevent people with disabilities from fully using or interacting with your site. By the end of the audit, you’ll have a comprehensive report that details the issues found and actionable steps to improve your site's accessibility.
What to Do Before the Audit
Before diving into the actual audit, there are a few preparatory steps you need to take to set the foundation for a thorough and organized accessibility review. Here's what you need to do:
1. Familiarize Yourself with Accessibility Guidelines
The first step in any accessibility audit is understanding the rules you're auditing against. Familiarizing yourself with these guidelines will help you understand what to look for and what kind of changes might be necessary to improve your site's accessibility.
The Web Content Accessibility Guidelines (WCAG) provide detailed recommendations on how to make websites more accessible to people with disabilities. It is versioned, with the WCAG 2.2 being the most updated version. The guidelines are divided into three levels of conformance:
Level A: The minimum requirements for accessibility.
Level AA: Addresses more common barriers for disabled users.
Level AAA: The highest and most rigorous level of accessibility.
For a start, you should aim for Level AA compliance.
2. Define the Goal of Your Audit
Why are you doing the audit in the first place, and what do you hope to achieve? You goal could be to:
Know where you are in terms of accessibility.
Generate a voluntary product accessibility template (VPAT).
Identify what issues need to be remediated.
Your goal will determine what approach you take to perform the audit.
3. Define the Scope of Your Audit
Next, decide what parts of your website you’ll be auditing. While it's ideal to audit the entire site, this might not always be feasible due to time or resource constraints. In that case, focus on key pages and features that are critical for user interaction.
4. Gather Your Tools
To conduct a thorough web accessibility audit, you'll need a combination of automated and manual testing tools.
For automated testing, some popular tools include:
WAVE
Axe DevTools
Lighthouse
Color contrast analyzers
For manual testing, you'll need:
A keyboard (to test keyboard navigation).
Screen readers like JAWS, NVDA, or VoiceOver.
Different browsers to check compatibility.
Ideally, a group of test participants, especially individuals with disabilities, to provide real-world feedback.
5. Create an Accessibility Checklist
Based on the WCAG guidelines, create a checklist of specific items to verify during your audit. This checklist will serve as your roadmap, ensuring that you don’t miss any critical components.
Having a checklist based on WCAG standards ensures consistency in your audit and gives you clear, actionable steps to follow. It also allows you to track your progress and document issues for later review.
How to Audit Your Website
Now it’s time to conduct the actual audit. A good approach is to start with a quick test using an automated tool, followed by a thorough manual review to catch issues that automation might miss.
Step 1: Run an Automated Scan
For the automated scan, you can use WAVE, axe DevTools, Lighthouse, or a combination of these for a more comprehensive assessment. Use multiple tools to catch a broader range of accessibility issues and provide a more well-rounded analysis.
Using WAVE
Go to wave.webaim.org.
Enter the URL of the website you want to check.
Alternatively,
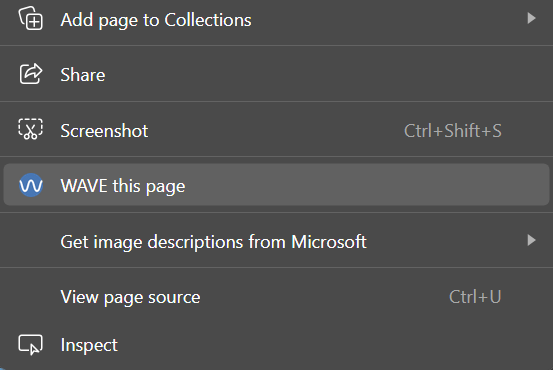
Install the WAVE browser extension.
Go to the page you want to audit.
Right-click on the page to open the context menu.
Click “WAVE this page” to scan your page.
WAVE will generate a report showing:
Errors (red icons)
Alerts (yellow icons)
Features (green icons)
Structural elements (blue icons)
HTML5 and ARIA elements (purple icons)
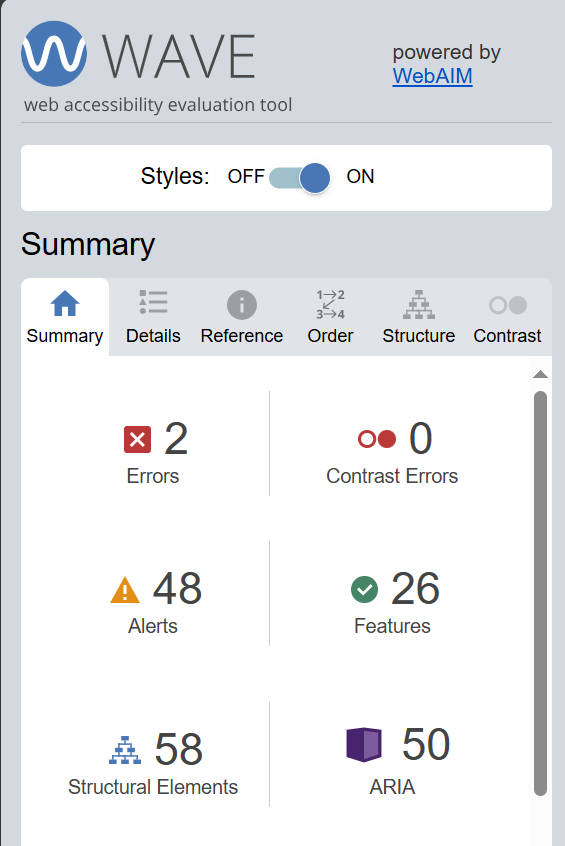
Click on each icon to get more information about the issue or feature.
Using axe DevTools
Install the axe DevTools extension for your browser.
Navigate to the web page you want to test.
Open your browser DevTools (F12 or Cmd+Option+I)
Go to the "axe DevTools" tab.
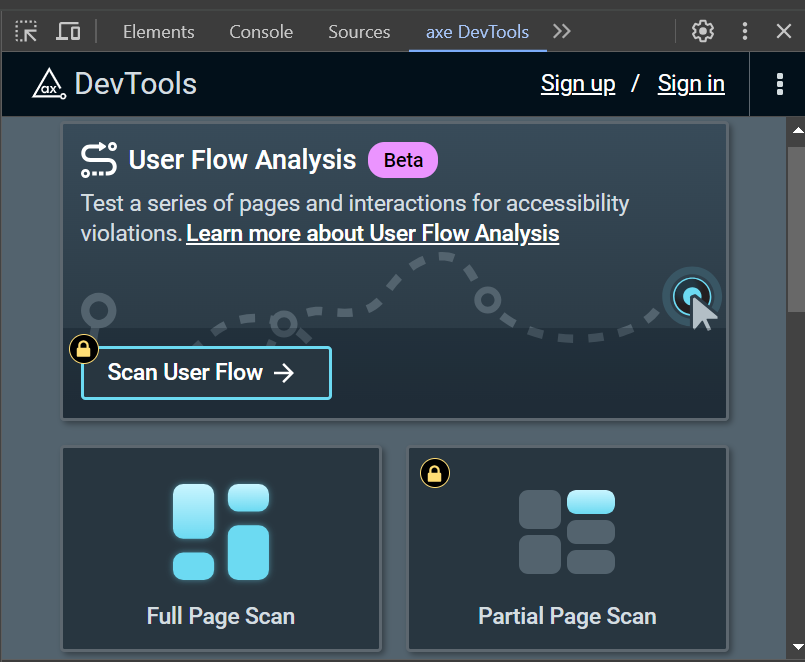
Click "Full Page Scan" to start the accessibility check.
Review the results. They are categorized by severity (Critical, Serious, Moderate, Minor).
Each issue includes details on:
What the problem is
Why it matters
How to fix it
Which WCAG success criteria it violates
Using Lighthouse
Open your browser DevTools (F12 or Cmd+Option+I).
Go to the "Lighthouse" tab.
Select "Accessibility" under "Categories" (you can select others too).
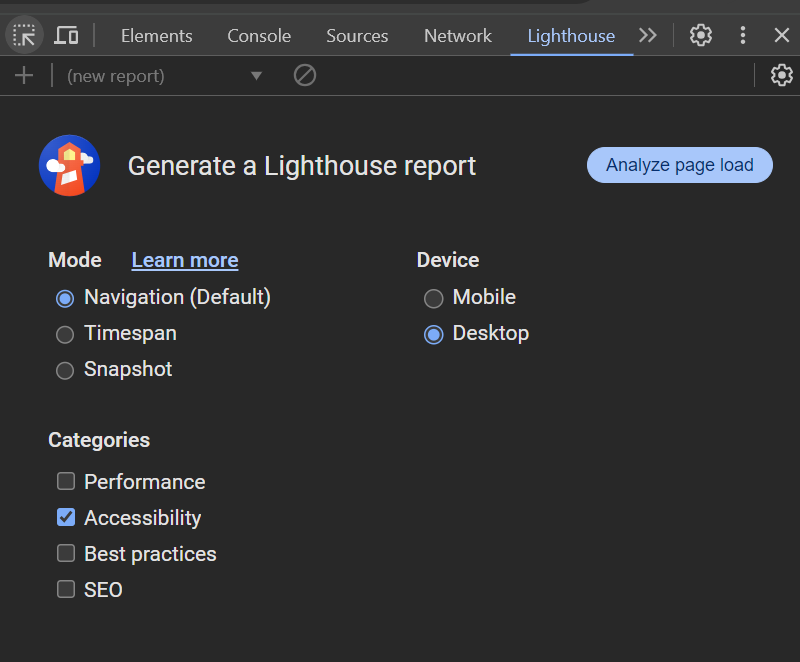
Click "Analyze page load".
Review the accessibility score and specific issues found.
Each issue links to more detailed explanations and how to fix them.
Step 2: Conduct a Manual Test
Manual testing complements automated tools by checking issues that can’t be automatically detected. It involves simulating how users with disabilities would interact with your website. Here are some key areas to focus on during manual testing:
1. Keyboard Navigation
Many users rely on a keyboard to navigate the web, either due to mobility impairments or because they use assistive technologies like screen readers. To test this:
Ensure all interactive elements (links, buttons, forms) can be accessed using the Tab key.
Use the Enter or Spacebar to activate elements.
Check for keyboard traps (places where a user can get stuck and can’t navigate out).
2. Screen Reader Compatibility
Screen readers convert on-screen content into speech or Braille. To test screen reader accessibility:
Install a screen reader like NVDA (for Windows) or VoiceOver (for macOS).
Navigate through the website using only the screen reader. Check whether the content is read in a logical order and all elements are properly labeled.
Pay attention to issues like missing or incorrect alt text for images, improper headings structure, and unlabeled buttons.
3. Text Alternatives
Check that non-text content such as images, videos, and icons have appropriate text alternatives. For example:
Images should have descriptive alt text that conveys their purpose or function.
Videos should include captions and transcripts to ensure accessibility for users with hearing impairments.
Step 3: Review Semantic HTML and ARIA Usage
Semantic elements like <header>, <nav>, <article>, and <footer> help screen readers understand the structure of a page. Accessible Rich Internet Applications (ARIA) attributes can be used to enhance accessibility for dynamic content. However, it’s important to use ARIA sparingly and only when necessary, as incorrect usage can lead to more problems.
Here are some best practices:
Use semantic HTML wherever possible before resorting to ARIA.
Ensure that ARIA roles, states, and properties are correctly implemented. Misusing ARIA can confuse users and screen readers.
Step 4: Document Issues
Once you’ve completed both automated and manual testing, it’s time to document the accessibility issues you’ve discovered. Categorize the issues by their severity:
Critical: Issues that block users from accessing essential features, such as non-functional navigation or forms.
Moderate: Issues that degrade the user experience, like poor color contrast.
Minor: Minor violations that don’t significantly impact the user experience but should still be addressed, such as misused ARIA attributes.
Use a spreadsheet or project management tool like GitHub Issues to document the issues. You could also use the WCAG-EM report tool developed by the W3C Web Accessibility Initiative (WAI).
In your report, be sure to include:
The page where the issue occurs.
A description of the problem.
WCAG success criteria it violates.
Suggestions for how to fix the issue.
What to Do After the Audit
You’re done with your audit. You now have a detailed accessibility report with issues that you’ve identified. What do you do next?
1. Implement and Test Fixes
The next step is to work with your development team to implement the fixes. Ideally, you should aim to resolve all identified issues. However, if you're working under time constraints, you may want to prioritize issues that are easier to fix but still have a significant impact on accessibility.
After making these changes, rerun your accessibility audits—both automated and manual—to verify that the issues have been successfully resolved.
2. Establish Accessibility Guidelines
Your accessibility efforts would go to waste if new developers on your team introduced accessibility issues to your website. To prevent this, create a comprehensive document outlining your accessibility standards. This document should detail the best practices your team will follow moving forward. This way, all future updates or changes maintain the accessibility improvements you've made.
Accessibility is an Ongoing Process
Performing a web accessibility audit is an important step toward making your website more inclusive. But does that mean your job is done, and you can sit back and relax? Not quite. Accessibility isn't a one-time task. It's an ongoing process.
As you add new features or content, you'll need to continuously test and improve your site to maintain accessibility standards. This doesn't just benefit users with disabilities, it enhances the overall user experience for everyone.
Consistently prioritizing accessibility leads to a more user-friendly, functional, and inclusive website.