What is Chrome’s window.ai?
With increasing sophistication in machine learning and AI technologies, Google has made it even easier to integrate AI capabilities directly into the browser for more sophisticated client-side functionality without relying as heavily on server-side processing and cloud-based ML/AI services.
The new window.ai API provides pre-trained models and ready-made APIs, allowing developers to focus on building product features and leave training and fine-tuning to Google’s ML specialists. What’s even more great about this API is that you don’t need prior ML experience to build AI features into your web applications.
In this article, we’ll cover how to integrate on-device AI capabilities into web applications using the new window.ai API, and we’ll explore the API’s limitations and future.
Before moving forward with this tutorial, you should have:
- Knowledge of JavaScript
- Experience building Vue.js applications
Overview of AI in web development
AI in web development has evolved from simple automation to advanced, intelligent systems that enhance both developer workflows and user experiences.
In the early 2000s, AI started making a significant impact when Google applied it to search engines to deliver better search results. Around the same time, ecommerce platforms began using AI-driven recommendation engines to suggest products based on user behavior.
The 2010s brought major advancements in machine learning, especially deep learning, which enabled AI to process images, text, and speech. This led to websites personalizing user content based on their preferences and behaviors, along with innovations like text-to-speech conversion and language translation.
During this period, chatbots powered by natural language processing (NLP) and machine learning also became popular, providing more interactive and responsive customer service on websites.
The 2020s have seen the rise of AI-powered platforms like Wix and Webflow, offering drag-and-drop interfaces that allow non-developers to create websites with minimal coding. Additionally, tools like GitHub Copilot now use AI to assist developers by auto-completing code, suggesting improvements, and even generating entire code snippets.
Understanding the window.ai API and how it interacts with AI models
At the time of writing this article, most AI-powered websites rely on on-server AI services (i.e., AI services running either on the cloud or large servers). Google’s window.ai API is the first on-device AI solution with AI models running in the Chrome browser and even offline.
window.ai interacts with AI models in the following ways.
Model loading and management: This is usually the first stage where the pre-trained AI models are loaded directly into the browser, either from a remote server or as npm packages. The window.ai API manages the models’ lifecycle, including loading, updating, and unloading.
Once a model is loaded, data inputs can be sent to the model via the API and the processed output will be returned. This process is usually asynchronous for the browser to remain responsive.
Prompt fine-tuning: In this stage, prompts are refined to get the most suitable results. Prompt fine-tuning is usually handled by the developer to implement features with specific AI needs.
Here are some example commands for interacting with the window.ai API.
The following snippet checks to see if text sessions are supported by the browser:
await window.ai.canCreateTextSession();
This snippet returns an object of default options for createTextSession:
const options = await window.ai.defaultTextSessionOptions();
This next snippet creates a session using the Gemini Nano model:
const session = await window.ai.createTextSession(options);
Note that the options arg is optional.
The following snippet destroys the session:
await session.destroy();
This command executes a prompt:
await session.prompt("Who is the president of USA?");
The following command executes the prompt and then returns a ReadableStream object:
await session.promptStreaming("What does NASA stand for?");
Setting up the window.ai API
To access the window.ai API, you need to download either Chrome Dev or Canary browser version 127 or higher. Once your browser is installed, ensure the following flags are set:
chrome://flags/#prompt-api-for-gemini-nano: Select Enabledchrome://flags/#optimization-guide-on-device-model: Select EnabledBypassPrefRequirementchrome://components: Find Optimization Guide On Device Model, then click its Check for Update button to download the model
N.B., if you don’t see Optimization Guide, ensure you correctly set the flags above. If you still don’t see Optimization Guide, run await window.ai.assistant.create(); in your browser console, then refresh the page.
Run the following code in your browser console to confirm if you can access the Gemini Nano model:
await window.ai.canCreateTextSession();
If the above code returns Readily, you can access the Gemini Nano model in your Chrome browser.
Now, you can create a session with the Gemini Nano model and execute a prompt with a few lines of code in your browser console:
const session = await window.ai.createTextSession();
await session.prompt("What is the capital of France?");
Building a demo AI chatbot
In this section, we’ll use the window.ai to build an AI chatbot that gives recommendations to proposed questions.
Run the following command in your terminal to scaffold a Vue single-page application on your local machine:
npm create vue@latest
Respond to the prompt as follows:
✔ Project name: … <your-project-name>
✔ Add TypeScript? … No
✔ Add JSX Support? … No
✔ Add Vue Router for Single Page Application development? … No
✔ Add Pinia for state management? … No
✔ Add Vitest for Unit testing? … No
✔ Add an End-to-End Testing Solution? … No
✔ Add ESLint for code quality? … Yes
✔ Add Prettier for code formatting? … No
✔ Add Vue DevTools 7 extension for debugging? (experimental) … No
We’ll install Vercel AI SDK and ChromeAI provider to call Chrome’s built-in AI model (Gemini Nano) and Tailwind CSS for styling:
npm install ai chrome-ai tailwindcss
Create a tailwind.config.js file in the project root directory and add the following:
/** @type {import('tailwindcss').Config} */
export default {
  purge: ['./index.html', './src/**/*.{vue,js,ts,jsx,tsx}'],
  content: [],
  theme: {
    extend: {},
  },
  plugins: [],
}
Next, update assets/main.css as follows:
@tailwind base;
@tailwind components;
@tailwind utilities;
body {
  font-family: 'General Sans', sans-serif;
  background-color: #F9FAFB;
}
AI support configuration
Because the window.ai API is only supported in Chrome Dev and Canary browsers, we need to write helper functions to handle validations for unsupported browsers.
Create a utils.js file in the src directory and add the following:
export async function checkEnv() {
  function getChromeVersion() {
    var raw = navigator.userAgent.match(/Chrom(e|ium)\/([0-9]+)\./);
    return raw ? parseInt(raw[2], 10) : 0;
  }
  if (navigator.userAgentData?.brands) {
    const isChrome = navigator.userAgentData?.brands.some(
      (brandInfo) => brandInfo.brand === "Google Chrome",
    );
    if (!isChrome) {
      throw new Error(
        "Your browser is not supported. Please use Google Chrome Dev or Canary.",
      );
    }
  } else {
    // If brands is not available, we can't determine the browser, so we should handle this case
    throw new Error(
      "Your browser is not supported. Please use Google Chrome Dev or Canary.",
    );
  }
  const version = getChromeVersion();
  if (version < 127) {
    throw new Error(
      "Your browser is not supported. Please update to 127 version or greater.",
    );
  }
  if (!("ai" in globalThis)) {
    throw new Error(
      "Prompt API is not available, check your configuration in chrome://flags/#prompt-api-for-gemini-nano",
    );
  }
  const state = await ai?.assistant.capabilities();
  if (state.available !== "readily") {
    try {
      await window.ai.assistant.create();
    } catch (e) {
      console.error(e);
    }
    throw new Error(
      "Built-in AI is not ready, check your configuration in chrome://flags/#optimization-guide-on-device-model",
    );
  }
}
The checkEnv function ensures the user is running a supported version of Chrome and has enabled the necessary experimental features (via Chrome flags) before allowing the application to proceed.
Creating a modal component
The modal component will came in handy for displaying error messages for unsupported browsers and disabled experimental features in supported browsers.
More great articles from LogRocket:
- Don't miss a moment with The Replay, a curated newsletter from LogRocket
- Learn how LogRocket's Galileo cuts through the noise to proactively resolve issues in your app
- Use React's useEffect to optimize your application's performance
- Switch between multiple versions of Node
- Discover how to use the React children prop with TypeScript
- Explore creating a custom mouse cursor with CSS
- Advisory boards aren’t just for executives. Join LogRocket’s Content Advisory Board. You’ll help inform the type of content we create and get access to exclusive meetups, social accreditation, and swag.
Create a components folder inside the src directory, then create a Modal.vue file inside the components directory and add the following:
<script>
export default {
    props: {
        open: {
            type: Boolean,
            required: true
        }
    },
}
</script>
<template>
    <transition name="fade">
        <div class="vue-modal" v-if="open">
            <transition name="drop-in" v-show="open">
                <div class="vue-modal-inner">
                    <div class="vue-modal-content">
                        <slot/>
                    </div>
                </div>
            </transition>
        </div>
    </transition>
</template>
<style scoped>
*,
::before,
::after {
    margin: 0;
    padding: 0;
    box-sizing: border-box;
}
.vue-modal {
    position: fixed;
    top: 0;
    left: 0;
    width: 100%;
    height: 100%;
    overflow-x: hidden;
    overflow-y: auto;
    background-color: rgba(0, 0, 0, 0.44);
    z-index: 1;
}
.vue-modal-inner {
    max-width: 600px;
    margin: 3rem auto;
    border-radius: 0.4rem;
}
.vue-modal-content {
    position: relative;
    background-color: #fff;
    background-clip: padding-box;
    border-radius: 0.4rem;
    padding: 1rem;
}
.fade-enter-active,
.fade-leave-active {
    transition: opacity 0.5s;
}
.fade-enter-from,
.fade-leave-to {
    opacity: 0;
}
.drop-in-enter-active,
.drop-in-leave-active {
    transition: all 0.3s ease-out;
}
.drop-in-enter-from,
.drop-in-leave-to {
    opacity: 0;
    transform: translateY(-50px);
}
</style>
Creating a navbar component
In this step, we’ll create a navbar component that will be useful for displaying the brand logo and the logged in user profile.
Create Navbar.vue in the components directory and add the following:
<template>
    <div class="h-[96px] px-[28px] sm:px-[48px] bg-[#FFFFFF] flex justify-between items-center">
        <h1 class="text-[#111827] font-bold text-lg sm:text-2xl">AI ChatBot</h1>
        <div class="flex sm:space-x-2 space-x-1">
            <img class="w-10 sm:w-12" src="/Avatar.svg">
            <div>
                <p class="font-bold mb-1 text-sm sm:text-base  text-[#111827] leading-6">Tynisha Obey</p>
                <p class="text-xs text[#718096] leading-5">Makostore</p>
            </div>
        </div>
    </div>
</template>
Creating a message component
This is a simple component with unique styles to distinguish between the bot response and the user’s prompts.
Create Message.vue in the components directory and add the following:
<template>
    <div v-if="role==='user'" className="flex items-start gap-3 mt-1 justify-end">
      <div className="bg-blue-100 rounded-lg p-3 max-w-[100%] md:max-w-[50%] text-primary-foreground">
        <div className="text-sm">{{message.content}}</div>
      </div>
      <div className="w-8 h-8 border rounded-full shrink-0">
        <img class="w-10 sm:w-12" src="/Avatar.svg">
      </div>
    </div>
    <div v-if="role==='assistant'" className="flex items-start mt-1 gap-3">
      <div className="w-8 h-8 border rounded-full shrink-0">
        <img class="w-10 sm:w-12" src="/bot.svg">
      </div>
      <div className="bg-gray-100 rounded-lg p-3 max-w-[100%] md:max-w-[50%]">
        <div className="text-sm">
            {{message.content}}
        </div>
      </div>
    </div>
</template>
<script>
export default {
    name: "message-component",
    props: {message: Object, role: String},
}
</script>
Creating the chat component
The chat component is made up of the message display, a button to submit a message, and the input field for entering the prompt that will be sent to the Gemini model.
Create ChatComponent.vue in the components directory and add the following:
<script>
import Message from './Message.vue';
import { streamText } from "ai";
import { chromeai } from "chrome-ai";
export default {
    name: "chat-component",
    components: { Message },
    props: {
        error: Object
    },
    data() {
        return {
            messages: [],
            userInput: '',
        };
    },
    methods: {
       async  sendMessage(e) {
            e.preventDefault();
        }
    },
}
</script>
<template>
    <div className="flex flex-col h-screen">
        <div className="flex-1 p-4 overflow-auto" ref={containerRef}>
            <div className="flex min-h-full flex-col gap-4 py-4 overflow-visible">
                <div v-if="messages.length > 0">
                    <div v-for="(m, i) in  messages " :key="i">
                        <Message :message=" m " :role="m.role"/>
                    </div>
                </div>
                <div v-else
                    className="mx-auto my-auto text-center w-full max-w-md flex items-center justify-center h-full">
                </div>
            </div>
        </div>
        <form @submit="sendMessage" className="bg-background border-t border-muted px-4 py-3 sticky bottom-0 w-full">
            <div>
                <div className="flex space-x-2">
                    <div className="w-full">
                        <input :v-model="userInput" :disabled="error" placeholder="Type your message..." className="w-full rounded-sm pr-16" />
                    </div>
                    <button type="submit" :disabled="error" className="">
                        <svg xmlns="http://www.w3.org/2000/svg" width="24" height="24" viewBox="0 0 24 24" fill="none"
                            stroke="currentColor" strokeWidth="2" strokeLinecap="round" strokeLinejoin="round">
                            <path d="m22 2-7 20-4-9-9-4Z" />
                            <path d="M22 2 11 13" />
                        </svg>
                        <p>Send</p>
                    </button>
                </div>
            </div>
        </form>
    </div>
</template>
<style scoped>
input {
    flex: 1;
    padding: 10px 15px;
    border: 1px solid #ddd;
    border-radius: 8px;
    margin-right: 10px;
    font-size: 14px;
    color: #333;
    outline: none;
    transition: border-color 0.3s ease;
}
input:focus {
    border-color: #007bff;
}
button {
    display: flex;
    align-items: center;
    justify-content: center;
    padding: 10px 15px;
    background-color: #007bff;
    color: #fff;
    border: none;
    border-radius: 8px;
    cursor: pointer;
    outline: none;
    transition: background-color 0.3s ease;
}
button:hover {
    background-color: #0056b3;
}
button svg {
    width: 20px;
    height: 20px;
}
</style>
The sendMessage method
Now, we need to process user input submission asynchronously and stream the AI’s response in real-time, updating the chat interface as the response is received.
Update the sendMessage with the following:
async  sendMessage(e) {
    e.preventDefault();
    const newMessages = [
        ...this.messages,
        { content: this.userInput, role: "user" },
    ];
    this.input = '';
    this.messages = newMessages
    try {
        const { textStream } = await streamText({
            model: chromeai(),
            system: "You are an assistant. Respond to every question completely.",
            prompt: ("User: '" + newMessages.slice(-1)[0].content)
        });
        let t = "";
        for await (const textPart of textStream) {
            t = t.concat(textPart);
            this.messages = ([...newMessages, { role: "assistant", content: t }]);
        }
    } catch (e) {
        console.error(e);
    }
}
The asynchronous sendMessage method gets triggered when the user submits a message. This method appends the user’s message to the messages array and clears the input field, then uses streamText to send the user’s message to the AI model (via chromeai) and receives a streaming response.
The response is collected in parts (streaming) and appended to the messages array, updating the UI in real time as the AI assistant generates its reply.
Creating an app component
Next, we’ll put together the app’s UI by importing the necessary components and managing environment validation and error reporting using the modal component.
Update the App.js file with the following:
<script>
import NavBar from "./components/NavBar.vue";
import ChatComponent from "./components/ChatComponent.vue";
import { checkEnv } from "./utils";
import Modal from "./components/Modal.vue";
export default {
  name: "app-component",
  components: { NavBar, ChatComponent, Modal },
  data() {
    return {
      error: null,
      showModal: false,
    };
  },
  computed: {
  },
  mounted() {
    const checkBrowser = async () => {
      try {
        await checkEnv();
      } catch (e) {
        if (e instanceof Error) {
          console.log(e?.message);
          this.error = e?.message;
          this.showModal = true;
        }
      }
    };
    checkBrowser();
  },
  methods: {
    openModal () {
      this.showModal = true;
    },
    closeModal () {
      this.showModal = false;
    }
  },
};
</script>
<template>
  <NavBar />
  <div v-if="error">
    <Modal :open="showModal" @close="showModal = !showModal">
            <p class="text">{{error}} </p>
            <div class="flex justify-end">
                <button @click="showModal = !showModal" class="bg-[#007bff] rounded-md px-6 py-1.5 text-white ">
                    <span>Close</span>
                </button>
            </div>
    </Modal>
  </div>
  <ChatComponent :error="error"/>
</template>
When the App component is mounted, it checks if the browser environment is suitable. If it isn’t, the component sets an error message and shows the modal dialog to inform the user. The modal can be closed by the user, but the error message persists until the issue is resolved.
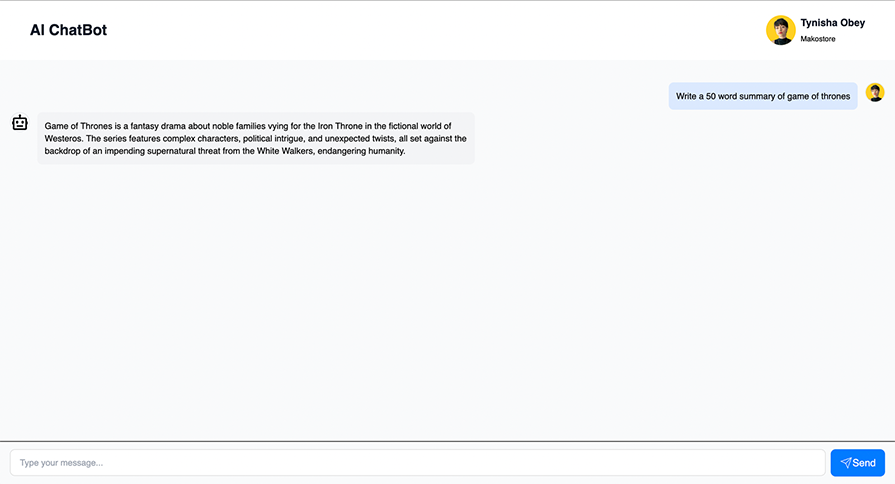
If you followed along correctly, here is an image of what the final build of the chatbot should look like:
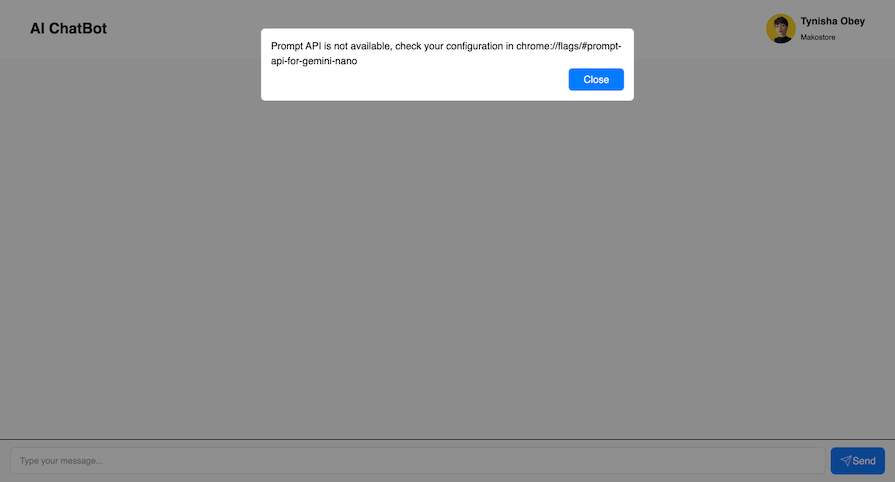
Here is what you’ll get if you run the project on a supported browser without setting the flags in the Setting up the window.ai API section correctly:
The chatbot can also work offline. You can turn off your internet to experience the offline support feature.
Is the on-device AI (window.ai API) model worth it?
Having to run large sizes of models on a website negatively impacts users. It’s also not practical to have every site download its LLM. Another downside of the window.ai API is the difficulty in prompt engineering. This eats up feature development time because much time is spent refining the prompts to get the most suitable ones.
Regardless of these downsides, the window.ai API is worth it on the business side of things because of its privacy-sensitive feature. Ditching the round trip to the server provides near-instant results for users.
The window.ai API can help you manage your server cost if your user’s device can shoulder some processing load in exchange for more access to AI features. You may even consider a free tier with on-device AI features to help your customers get a glimpse of what they would get with a premium plan.️
Conclusion
In this tutorial, we explored Chrome’s new window.ai API by building an AI-powered chatbot with Vue.js. This demo gives you an example of how to use the window.ai API to create AI-powered web applications.
Because not every device is an AI powerhouse, it’s important to design your features with graceful fallbacks for devices that can’t handle advanced features. Also, you should run benchmarks on your target devices. Hosting AI models can be resource-intensive, so be sure to have a good serving and caching strategy.
What can we expect for the future of AI-powered web apps? Generative AI is a rapidly growing field so we can confidently expect smaller, web-optimized models to emerge over time. In the near future, on-device inference will continue to get faster with the help of WebGPU, WebAssembly, and library updates. For example, Transformers.js v3 now includes WebGPU embedding benchmark support, which is a huge win for real-time, on-device AI.
Speaking of updates, Transformers.js v3 is finally available on npm with WebGPU support! 🤯⚡
As a final note, keep in mind that the window.ai API is highly experimental and may change or never be included in the main Chrome build.