Node.js v22.5.0 introduced a native SQLite module. This addition is similar to what other JavaScript runtimes like Deno and Bun already had. Programming languages like Python and PHP also already have SQLite built into them. This shows that there are benefits to adding this feature to a runtime environment.

As of the time of this writing, Node’s SQLite module is still experimental, which means that it is still undergoing development and testing, and is not yet stable. As a result, it is not recommended for production. However, developers can access the new API by using the Node.js --experimental-sqlite flag to run their applications.
This article is a guide on how to use the Node.js built-in SQLite module in a project. We’ll start by offering a summary of what SQLite is, and why adding it to Node.js is beneficial. Then, we’ll focus on how SQLite works in the Node.js runtime by building a simple demo application. You can find the source code for this project in this GitHub repository.
Prerequisites
- Node.js version 22.5.1 or above installed (Use a tool like Volta or NVM to manage alternate Node.js versions)
- Familiarity with using Node.js and Express to build REST APIs
- Familiarity with SQL syntax
What is SQLite?
SQLite is a lightweight database engine written in C. It is a simple, fast, and fully featured implementation of an SQL Database Management System. SQLite differs from other relational databases like MariaDB and PostgreSQL because it does not run as a server.
Other typical relational database engines are dedicated servers. They accept requests (SQL queries) and give data responses to clients. Instead of this, SQLite stores an application’s data in a specified file (or in memory). Consequently, interacting with an SQLite database is just performing read and write operations to a file stored in the computer’s memory disk (or to data in memory).
This difference (among other things) is what makes SQLite very lightweight. It has a package size that is generally less than 1 MB. This feature also makes it fit neatly as an embedded database for all kinds of applications. Today, almost every operating system ships with SQLite. In fact, the official website claims it is the “most widely deployed database engine in the world.” I mean, I wouldn’t argue with that.
Why did Node.js add support for SQLite?
In its release of version 22.4.0, Node.js added experimental support for Web Storage (consisting of local and session storage). This new feature serves as a key–value system in Node.js. It also improves Node.js compatibility with Web APIs. Node.js developers used SQLite to handle Web Storage in the runtime for this feature.
However, in order for the user to fully benefit from the capabilities of SQLite, the Node.js developer team introduced SQLite in a new module, node:sqlite. This module enables users to create their databases in memory (RAM) or in a designated file. So, Node.js shipping with SQLite (initially for Web Storage) was an incentive to further allow developers to use the embedded database for other needs.
Third-party npm packages like better-sqlite3 and node-sqlite3 had already brought SQLite functionality to Node.js applications. But this new built-in module reduces the need to install third-party packages, minimizing external dependencies in your application.
Having this module also gives Node.js users access to a simple database when building with the runtime. SQLite is ideal for data storage needs that do not require high complexity. This can be useful in saving command line application settings, backend caching, and perhaps most especially for offline applications (like ones built with Electron). It sure looks like a great addition to the Node.js core.
How does SQLite work in Node.js?
The first step to using this module is to make sure you run your application with the --experimental-sqlite flag. For example, if the name of your file is index.js, then run it as:
node --experimental-sqlite index.js
The next step is to import the module to your Node.js file:
import { DatabaseSync } from 'node:sqlite';
The node:sqlite module exposes a DatabaseSync class, which is a constructor for creating a new database. When using the DatabaseSync class, keep in mind that you can only query the resulting database synchronously (hence the -Sync suffix). At the time of writing, built-in SQLite databases in Node.js do not have asynchronous features.
After importing the module, create the database in memory, or in a designated file:
import { DatabaseSync } from 'node:sqlite';
const database = new DatabaseSync(':memory:');
// Use :memory: to specify the database will be in memory or
const database = new DatabaseSync('path/to/file');
// Specify the path of the SQLite database file
This module allows a developer to do many essential things in the database:
- Open and close database connections (using the
open()andclose()methods) - Prepare SQL statements (using the
prepare()method) - Execute a query directly (using the
exec()method)
There are also different ways to return the results of executed prepared statements. They include:
- Returning results as an array (using
all()) - Returning only the first result as an object (using
get()) - Returning an object that summarizes the operation (using
run()) - So much more
The following tutorial shows the practical usage of some of these methods.
Building a to-do app with Node.js and SQLite
The demo application we’re going to build in the following sections is a to-do app with a REST API backend that allows multiple users to log in. It also allows those users to create, check, and delete their to-dos. Apart from the Node.js runtime, this project will use Express.js for the server, bcrypt to hash passwords, and nanoid to generate random IDs.
To start, create a folder for the project and give it your preferred name. For illustration, this guide will use the name native-sqlite:
mkdir native-sqlite
Next, navigate to the folder and create a package.json file:
cd native-sqlite && npm init -y
Now install the dependencies the project needs:
npm install express bcrypt nanoid
After that, create a file in the root folder called server.js and start your Express.js server inside that file:
// server.js
import express from 'express';
const PORT = 5000;
const app = express();
app.listen(PORT, () => console.log(`Listening on PORT ${PORT}`));
In your package.json file, make sure to run your project with the --experimental-sqlite flag:
// package.json
...
"scripts": {
  "start": "node --watch --experimental-sqlite server.js"
}
...
The --watch flag helps restart your server whenever you save code. It works very similarly to Nodemon.
Now start the server, and everything should be up and running:
npm start
// Listening on PORT 5000
Next, initialize your database tables. Create a data folder in the root of your project. This folder will hold instructions relating to your database.
Then, create a file inside data called model.js. Inside model.js, start a new database, create tables for it using SQL syntax, and export the database from that file:
// data/model.js
import { DatabaseSync } from 'node:sqlite';
const database = new DatabaseSync(`${import.meta.dirname}/main.db`);
const initDatabase = `
CREATE TABLE IF NOT EXISTS users (
  user_id TEXT PRIMARY KEY,
  username TEXT NOT NULL UNIQUE,
  password TEXT NOT NULL,
  created_at INTEGER NOT NULL
);
CREATE TABLE IF NOT EXISTS todos (
  todo_id TEXT PRIMARY KEY,
  todo_owner TEXT NOT NULL,
  title TEXT NOT NULL,
  checked INTEGER NOT NULL DEFAULT 0,
  created_at INTEGER NOT NULL,
  checked_at INTEGER,
  FOREIGN KEY (todo_owner) REFERENCES users (user_id)
);
`;
database.exec(initDatabase);
export default database;
'data/main.db' will serve as the app’s database file as specified above in:
const database = new DatabaseSync(`${import.meta.dirname}/main.db`);
Also, the exec() method in database.exec(initDatabase) will execute the SQL commands in the variable initDatabase.
Inside the data folder, create a new file called queries.js. This file will contain prepared SQL queries you will use throughout your app. Import the database from model.js into that file and prepare the SQL statements using the prepare() method. Finally, export the prepared statements:
// data/queries.js
import database from './model.js';
const createUser = database.prepare(`
  INSERT INTO users (user_id, username, password, created_at)
  VALUES (?, ?, ?, ?)
  RETURNING user_id, username, created_at
`);
const getUserByUsername = database.prepare(`
  SELECT * FROM users WHERE username = ?
`);
const getUserById = database.prepare(`
  SELECT * FROM users WHERE user_id = ?
`);
const createTodo = database.prepare(`
  INSERT INTO todos (todo_id, todo_owner, title, created_at)
  VALUES (?, ?, ?, ?)
  RETURNING todo_id, title, checked, created_at
`);
const getTodosByUserId = database.prepare(`
  SELECT * FROM todos WHERE todo_owner = ?
`);
const getTodoById = database.prepare(`
  SELECT * FROM todos WHERE todo_id = ?
`);
const updateTodoCheckById = database.prepare(`
  UPDATE todos SET checked = ?, checked_at = ? WHERE todo_owner = ? AND todo_id = ?
  RETURNING todo_id, title, checked_at, created_at
`);
const deleteTodo = database.prepare(`
  DELETE from todos WHERE todo_id = ? AND todo_owner = ?
`);
export {
  createUser,
  getUserByUsername,
  getUserById,
  createTodo,
  getTodosByUserId,
  getTodoById,
  updateTodoCheckById,
  deleteTodo,
};
Create and log in users
In the root folder of the project, create a folder called routes. This folder will contain all the logic relating to the routes in your REST API. Create a file inside the folder named users.router.js. This file will contain routes that allow users to create accounts, and log into the app.
For this file, you need to import createUser and getUserByUsername from data/queries.js:
// routes/users.router.js
import express from 'express';
import bcrypt from 'bcrypt';
import { nanoid } from 'nanoid';
import { createUser, getUserByUsername } from '../data/queries.js';
const usersRouter = express.Router();
const saltRounds = 10;
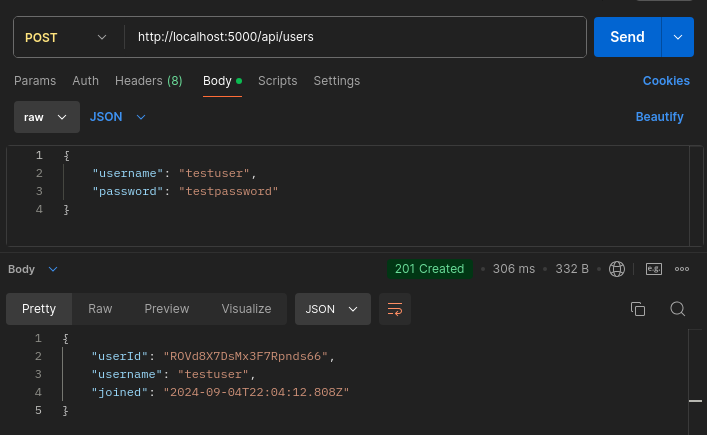
usersRouter.post('/', async (req, res) => {
const { username, password } = req.body;
// Minimal Input Validation
if (!username || !password) {
return res.status(400).json({ error: 'Missing required property' });
}
// Hash Password
const hashedPassword = await bcrypt.hash(password, saltRounds);
const userId = nanoid();
const recordedUser = getUserByUsername.get(username);
if (recordedUser)
return res.status(400).json({ error: 'Username already exists' });
const newUser = createUser.get(userId, username, hashedPassword, Date.now());
return res.status(201).json({
userId: newUser.user_id,
username: newUser.username,
joined: new Date(newUser.created_at).toISOString(),
});
});
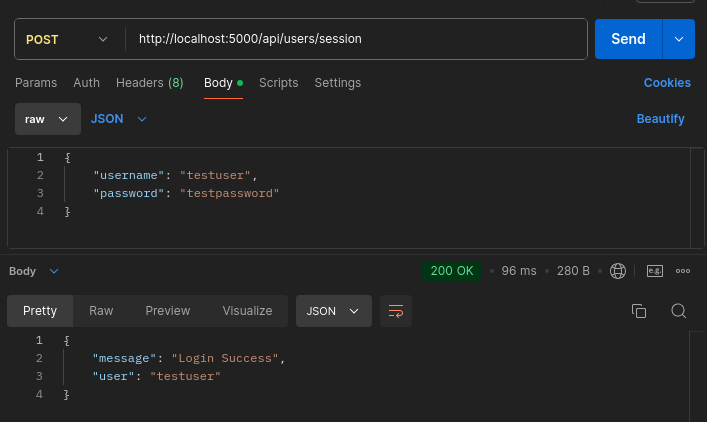
Also, create a route for logging users in. Then, export the new Express router you created:
// routes/users.router.js
...
// This route is only for illustration. There is no real login implementation
usersRouter.post('/session', async (req, res) => {
  const { username, password } = req.body;
  // Minimal Input Validation
  if (!username || !password) {
    return res.status(400).json({ error: 'Missing required property' });
  }
  const registeredUser = getUserByUsername.get(username);
  if (!registeredUser) return res.status(400).json({ error: 'User not found' });
  // Check for password
  const isCorrectPassword = await bcrypt.compare(
    password,
    registeredUser.password
  );
  if (!isCorrectPassword) {
    return res.status(400).json({ error: 'Incorrect Password' });
  }
  // Login Implementation
  return res
    .status(200)
    .json({ message: 'Login Success', user: registeredUser.username });
});
export default usersRouter;
After that, import the router to your server.js file:
// server.js
...
import usersRouter from './routes/users.router.js';
...
app.use('/api/users', usersRouter);
...
Test the newly implemented routes:
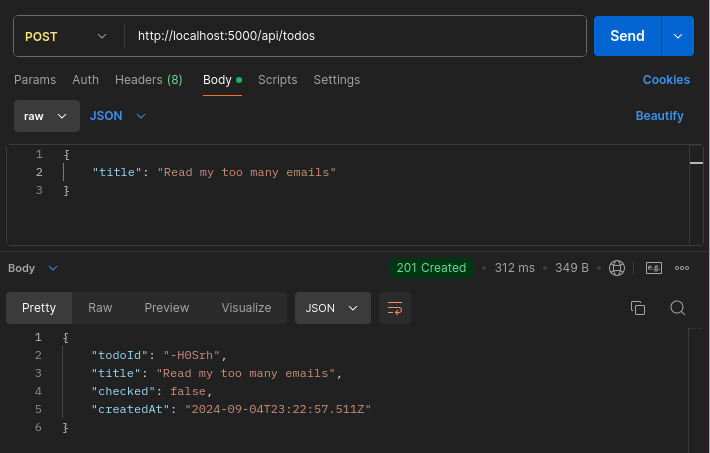
Add to-do item
Create a new file inside the routes folder called todos.router.js. Inside that file, add a new route that inserts a to-do into the database. For this route, use getUserById and createTodo queries. Execute the queries using the get() method:
// routes/todos.router.js
import express from 'express';
import { nanoid } from 'nanoid';
import {
  getUserById,
  createTodo,
} from '../data/queries.js';
const todosRouter = express.Router();
// Use this to simulate a logged in user
const defaultUserId = 'CHANGE TO VALID USER ID STRING';
// Create a todo as a user
todosRouter.post('/', (req, res) => {
  const { title } = req.body;
  if (!title) return res.status(400).json({ error: 'Missing Todo Title' });
  const fetchedUser = getUserById.get(defaultUserId);
  if (!fetchedUser) return res.status(400).json({ error: 'User not found' });
  const todoId = nanoid(6);
  const todoOwner = fetchedUser.user_id;
  const createdAt = Date.now();
  const addedTodo = createTodo.get(todoId, todoOwner, title, createdAt);
  return res.status(201).json({
    todoId,
    title,
    checked: Boolean(addedTodo.checked),
    joined: new Date(addedTodo.created_at).toISOString(),
  });
});
export default todosRouter;
Import todosRouter into the server.js file:
// server.js
...
import todosRouter from './routes/todos.router.js';
...
app.use('/api/todos', todosRouter);
...
Finally, test out the route:
Get to-do items
Inside the todos.router.js file, add a new route that will return all the different to-dos of a particular user. For this route, use the getUserById and getTodosByUserId queries:
// routes/todos.router.js
...
import {
  ...
  getTodosByUserId,
}
...
// List all todos of a user
todosRouter.get('/', (req, res) => {
  const fetchedUser = getUserById.get(defaultUserId);
  if (!fetchedUser) {
    return res.status(400).json({ error: 'Unauthenticated user' });
  }
  const todos = getTodosByUserId.all(defaultUserId);
  return res.status(200).json(
    todos.map(({ todo_id, title, checked, created_at }) => ({
      todoId: todo_id,
      title,
      checked: Boolean(checked),
      createdAt: new Date(created_at).toISOString(),
    }))
  );
});
...
In the above illustration, notice the use of all() method to execute the getTodosByUserId statement. This is because the method returns an array of all the results from SQLite. This is the most beneficial for what you want to achieve.
Go ahead and test out the route:

Check to-do items
Create a new route for checking off a to-do item. For this route, use the updateTodoCheckById and getTodoById queries:
// routes/todo.router.js
...
import {
  ...
  updateTodoCheckById,
  getTodoById,
}
...
// update the status of a todo
todosRouter.patch('/:id', (req, res) => {
  const { checked } = req.body;
  const todoId = req.params.id;
  const recordedTodo = getTodoById.get(todoId);
  if (!recordedTodo) {
    return res.status(404).json({ error: 'Todo not found' });
  }
  if (recordedTodo.todo_owner !== defaultUserId) {
    return res
      .status(401)
      .json({ error: 'User unauthorized to update this todo' });
  }
  const checkedAt = Date.now();
  const updatedCheck = checked ? 1 : 0;
  const { todo_id, title, checked_at, created_at } = updateTodoCheckById.get(
    updatedCheck,
    checkedAt,
    recordedTodo.todo_owner,
    todoId
  );
  return res.status(200).json({
    message: 'Successfully checked todo',
    update: {
      todoId: todo_id,
      title,
      check: Boolean(updatedCheck),
      checkedAt: new Date(checked_at).toISOString(),
      createdAt: new Date(created_at).toISOString(),
    },
  });
});
...
Again, test out the route:
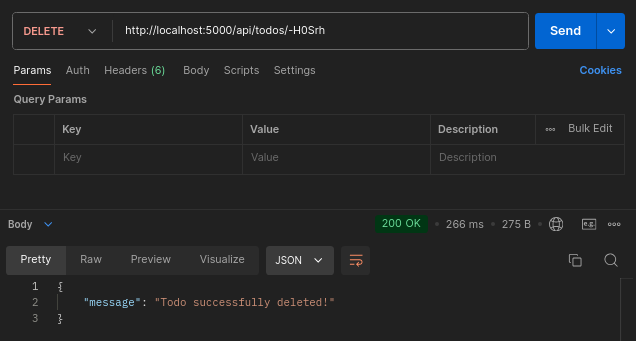
Delete to-do items
This is the last route the tutorial will implement. This route is for deleting a to-do based on its ID. It imports and uses the getTodoById and deleteTodo prepared statements:
// routes/todo.router.js
...
import {
  ...
  getTodoById,
  deleteTodo,
} from '../data/queries.js';
...
// Delete a todo by ID
todosRouter.delete('/:id', (req, res) => {
  const todoId = req.params.id;
  const recordedTodo = getTodoById.get(todoId);
  if (!recordedTodo) {
    return res.status(404).json({ error: 'Todo not found' });
  }
  if (recordedTodo.todo_owner !== defaultUserId) {
    return res
      .status(401)
      .json({ error: 'User unauthorized to delete this todo' });
  }
  deleteTodo.run(todoId, defaultUserId);
  return res.status(200).json({ message: 'Todo successfully deleted!' });
});
...
Here is a test of the newly created route:
And that rounds up the tutorial. The complete code for this project is available on GitHub. Our example project demonstrates that SQLite can easily serve as a database in a Node.js application for a variety of use cases.
Things to look out for when using the SQLite module
This section will highlight key issues to watch out for when using the SQLite module and explain its impact on your apps.
Experimental
As we mentioned at the start of this article, the built-in SQLite module in Node.js is still experimental. This means it is possible there are some critical and unresolved bugs in the module. It is not yet recommended for production. Use it with this caution in mind.
Synchronous
There are no provisions for asynchronous querying in the created databases yet. Every database instruction in this module is synchronous. While this should work fine for most apps, querying (or returning) huge chunks of data synchronously can block the Node.js event loop. If this happens, it will slow down your application.
Limited configuration
When bundling SQLite for a platform or operating system, there are many configuration options. These options are also called “Compile-time options” because after building and compiling the program, the user cannot change the settings. Some examples of these options are enforcing foreign key constraints, limiting the number of tables in a column, and so much more.
SQLite also allows developers to load extensions in runtime. An SQLite extension is a program written in C that extends the default capability of SQLite. These extensions offer functionality that ranges from data hashing to string manipulation.
At the time of writing, you cannot build a custom SQLite with your preferred configuration options in Node.js. You also cannot add extensions to the native SQLite module. You can only use the default build with no extensions.
Comparing the built-in module to other third-party libraries
This section will compare the native SQLite module in Node.js to other libraries that are also SQLite drivers. While there may be others, this section discusses the most popular ones — node-sqlite3 and better-sqlite3.
Comparing the built-in SQLite to node-sqlite3
node-sqlite3 is the most popular SQLite driver for Node.js. It is primarily written in C++. Well-known ORMs like Sequelize and TypeORM use it to interact with SQLite databases.
According to its documentation, node-sqlite3 ships with SQLite v3.45.0, but also allows developers to make a custom build using any version of their choice. Another feature node-sqlite3 has is that it allows developers to use SQLite extensions. This is a feature that the native SQLite module currently does not have.
node-sqlite3 runs database operations asynchronously and therefore does not block the event loop (non-blocking). It also has a more extensive API for some use cases that the native SQLite module does not cover. Examples include database runtime configuration options, and the ability to interrupt long-running queries.
While node-sqlite3 appears to have a lot more features than the native Node.js SQLite module, this can be a downside too. It takes more time to be familiar with it, and it increases the size of external dependencies for an app using it. Also, being asynchronous is not always a good thing as some otherwise fast synchronous operations are slower when performed asynchronously.
The built-in SQLite module is a lot easier to set up than node-sqlite3. It also has a simpler API and will work fine for most use cases of an SQLite database. node-sqlite3 is only better for custom database configurations and asynchronous functionality.
More great articles from LogRocket:
- Don't miss a moment with The Replay, a curated newsletter from LogRocket
- Learn how LogRocket's Galileo cuts through the noise to proactively resolve issues in your app
- Use React's useEffect to optimize your application's performance
- Switch between multiple versions of Node
- Discover how to use the React children prop with TypeScript
- Explore creating a custom mouse cursor with CSS
- Advisory boards aren’t just for executives. Join LogRocket’s Content Advisory Board. You’ll help inform the type of content we create and get access to exclusive meetups, social accreditation, and swag.
Comparing the built-in SQLite to better-sqlite3
better-sqlite3 is another npm package that allows developers to create and manage SQLite databases. A lot of developers prefer it to node-sqlite3. It claims to be “much faster than node-sqlite3 in most cases, and just as fast in all other cases.”
better-sqlite3 has a simple synchronous API. Additionally, it offers advanced functionality such as transaction functions and user-defined functions that can be used within SQL statements. better-sqlite allows developers to create builds of SQLite with their preferred versions. Developers can also build with compile-time options. better-sqlite allows developers to add SQLite extensions to their builds, providing further flexibility.
There is no doubt that better-sqlite3 offers many benefits. However, it is an extra dependency that takes up space in a project that does not need its extra features. With the presence of the built-in Node.js module, one can easily set up a working SQLite database without having to install a package with features they will not use. Also, the built-in Node.js module has a very similar API to better-sqlite so it leverages that simplicity — which is a plus.
When not to use the SQLite module
There are some instances when using the SQLite module in a Node.js app is not the best strategy:
- Different SQLite version: If you are looking for the benefits of different SQLite versions then the Node.js built-in module will not fit what you want. Use alternatives that allow you to make custom builds with different versions — like better-sqlite3 and node-sqlite3
- Better configuration: If you want better control over the SQLite configuration — like compile-time options, run-time configurations, or extensions — then use the aforementioned third-party alternatives
- High number of concurrent writes: One of the biggest limitations of SQLite is that it does not allow concurrent writes. SQLite operations are so fast that this is not noticeable for most of its use cases. However, for applications that require a very high number of concurrent writes (for example, real-time collaborative apps), using a more featured database like MariaDB or PostgreSQL is a better option
If your app makes you fall into any of these categories, then the built-in SQLite module in Node.js is not for you.
Wrapping up
This article gave an elaborate guide to the built-in SQLite module in Node.js. It started by defining SQLite, answered why Node.js added built-in support for it and explained how the new module works in Node.js. This article also featured a tutorial that built a to-do app REST API. The project used the SQLite module to handle database functionality for the application.
The addition of SQLite to Node.js is a welcome development. One can only hope it gets a stable release soon so that developers can become comfortable using it in production